background image

www.pbteen.com


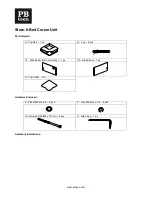
N - Cam Lock (16) 

O -  Screw (4 x 20 mm) (Twin and Full - 24 pcs, Queen - 
27pcs ) 


Tools Required: 

Phillips Head Screwdriver (not included)


Assembly Instructions: 
 

Find a


carpeted or scratch-free surface to do the assembly 

 
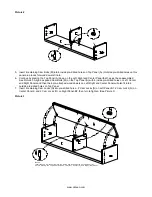
1.  Attach the Left Panel (B1) and Right Panel (B2) into the Bottom Panel (E). Make sure all pre-attached wood 

dowels on both Side Panels (B1 & B2) are inserted into the pre-drilled holes on the Bottom Panel. Secure both 
Side Panels (B1 & B2) to the Bottom Panel (E) by using Allen Head Bolt (K), Lock Washer (J), and Flat


Washer (I). 

Turn clockwise to tighten with Allen Key (L). (See Picture 1) 


Picture 1 


2.  Carefully lay the Bottom Panel (E) facing down with the Side Panels (B1 & B2) facing up. (See Picture 2). Insert 2 

Cam Bolts (M) into 2 inside pre-drilled holes at the center of Bottom Panel (E). (Outside pre-drilled holes on this 
panel are for the wooden dowels to fit into).   

3.  Lay the Center Panel (C) down on the Bottom Panel (E).  Align 2 exposed Cam Bolts (M) from the Bottom Panel 

(E) with 2 inside pre-drilled holes on Center Panel (C) and then 2 pre-attached wooden dowels on Center Panel 
(C) will fit into 2 outside pre-drilled holes on Bottom Panel (E).  

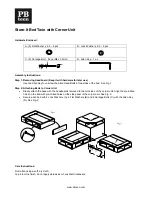
4.  Insert 2 Cam Locks (N) into pre-drilled holes on Center Panel (C) then turn to tighten. See Picture 2.  


Summary of Contents for Store-It Bed

Page 1: ...2 B2 Right Panel 2 C Center Panel 2 D Back Panel 2 E Bottom Panel 2 F Foot Part 1 G Center Platform 1 Hardware Included H Screw 3 5 x 12 mm Twin and Full Bed 40 pcs Queen 44 pcs I Flat Washer 8 J Loc...

Page 2: ...at Washer I Turn clockwise to tighten with Allen Key L See Picture 1 Picture 1 2 Carefully lay the Bottom Panel E facing down with the Side Panels B1 B2 facing up See Picture 2 Insert 2 Cam Bolts M in...

Page 3: ...ith 6 inside pre drilled holes on Left Center and Right Panels and then the 6 pre attached wood dowels on Left Right and Center Panel will also fit into 6 outside pre drilled holes on Top Panel 7 Inse...

Page 4: ...ve just been assembled in the previous steps next to the Foot Part I See Picture 5 Align the outside of these parts to ensure they are equal and fit Lay the Center Platform G down on top of the Foot P...

Page 5: ...Included A Top Part 1 pc B Leg 4 pcs C1 Side Panel With V Groove 1 pc C2 Side Panel 1 pc D Top Panel 1 pc Hardware Enclosed E Flat Washer 6 5 8 pcs F Lock Washer 6 5 8 pcs G Carriage Bolt M6 x 70mm 8...

Page 6: ...the top corners of the back side of the Side Panel C1 with the two pre attached wood dowels on the left side of the Top Part A Secure with 4 Flat Washers E 4 Lock Washers F 4 Carriage Bolts G from ins...

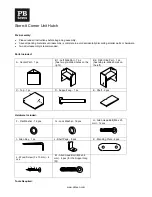
Page 7: ...Parts Included A Center Part 1 pc B1 Left Side Part 1 pc has two pre drilled holes on the right B2 Right Side Part 1 pc has two pre drilled holes on the left C Top 1 pc D Support Leg 1 pc E Shelf 2 pc...

Page 8: ...ted Nut on the side of Side Parts B1 B2 2 Secure these parts with Flat Washer F Lock Washer G and Allen Head Bolt H 25 mm long with the Allen Key I from inside of Center Part A for the 4 pre drilled h...

Page 9: ...he Top C Secure with Flat Washer F Lock Washer G and Allen Head Bolt M and tighten with the Allen Key I in 4 places See Figure 4 Figure 4 5 Carefully place the Store It Corner Hutch onto the Store It...

Page 10: ...ch as a guide Insert the Shelf Pegs J into the pre drilled holes on the interior sides of the Left Side Part B1 and Right Side Part B2 until fully inserted Carefully place the Shelves E on the Shelf P...

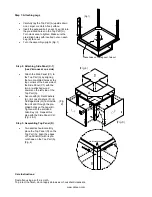
Page 11: ...lts at two sides of the bed See Fig 1 Step 2 Attaching Beds to Corner Unit Slowly attach the beds with the headboards removed to the two sides of the corner unit Align the pre drilled holes on the bed...

Reviews: