background image

www.pbteen.com


Picture 2 


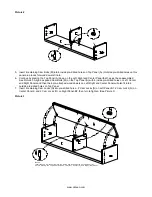
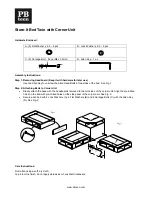
5.  Insert 6 remaining Cam Bolts (M) into 6 inside pre-drilled holes on Top Panel (A). (Outside pre-drilled holes on this 

panel are places for wood dowels fit into


6.  Continue by placing


the Top Panel (A) down on the Left, Right and Center Panel that has just been assembled. 

See Picture 3. Align 6 exposed Cam Bolts (M) on the Top Panel (A) with 6 inside pre-drilled holes on Left, Center 
and Right Panels and then the 6 pre-attached wood dowels on Left, Right and Center Panel will also fit into 6 
outside pre-drilled holes on Top Panel.  

7.  Insert 6 remaining Cam Locks (N) into pre-drilled holes – 2 Cam Locks (N) on Left Panel-B1, 2 Cam Locks (N) on 

Center Panel-C and 2 Cam Locks (N) on Right Panel-B2, then turn to tighten. (See Picture 3)   

 
Picture 3 

N otes:
I nsert these C am  B ol ts (M ) i nto the i nsi de pre-dri l l ed hol es on T op Panel  (A ) 
bef ore pl aci ng the T op Panel  dow n on L ef t (B 1), Center (C) and Ri ght (B 2) Panel . 


Summary of Contents for Store-It Bed

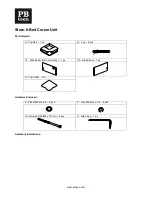
Page 1: ...2 B2 Right Panel 2 C Center Panel 2 D Back Panel 2 E Bottom Panel 2 F Foot Part 1 G Center Platform 1 Hardware Included H Screw 3 5 x 12 mm Twin and Full Bed 40 pcs Queen 44 pcs I Flat Washer 8 J Loc...

Page 2: ...at Washer I Turn clockwise to tighten with Allen Key L See Picture 1 Picture 1 2 Carefully lay the Bottom Panel E facing down with the Side Panels B1 B2 facing up See Picture 2 Insert 2 Cam Bolts M in...

Page 3: ...ith 6 inside pre drilled holes on Left Center and Right Panels and then the 6 pre attached wood dowels on Left Right and Center Panel will also fit into 6 outside pre drilled holes on Top Panel 7 Inse...

Page 4: ...ve just been assembled in the previous steps next to the Foot Part I See Picture 5 Align the outside of these parts to ensure they are equal and fit Lay the Center Platform G down on top of the Foot P...

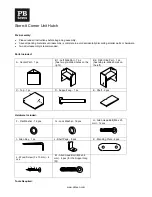
Page 5: ...Included A Top Part 1 pc B Leg 4 pcs C1 Side Panel With V Groove 1 pc C2 Side Panel 1 pc D Top Panel 1 pc Hardware Enclosed E Flat Washer 6 5 8 pcs F Lock Washer 6 5 8 pcs G Carriage Bolt M6 x 70mm 8...

Page 6: ...the top corners of the back side of the Side Panel C1 with the two pre attached wood dowels on the left side of the Top Part A Secure with 4 Flat Washers E 4 Lock Washers F 4 Carriage Bolts G from ins...

Page 7: ...Parts Included A Center Part 1 pc B1 Left Side Part 1 pc has two pre drilled holes on the right B2 Right Side Part 1 pc has two pre drilled holes on the left C Top 1 pc D Support Leg 1 pc E Shelf 2 pc...

Page 8: ...ted Nut on the side of Side Parts B1 B2 2 Secure these parts with Flat Washer F Lock Washer G and Allen Head Bolt H 25 mm long with the Allen Key I from inside of Center Part A for the 4 pre drilled h...

Page 9: ...he Top C Secure with Flat Washer F Lock Washer G and Allen Head Bolt M and tighten with the Allen Key I in 4 places See Figure 4 Figure 4 5 Carefully place the Store It Corner Hutch onto the Store It...

Page 10: ...ch as a guide Insert the Shelf Pegs J into the pre drilled holes on the interior sides of the Left Side Part B1 and Right Side Part B2 until fully inserted Carefully place the Shelves E on the Shelf P...

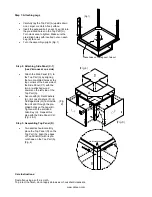
Page 11: ...lts at two sides of the bed See Fig 1 Step 2 Attaching Beds to Corner Unit Slowly attach the beds with the headboards removed to the two sides of the corner unit Align the pre drilled holes on the bed...

Reviews: