background image

5

a

b

c

e

Discharge Tubes

Discharge Hose

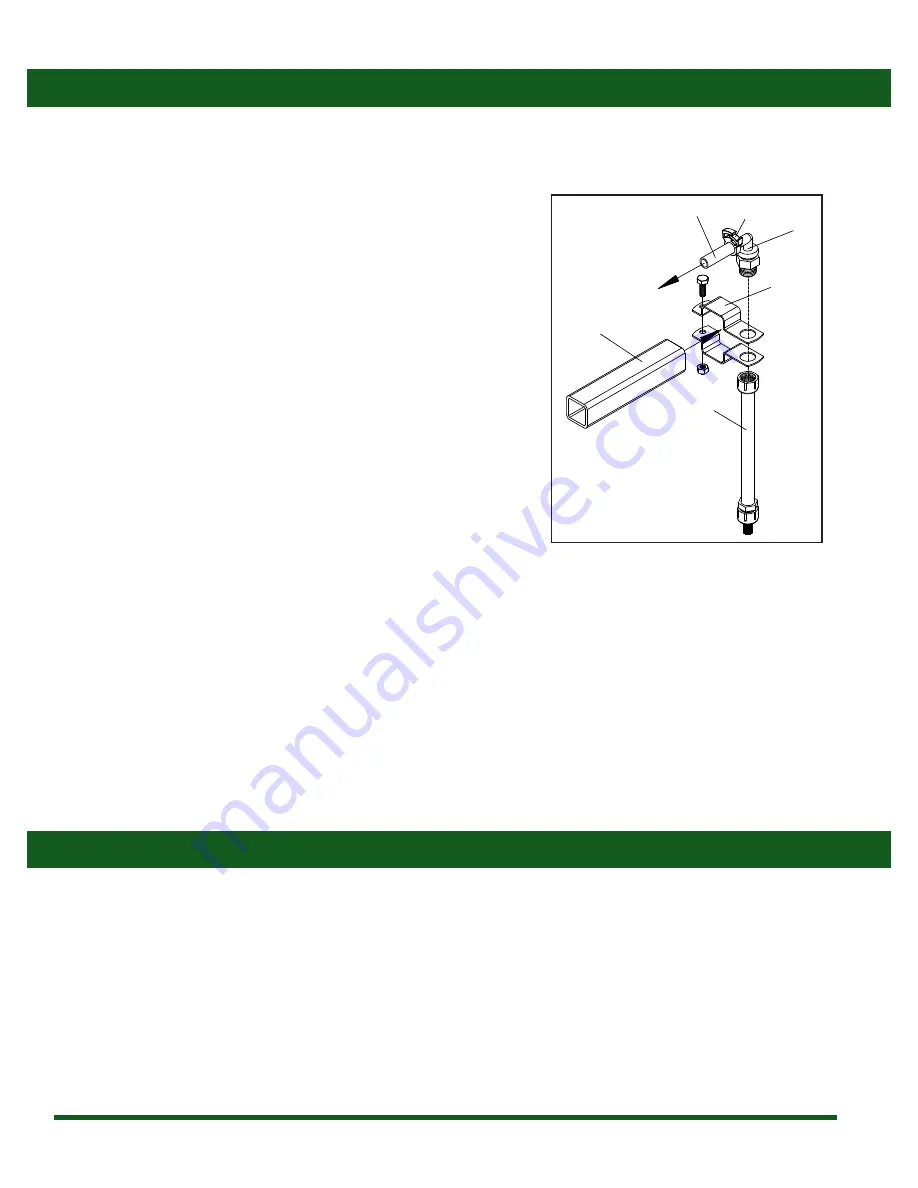
1.  The discharge tubes (a) dispense the foam and should  

be  mounted  in  the  desired  foaming  position.  

Generally,  they  are  mounted  at  the  end  of  a  sprayer  

boom (b) (Figure 4).

2.  If you are mounting the tubes on a sprayer, a nozzle body 

clamp (c) can be used.  Simply mount the clamp on the 

sprayer's boom and insert the threaded barb elbow (d) 

through the hole where the nozzle body would normally 

go.

3.  Ensure that the discharge tube does not interfere with 

the operation of the equipment it is mounted on.  For 

example,  make  sure  that  the  discharge  tubes  do  not 

interfere with the spray pattern if you are mounting the 

foam marker on a sprayer.

1.  One 33’ length of 3/8” discharge hose is included with the 

turf foam marker and may be cut as needed.  

2.  Begin by attaching the discharge (e) hose to the hose 

barbs on the compressor on the foam marker unit. 

3.  It is important that both hoses are the same length.  This 

will ensure uniform foaming from both discharge tubes.  

Clamp the hose onto the hose barbs with the included 

hose clamps (f).

4.  Route the discharge hoses (e) to the discharge tubes and 

attach the hose to the threaded barb elbow (d) (Figure 4).

Figure 4: Discharge Tube Mounting

Operating Instructions

Before operating the turf foam marker, it is important that you read this entire manual and know all safety precautions.  It is also 

recommended that you do a thorough inspection of the turf foam marker before operation.  Prior to use, ensure that all hoses are 

attached and undamaged and that the wiring harnesses are properly plugged together and connected to an adequate power source.

1.  Fill  the  foam  solution  tank  with  the  proper  mixture  of 

water and an approved foam concentrate, according to 

the foam concentrate's manufacturer.  

2.  Do Not use dish soap, hand soap, or any other unapproved 

solution in the turf foam marker.  

5.      If  you  are  attaching  the  discharge  tube  to  a  sprayer 

boom,  pay  close  attention  to  the  positioning  of  the 

discharge  hose.    The  hose  should  be  positioned  in 

an  manner  such  that  it  won't  be  kinked  or  pinched 

when  the  boom  is  in  the  folded  or  unfolded  position.  

Remember to also account for boom height adjustment 

or other movements that the hose will be subject to.

6.  With the discharge hoses in the correct position, fasten 

them with the included cable ties.

Mounting the Turf Foam Marker

d

to compressor

f

Summary of Contents for CropCare F2500

Page 1: ...by PBZ 2 5 Gallon Turf Foam Marker Model F2500 Form F2500OM Rev Date 08 16 PBZ LLC 295 Wood Corner Rd Lititz PA 17543 www CropCareEquipment com 717 738 7365 A Paul B Zimmerman Inc Company Owner s Manual ...

Page 2: ...d understand this manual and its instructions and warnings completely before operating the turf foam marker Identification of Machine 2 Specifications 2 Before You Begin 2 Safety Precautions 3 General Guidelines 3 Mounting the Turf Foam Marker 3 Turf Foam Marker Unit 4 Wiring Harness 4 Discharge Tubes 5 Discharge Hose 5 Operating Instructions 5 Maintenance Instructions 6 Routine Maintenance 6 Wint...

Page 3: ...on the turf foam marker pay close attention to any moving parts Be especially aware of the metal fan blade on the compressor Do not touch the surface of the compressor since it may cause burns during and after operation See the warning label on the compressor Figure 1 Owner s Manual Decal DE39 General Guidelines Mounting the Turf Foam Marker Beawareofthelocationoftheowner smanualwarning decal on t...

Page 4: ... them with the flange nuts 1 The compressor wiring harness a has a 2 pronged plug This wiring harness needs to be connected to the switch wiring harness b which includes the control switch Make sure the colors match Figure 3 2 The switch wiring harness b needs to be connected to the battery wire harness c which includes the 15 amp fuse d Make sure the colors match Figure 3 3 The battery wire harne...

Page 5: ...ute the discharge hoses e to the discharge tubes and attachthehosetothethreadedbarbelbow d Figure4 Figure 4 Discharge Tube Mounting Operating Instructions Before operating the turf foam marker it is important that you read this entire manual and know all safety precautions It is also recommended that you do a thorough inspection of the turf foam marker before operation Prior to use ensure that all...

Page 6: ...eattachedandundamaged andthatthewiringharnessesareproperlyconnectedtoeach other and to an adequate power source The following are important components of the turf foam marker and their respective maintenance requirements a b Figure 5 Foamer Tank Assembly 5 Please note the 2 5 gallon capacity tank has an average foaming time of 90 minutes 6 To turn off the turf foam marker simply flip the control s...

Page 7: ... fuse on wiring harness ref 35 Malfunctioning switch Replace harness ref 29 Low voltage Connect directly to 12 volt 15amp power supply No Foam Output Broken or bent leaf valve inside the compressor Replace leaf valve See compressor breakdown page 10 Discharge hose is pinched or kinked Locate problem area and fix or replace the hose Plugged orifice disk or strainer on the end of the suction hose Cl...

Page 8: ...8 Breakdowns Parts Lists 26 26 28 14 15 38 14 14 8 6 7 27 27 25 40 39 27 33 32 31 24 5 35 30 29 36 8 25 16 2 14 12 26 33 13 7 9 27 28 3 11 1 6 4 20 21 22 19 15 34 23 17 18 10 6 F2500 Breakdown 41 ...

Page 9: ...p strainer poly 100 mesh SS green 22 1 CP491640 Orifice plate stainless steel 23 1 F2506 Adapter w breather hole 1 4 x 1 4 24 1 F2502 Motor cap 3 ID x 2 1 2 long 25 33 1958 Vinyl tubing 3 8 x 1 2 26 2 F2504 Foam discharge tube 27 4 HC054 Snap grip clamp 67 59 size F 28 2 BC114 1 1 4 square nozzle boom clamp 29 1 SPT SWH 9615A16G 8 wire harness with switch 30 1 SPT BCG 1215A 16G Battery connector w...

Page 10: ... 8 barbpolyhoseadapter 7 1 OR14 O Ring 1 2 x 5 8 R64 8 1 1984525PP Tip strainer all polypro 25M 1 2 3 4 5 6 8 7 4 Ref Qty Part Number Description 1 4 CM100150 Screw 2 1 CM250074 Head gasket 3 1 CM100146 Screw 4 1 CM299056 Leaf valve 5 1 CM299057 Leaf valve 6 1 CM100147 Screw 7 1 CM299066 Rubber diaphragm 1 CM800015 01 Diaphragm kit Includes ref s 3 7 8 4 CM100149 Screw 9 4 CM100148 Screw 10 1 CM29...

Page 11: ...omments concerning this warranty please contact an authorized CropCare dealer Warranty Coverage Warranty Is Void if Getting Service CropCare hereby provides a Limited One 1 Year Warranty on Turf Foam Markers manufactured by CropCare Turf Foam Markers manufactured by CropCare are warranted against any manufacturer s defects in any of the turf foam marker s components in the 12 months following the ...

Page 12: ...answer all questions thoroughly and in a timely manner Please feel free to contact our customer service department Ordering Parts Please contact your authorized CropCare dealer to order replacement parts for your product by PBZ Manufactured by PBZ LLC A Paul B Zimmerman Inc Company 295 Woodcorner Road Lititz PA 17543 717 738 7365 Fax 717 738 7375 www CropCareEquipment com ...

Reviews: