background image


©  PCE Instruments 


9. 

Micro USB connection under protective cap 


Figure 3   

Side view with USB connection 


3.2 

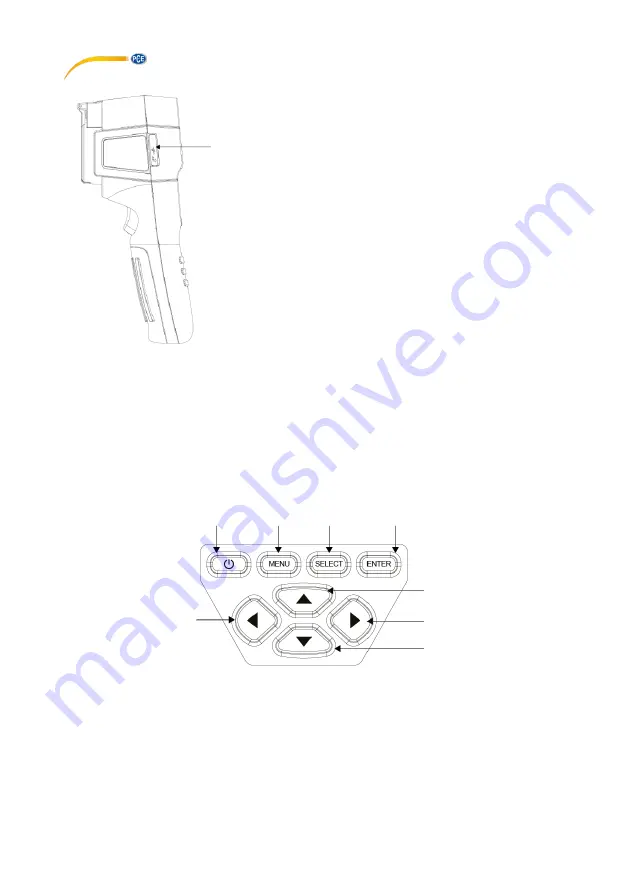
Control panel  


      ON/OFF      MENU      SELECT 

ENTER   


 UP 

LEFT 

 RIGHT 


 DOWN 


Figure 4   

Control panel 


Summary of Contents for PCE-TC 33N

Page 1: ...mal Imaging Camera User Manual User manuals in various languages fran ais italiano espa ol portugu s nederlands t rk polski can be found by using our product search on www pce instruments com Last cha...

Page 2: ...el 6 3 3 Display description 7 3 4 Charge replace battery 8 4 Operation 9 4 1 Switching the unit on and off 9 4 2 Functions in measuring mode 9 4 3 Submenus 10 4 4 Display delete saved images 10 4 5 C...

Page 3: ...not expose the device to shocks or strong vibrations The case should only be opened by qualified PCE Instruments personnel Never use the instrument when your hands are wet You must not make any techn...

Page 4: ...water condensation If you use the instrument successively in areas with different ambient temperatures condensation may form on the lens and sensor cover or inside the instrument To avoid this the in...

Page 5: ...sual image adjustable in steps of 25 50 75 100 Camera resolution of general camera 300 000 pixels Display 3 2 TFT Display resolution 320 x 240 pixels Memory Image memory fixed SD card 3 GB for more th...

Page 6: ...PCE Instruments 4 2 2 Delivery scope 1 x thermal imaging camera PCE TC 33N 1 x micro USB cable 1 x USB charging adaptor 1 x transport bag 1 x user manual...

Page 7: ...2 Control panel 3 Grab handle Figure 1 Rear side of the meter with display and control panel 4 Lens cover open before use 5 General camera lens for visible light 6 Infrared sensor 7 Trigger 8 Battery...

Page 8: ...PCE Instruments 6 9 Micro USB connection under protective cap Figure 3 Side view with USB connection 3 2 Control panel ON OFF MENU SELECT ENTER UP LEFT RIGHT DOWN Figure 4 Control panel...

Page 9: ...temperature in the centre of the image is also displayed in large size and as a numerical value at the top left Lowest temperature mark The red mark appears where the highest temperature is measured...

Page 10: ...is fully charged the icon is displayed Notes on charging Charge the battery for at least 1 5 hours before using the camera for the first time Before charging make sure that the battery charger and cam...

Page 11: ...tep by step This often makes it easier to correctly assign the measured values of the infrared image Pressing the RIGHT or LEFT navigation key increases or decreases the percentage of the general imag...

Page 12: ...han 6 seconds the camera automatically switches back to measuring mode and the direction arrows disappear If the images still do not overlap correctly call up the function again 4 4 Display delete sav...

Page 13: ...ion Here the infrared images of a component are shown with the different colour palettes Spectrum Iron Cold White Black 4 5 2 Select colour palette You can change the colour palette via the Color pale...

Page 14: ...t function is highlighted in blue The selection can be changed with the navigation keys UP or DOWN Confirm the selection of the Emissivity function with the RIGHT navigation key A list of the selectab...

Page 15: ...ide 0 78 0 82 Brick 0 93 0 96 Textiles 0 90 4 7 Settings You can adjust various device settings via the Settings submenu Press the MENU key The current function is highlighted in blue The selection ca...

Page 16: ...tion of the Language function with the RIGHT navigation key A selection list appears Select with UP DOWN Confirm with SELECT The selection is marked with a small circle Press LEFT or ENTER to return t...

Page 17: ...T navigation key A selection list appears Select with UP DOWN Confirm with SELECT The selection is marked with a small circle Press LEFT or ENTER to return to the Settings menu Press MENU to enter mea...

Page 18: ...liquid by squeezing the cloth or by absorbing it through an additional dry cloth Then wipe the lens surface with circular movements If it is necessary to repeat this step use a new cloth 7 Warranty Yo...

Page 19: ...Merkez Mah Ensign Way Southampton 55010 Loc Gragnano Pehlivan Sok No 6 C Hampshire Capannori Lucca 34303 K k ekmece stanbul United Kingdom SO31 4RF Italia T rkiye Tel 44 0 2380 98703 0 Telefono 39 05...

Reviews: