background image


info@tursdaletechnicalservices.co.uk


1. Press Hotkey 2 

 until the Visible On/Off icon appears 


2. If off 

 press the centre toggle button            to toggle to Visible On 

 .  

3. Use either the up/down, or left/right navigation buttons          to merge (blend) the visible and thermal images. 
Blend options are 0%, 25%, 50% 75% and 100%.  

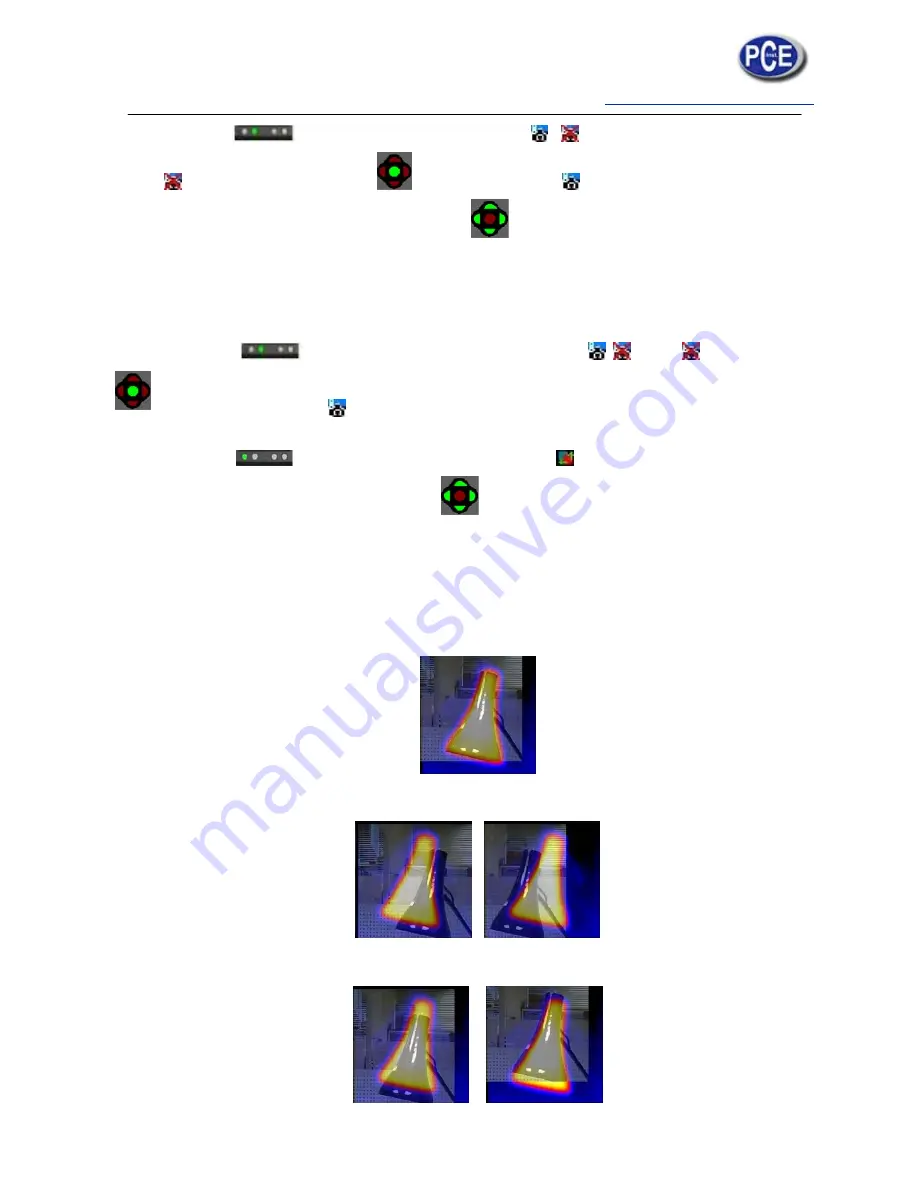
Image alignment  

As the visible and thermal camera are not co-axial the visible and thermal image often need to be aligned. This 
is usually required when moving to view objects at different distances.  


1. Press Hotkey 2 

to toggle through to the Visible On/Off icon 


.  If off 

 toggle the centre 

button                                    

          to turn the visible option on 

.   

 2. Press Hotkey 1 

 to toggle through to the alignment option 

.  

3. Use the up/down and left/right navigation buttons           to align the thermal and visible images.  

4. The alignment facility is only available when the camera is on and in live mode.  


 Note the visual image is moved during alignment.  


   Examples of alignment. 


 Fully  Aligned


                 Align left                Align right 


Summary of Contents for PCE-TC 2

Page 1: ...le Technical Services Ltd Unit N12B Tursdale Business Park Co Durham DH6 5PG United Kingdom Phone 44 0 191 377 3398 Fax 44 0 191 377 3357 info tursdaletechnicalservices co uk http www industrial needs...

Page 2: ...mperature measurement 7 4 Thermal and visible image blending 7 Image alignment 8 5 Menu structure 9 5 1 Infrared settings 10 5 2 Measurement options 10 5 3 Camera settings 12 5 4 Audio settings 12 5 5...

Page 3: ...info tursdaletechnicalservices co uk 3 1 Contents of the case 1 The case 2 Camera 3 PSU and International adaptors 4 CD User manual and software 5 USB cable camera to PC 6 Handle 7 Quick start guide...

Page 4: ...info tursdaletechnicalservices co uk 4 2 Main features and controls...

Page 5: ...info tursdaletechnicalservices co uk 5 3 Getting started a Switching the camera on off b Charging the internal battery c Focusing...

Page 6: ...ccording to the operating options chosen by the user A yellow box around the icon for Hotkey1 or Hotkey2 indicates that this option is selected and this defines the operation of the navigation and tog...

Page 7: ...ings are displayed at the top of the display In the default mode a single temperature in C is of the centre point of the cursor The other readings at the top of the display are emissivity settings and...

Page 8: ...d thermal image often need to be aligned This is usually required when moving to view objects at different distances 1 Press Hotkey 2 to toggle through to the Visible On Off icon If off toggle the cen...

Page 9: ...4m 0 5m and 1m These values appear in feet if F is selected 5 Menu structure a Select the menu by pressing Hotkey 4 b Navigate through the menu using the navigation button s and press Hotkey 3 to sele...

Page 10: ...Display in image using different colour palettes 1 Ironbow 5 High Contrast 2 Rainbow 6 Rainbow 16 3 Isotherm Style 7 Black Hot 4 Hot Metal 8 White Hot Reflected Temp Usually set to the ambient temper...

Page 11: ...e different area size boxes can be selected via Hotkey 1 Note that the above three items are mutually exclusive i e when one is turned on the other two are disabled o Isotherms Select High Low or High...

Page 12: ...der to save power There is also an Always On option o Camera reset Select with Hotkey 3 to restore the factory settings 5 4 Audio settings See frequently asked questions for more details of each item...

Page 13: ...of the navigation keys To display the selected image press Hotkey 3 To delete the selected image press Hotkey 2 to confirm deletion press Hotkey 3 When a stored image is displayed press Hotkey 3 to r...

Page 14: ...daletechnicalservices co uk 14 5 7 Language selection When the language is highlighted shown by a yellow box around it press Hotkey 3 to select French German Italian Spanish Portuguese Chinese Korean...

Page 15: ...this saved image Hotkey 2 for no Hotkey 3 for yes b Start voice recording Hotkey 3 for yes c Stop Recording Hotkey 3 to stop d Option to Re record the voice message Hotkey 2 for Yes Hotkey 3 for No e...

Page 16: ...ion Captions cannot be viewed with the saved images in the browser due to display constraints The captions can be viewed using the PC software 1 Use the up down arrow buttons to cycle through letters...

Page 17: ...88 Glazed Silica 0 87 Cuprous Oxide at 38 C 0 86 Emery Corundum 0 85 Snow 0 85 Stainless oxidized at 800 C 0 84 Oxidised Iron at 500 C 0 83 Cuprous Oxide at 260 C 0 82 Snow fine particles 0 81 Brass...

Page 18: ...rofile horizontal Profile vertical Alarm high Alarm low Playback Hotkey two Camera off Camera on Auto temperature range Manual temperature range Light off Light on No Yes Hotkey three Live Freeze No Y...

Page 19: ...ection User selectable 0 10 to 1 00 in steps of 0 01 with reflected ambient temperature compensation Accuracy The greater of 2 C or 2 of reading in C Imager power supply Battery Lithium ion field rech...

Page 20: ...nd report writer Computer requirements for PC software PC IBM compatible PC with a minimum of 300MHz processor MS Windows XP 128MB RAM 16 bit colour graphics with 1024x768 capability Environment Temp...

Reviews: