background image


graniteriverlabs.com


GRL-PCIE5-CEM-RXA User Guide and MOI


Rev7.0


© Granite River Labs 2022                        Version 7.0, June 2022. Updated 06.29.2022


Page 79 of 123


o


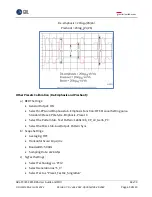
Determine which CTLE and Preset combination provides the largest Eye Area (Eye 
Width * Eye Height) and record these values. 


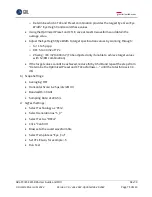
Using the Optimized Preset and CTLE, save at least 10 waveforms and obtain the 
average value.


Adjust the Eye Height/Eye Width to target specification values by scanning through: 

o


SJ: 1 to 5 pspp  

o


DM: 5 to 30 mV at TP2 

o


VSwing : 720 mV to 800 mV (To be adjusted only if unable to achieve target values 
with SJ/DM combination) 


If the target values cannot be achieved, reduce ISI by 0.5 dB and repeat the steps from 

“Determine the Optimized Preset and CTLE as follows:…” until 

the total ISI loss is 34 

dB. 

b)


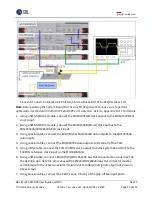
Scope Settings: 


Averaging: OFF  


Horizontal Scale: 6.25 µs/div (2M UI) 


Bandwidth: 33 GHz 


Sampling Rate: 

128 GS/s 

c)


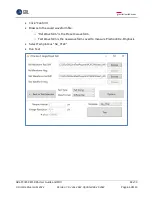
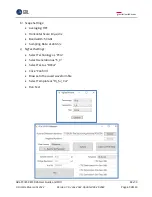
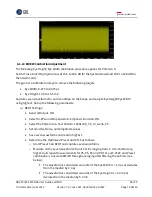
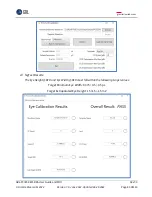
SigTest Settings: 


Select Technology as ‘

PCI

e’


Select 

Generation as “5_0”


Select Test as “RXCal”


Click “Confirm”


Browse to the saved waveform file 


Select Template as “Eye_Cal”


Set CTLE Gain, for example: -5 


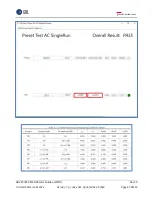
Run Test  
Summary of Contents for GRL-PCIE5-CEM-RXA

Page 1: ...Express Card Electromechanical CEM 5 0 32 GT s Receiver Compliance Test Automation Solution User Guide and MOI Using GRL PCIE5 CEM RXA Automation Test Software Anritsu MP1900A BERT and High Performanc...
Page 2: ...any particular purpose or any warranty otherwise arising out of any proposal specification or sample The GRL disclaims all liability for infringement of proprietary rights relating to use of informati...

Page 3: ...UTOMATED RX CALIBRATION FOR TP2 22 4 2 1 Connect Equipment for System Board Calibration 22 4 2 2 Connect Equipment for Add In Card Calibration 24 4 3 SET MEASUREMENT CONDITIONS 25 4 4 SET UP CALIBRATI...

Page 4: ...5 7 SET UP TEST REQUIREMENTS 45 5 7 1 Setup Tab 45 5 8 SELECT PCIE CEM 5 0 RX TESTS 45 5 8 1 Select to Run DUT Link Training and Rx Compliance Test 46 5 8 2 Select to Run SJ Margin Search Test 46 5 9...

Page 5: ...pback Test 91 8 3 2 Equipment Setup for System Board DUT Loopback Test 92 8 3 3 Link Training Initialization and Testing 94 8 3 4 Link Training Failure Troubleshooting 96 8 4 PERFORM DUT RX COMPLIANCE...

Page 6: ...0 Granite River Labs 2022 Version 7 0 June 2022 Updated 06 29 2022 Page 6 of 123 11 APPENDIX D SIGTEST TOOL TAB 114 12 APPENDIX E DEBUG TOOL TAB 116 13 APPENDIX F CONNECTING KEYSIGHT OSCILLOSCOPE TO P...

Page 7: ...TP2 Long Channel Rx Calibration PCIe Gen 5 Add In Card Using Tektronix ATI Scope 25 Figure 14 Select Test Condition 26 Figure 15 Set Up Calibration Requirements 26 Figure 16 Select Device for Calibra...

Page 8: ...nnel Loss Calibration Add In Card 59 Figure 49 Connection Diagram for Channel Loss Calibration System Board 59 Figure 50 Connection Diagram for Amplitude Preset SJ and RJ Calibration 60 Figure 51 Conn...

Page 9: ...nse Preset Cursor Test 117 Figure 65 Viewing Tx Link EQ Time Response Preset Cursor Test Results 118 Figure 66 Viewing Tx Link EQ Time Response Preset Cursor Test Trace for Transition Time 119 Figure...

Page 10: ...6 29 2022 Page 10 of 123 List of Tables Table 1 Equipment Requirements Systems and Accessories 12 Table 2 Equipment Requirements Cables 13 Table 3 Software Requirements 14 Table 4 Calibration Paramete...

Page 11: ...al calibrated eye diagram uses both the SigTest and Seasim software to achieve the final stressed eye calibration After completing calibration the GRL PCIE5 CEM RXA software will automate compliance t...

Page 12: ...32G bit s SI Pulse Pattern Generator or MU196020A 64 2G bit s or 64 2G baud PAM4 Pulse Pattern Generator d MU195040A 21G 32G bit s SI Error Detector MU195050A Noise Generator PCI SIG Compliance Base...

Page 13: ...r and Eye Analysis Tools software for making measurements b Oscilloscope with scope bandwidth as specified in vendor specific MOI s c MU181000B Option 02 is required for testing the System Board DUT d...

Page 14: ...GRL PCIE5 CEM RXA software GRL s software framework has been tested to work with all three versions of VISA available on the Market 1 NI VISA http www ni com download ni visa 17 0 6646 en 2 Keysight...

Page 15: ...nstalled on a PC where it is referred to as controller PC install VISA Virtual Instrument Software Architecture on to the PC where GRL PCIE5 CEM RXA is to be used see Section 2 2 2 Download the softwa...

Page 16: ...the PCIe CEM 5 0 Rx Test Application If the selection is grayed out it means that your license has expired FIGURE 2 START PCIE CEM 5 0 RX TEST APPLICATION 3 To enable license go to License License De...

Page 17: ...168 0 14 5001 MX183000A TCPIP0 192 168 0 14 5000 SOCKET or 192 168 0 14 5000 Note the IP addresses listed above are only examples and should be changed according to the actual network connection being...

Page 18: ...e all equipment is successfully connected from the previous section proceed to set up the preliminary settings before going to the advanced measurement setup 3 3 1 Enter Test Session Information Selec...

Page 19: ...along with the calibration channel for testing the receiver This will need to adjust the eye amplitude to specification values when measuring eye height eye width TP2 is a physical test point that wil...

Page 20: ...ED SETUP FOR TP3 RX CALIBRATION 1 Using a SMA SMA short cable connect the MU181000A B clock output to the MU181500B Ext clock input 2 Using a SMA SMA short cable connect the MU181500B jittered clock o...

Page 21: ...CALIBRATION USING TEKTRONIX ATI SCOPE Note Make sure that the Tektronix Scope Type is set to Dual ATI in the Configurations page see Section 4 6 1 Follow back the same connections from step 1 to 3 in...

Page 22: ...so comply with insertion loss limits of 34 to 37 dB 4 2 1 Connect Equipment for System Board Calibration FIGURE 10 RECOMMENDED SETUP FOR TP2 LONG CHANNEL RX CALIBRATION PCIE GEN 5 SYSTEM BOARD 1 Using...

Page 23: ...ed with the following system board calibration setup FIGURE 11 RECOMMENDED SETUP FOR TP2 LONG CHANNEL RX CALIBRATION PCIE GEN 5 SYSTEM BOARD USING TEKTRONIX ATI SCOPE Note Make sure that the Tektronix...

Page 24: ...D 1 Using back the same BERT connections from the TP3 calibration disconnect the MU195050A data outputs from the oscilloscope channels 2 Connect the MU195050A data outputs to Variable ISI Nominal 19 7...

Page 25: ...ktronix Scope Type is set to Dual ATI in the Configurations page see Section 4 6 1 Follow back the same connections from step 1 to 4 in Section 4 2 2 above 2 Then connect the Variable ISI Nominal 2 5...

Page 26: ...est for a single SJ frequency then select only the required SJ frequency for testing FIGURE 14 SELECT TEST CONDITION 4 4 Set Up Calibration Requirements After setting up the physical equipment select...

Page 27: ...jitter RJ and sinusoidal jitter SJ for PCIe Gen 5 frequencies as per PCIe CEM 5 0 Rx specs and forms a linear curve fit for each SJ frequency The GRL software will automatically run the selected cali...

Page 28: ...n when initiated FIGURE 19 SELECT LONG CHANNEL TP2 CALIBRATION WITH SIGTEST FIGURE 20 SELECT LONG CHANNEL TP2 CALIBRATION WITH SEASIM 4 6 Configure Calibration Parameters After selecting the desired c...

Page 29: ...graniteriverlabs com GRL PCIE5 CEM RXA User Guide and MOI Rev7 0 Granite River Labs 2022 Version 7 0 June 2022 Updated 06 29 2022 Page 29 of 123 FIGURE 21 CALIBRATION PARAMETERS CONFIGURATION PAGE...

Page 30: ...ation is already installed in the test controller system Scope Bandwidth GHz Select the appropriate bandwidth of the Scope being used for measurements Tektronix Scope Type If the Tektronix Scope is to...

Page 31: ...ong Channel TP2 calibration SigTest N Acquisition Enter the number of measurements to acquire when running SigTest over the Long Channel TP2 calibration Eye Width Height SigTest N Acquisition Enter th...

Page 32: ...To adjust use a lower PID Control value to reduce the subsequent step or increase the control value to make the subsequent step bigger FIGURE 22 CALIBRATION TARGET OVERWRITE PAGE 4 8 Run Automation Ca...

Page 33: ...o start running the selected calibration The connection diagram for the calibration being run will initially appear to allow the user to make sure that the calibration environment has been properly se...

Page 34: ...ystem board DUT The PCIe Gen 5 add in card DUT will be tested for Tx preset compliance as defined by the PHY Test Specification at 32 0 GT s This will first ensure the DUT is able to generate the corr...

Page 35: ...ck input on the CBB Connect the Tx lane under test on the CBB main board to the input of the BERT error detector Keep additional Tx lanes other than the Tx lane under test unterminated Make sure that...

Page 36: ...e within a 1 microsecond response timeframe Record the cursors reported by the DUT for that preset Set the BERT error detector to place the DUT in the loopback state and capture the following 2 0 mill...

Page 37: ...microsecond response timeframe The test should also be repeated with each request for the DUT Tx equalization using the cursors reported by the DUT for that preset 5 4 Overview of DUT Rx Link Equaliza...

Page 38: ...of the BERT error detector Connect the 100 MHz reference clock output from the BERT to the clock input on the CBB Make sure that the Tx Rx lanes other than the lane under test are unterminated Set th...

Page 39: ...will go into the Polling Configuration state after sending more than 1024 TS1 and 8 consecutive TS1 or TS2 with Pad or Loopback bit asserted have been received 3 The DUT will next enter the Configura...

Page 40: ...and oscilloscope to be used 5 5 1 Connect Equipment for System Board TxRx Link EQ Testing The following link EQ test setup uses a PCI SIG compliance load board CLB test fixture for the PCIe Gen 5 Syst...

Page 41: ...les connect Channels 1 and 3 on the oscilloscope to the pick off tee tapped input ports 5 Using coaxial cables connect the pick off tee outputs to the PCIe5 Re Driver and then to the MU195040A data in...

Page 42: ...els 1 and 3 on the oscilloscope to the pick off tee input ports 5 Using coaxial cables connect the CBB Tx Lane to the pick off tee tapped input ports 6 Using coaxial cables connect the pick off tee ou...

Page 43: ...from the system board link EQ test remove all oscilloscope connections along with the pick off tees 2 Connect the MU195050A data outputs to Variable ISI Nominal 4 9 7 9 dB 3 Using 1 ft cables connect...

Page 44: ...PCIE GEN 5 ADD IN CARD 1 Using the same setup from the add in card link EQ test remove all oscilloscope connections along with the pick off tees 2 Connect the MU195050A data outputs to Variable ISI N...

Page 45: ...tup Tab Select to use a compliant PCIe System Board or Add In Card as the DUT FIGURE 32 SELECT DUT TYPE 5 8 Select PCIe CEM 5 0 Rx Tests After selecting the DUT type access the Select Tests page on th...

Page 46: ...ations The GRL software will automatically run the link equalization test sequence when initiated Note the Tx Initial Link EQ test is only available when Add in Card is selected as the DUT in the Setu...

Page 47: ...9 2022 Page 47 of 123 5 9 Configure Test Parameters After selecting the desired tests select from the menu to access the Configurations page Set the required parameters for testing as described below...

Page 48: ...elected from the Use Custom Tx EQ Response Preset Hints field specify the custom preset hints for Preset 0 to Preset 9 Tx EQ Response Test Criteria Select to enable the Tx link equalization response n...

Page 49: ...number of steps for stepping through margins during the SJ margin search test Margin Test Step Size Set the step size in percentage for stepping through margins during the SJ margin search test Maximu...

Page 50: ...tware to automate loopback testing for error detection go to the Equipment Setup page and type in the VISA address that connects to the Anritsu MX183000A High Speed Serial Data Test Software FIGURE 37...

Page 51: ...ning the tests select the option to Skip Test if Result Exists If results from previous tests exist the software will skip those tests Replace if Result Exists If results from previous tests exist the...

Page 52: ...eriverlabs com GRL PCIE5 CEM RXA User Guide and MOI Rev7 0 Granite River Labs 2022 Version 7 0 June 2022 Updated 06 29 2022 Page 52 of 123 FIGURE 40 EXAMPLE CONNECTION POP UP DIAGRAM FOR RX COMPLIANCE...

Page 53: ...ts are not desired they can be individually deleted by selecting the Delete button For detailed test report select the Generate report button to generate a PDF report To have the calibration data plot...

Page 54: ...the calibration and tests performed along with their conditions and results Note In the example above the number 1 next to PASS indicates the number of errors detected along with the pass fail status...

Page 55: ...ion and return later to continue where the user left off Save and Load Sessions are used to save a test session that the user may want to recall later The user can switch between different sessions by...

Page 56: ...pe ii Perform link training sequence for BER loopback testing Enable DUT loopback mode for error detection with MP1900A BERT Troubleshoot in the case of link training failure iii Test for DUT Rx compl...

Page 57: ...correct amount of insertion loss being measured b The CTLE range from 9 dB to 15 dB in 1 dB step sizes is run for every waveform Note that this is a subset of allowed CTLE range This subset is used to...

Page 58: ...board or PCI SIG CLB test fixture for the add in card device The board will be connected between the BERT noise generator output and the oscilloscope which will validate the test pattern of the signa...

Page 59: ...minal 2 5 dB trace 2 Using 1 m cables connect between both the VNA Ports 1 3 and the CBB Variable ISI and between both the CLB Variable ISI and the VNA Ports 2 4 FIGURE 49 CONNECTION DIAGRAM FOR CHANN...

Page 60: ...Ext clock input 2 Using a SMA SMA short cable connect the MU181500B jittered clock output to the MU195020A MU196020A Ext clock input 3 Using coaxial cables connect the MU195020A MU196020A data outputs...

Page 61: ...on Adjustment Adjust the Amplitude with Scope markers to 800 mVpp diff using the following configuration a BERT Settings General Output ON Select SI PPG and Emphasis tab Emphasis Function OFF Manual S...

Page 62: ...PCIE5 CEM RXA User Guide and MOI Rev7 0 Granite River Labs 2022 Version 7 0 June 2022 Updated 06 29 2022 Page 62 of 123 b Scope Settings Averaging 256 points Horizontal Scale 100 ns div Bandwidth 50 G...

Page 63: ...he Pre and Post Cursor1 of Presets 0 to 9 with Scope markers using the following configuration Preset 4 Calibration a BERT Settings General Output ON Select SI PPG and Emphasis tab Emphasis Function O...

Page 64: ...PCIE5 CEM RXA User Guide and MOI Rev7 0 Granite River Labs 2022 Version 7 0 June 2022 Updated 06 29 2022 Page 64 of 123 b Scope Settings Averaging 256 points Horizontal Scale 1 ns div Bandwidth 50 GH...

Page 65: ...Settings General Output ON Select SI PPG and Emphasis tab Emphasis Function OFF Manual Setting pane Standard Preset PCIe5 De Emphasis Preset 4 Select the Pattern tab Test Pattern 128b130b_CP_L0_Gen5_P...

Page 66: ...e River Labs 2022 Version 7 0 June 2022 Updated 06 29 2022 Page 66 of 123 Click Confirm Browse to the saved waveform file o Ref Waveform is the Preset 4 waveform o Test Waveform is the new waveform sa...

Page 67: ...graniteriverlabs com GRL PCIE5 CEM RXA User Guide and MOI Rev7 0 Granite River Labs 2022 Version 7 0 June 2022 Updated 06 29 2022 Page 67 of 123...

Page 68: ...ittered and analyze SJ using SigTest Set up the following parameters a BERT Settings General Output ON Select SI PPG and Emphasis tab Emphasis Function OFF Select the Pattern tab Test Pattern 128b130b...

Page 69: ...2 Updated 06 29 2022 Page 69 of 123 b Scope Settings Averaging OFF Horizontal Scale 10 s div Bandwidth 50 GHz Sampling Rate 128 GS s c SigTest Settings Select Technology as PCIe Select Generation as 5...

Page 70: ...P P value Calculate SJ by subtracting the average value of the three TJ Jittered and TJ Base waveforms Adjust SJ until SJ 3 125ps 8 1 9 RJ Calibration Capture the waveform on the Scope and analyze RJ...

Page 71: ...ect Jitter Modulation Source RJ ON RJ HPF and Amplitude 10 MHz 0 228 UIpp b Scope Settings Averaging OFF Horizontal Scale 10 s div Bandwidth 50 GHz Sampling Rate 128 GS s c SigTest Settings Select Tec...

Page 72: ...rlabs com GRL PCIE5 CEM RXA User Guide and MOI Rev7 0 Granite River Labs 2022 Version 7 0 June 2022 Updated 06 29 2022 Page 72 of 123 d SigTest Results Read Random Jitter RMS value Adjust RJ until RJ...

Page 73: ...graniteriverlabs com GRL PCIE5 CEM RXA User Guide and MOI Rev7 0 Granite River Labs 2022 Version 7 0 June 2022 Updated 06 29 2022 Page 73 of 123...

Page 74: ...ight Eye Width Calibration Setup The following connection diagrams show the calibration setups at TP2 for DM amplitude DM I CM amplitude CM I and Eye Height EH Eye Width EW for PCIe Gen 5 The CLB CBB...

Page 75: ...Lane 0 and CLB Variable ISI and between both the CBB Tx Lane 0 and the CBB Variable ISI Nominal 13 0 dB 5 For Add In Card calibration a Using coaxial cables connect the MU195050A data outputs to the...

Page 76: ...n 7 0 June 2022 Updated 06 29 2022 Page 76 of 123 b Scope Settings Averaging OFF Horizontal Scale 5 ns div Bandwidth 8 GHz 8 1 12 CM I Calibration Adjustment Adjust the CM Amplitude using the Scope RM...

Page 77: ...d 06 29 2022 Page 77 of 123 General Output ON Select SI PPG and Emphasis tab PPG Data Output OFF Select Noise Generator CM ON Common mode noise Amplitude and Frequency 150 mVpp and 120 MHz b Scope Set...

Page 78: ...p the following parameters a BERT Settings General Output ON Select SI PPG and Emphasis tab Emphasis Function ON Select the Pattern tab Test Pattern 128b130b_CP_L0_Gen5_P0 Set all Jitter Noise and Amp...

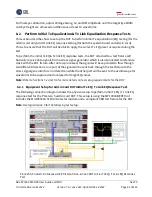
Page 79: ...through o SJ 1 to 5 pspp o DM 5 to 30 mV at TP2 o VSwing 720 mV to 800 mV To be adjusted only if unable to achieve target values with SJ DM combination If the target values cannot be achieved reduce...

Page 80: ...ranite River Labs 2022 Version 7 0 June 2022 Updated 06 29 2022 Page 80 of 123 d SigTest Results The Eye Height BER and Eye Width BER must fall within the following target values Target Minimum Eye Wi...

Page 81: ...ignal generator which is also connected to reference clock with the DUT fixture After data is processed the signals will be separated to flow through two different directions one part of the signal wi...

Page 82: ...the oscilloscope Note the other unused MU195020A MU196020A Aux Out connector must be terminated with the J1632A coaxial terminator due to differential signal output not shown in above setup 7 Using ph...

Page 83: ...MU181500B jittered clock output to the MU195020A MU196020A Ext clock input 3 Using coaxial cables connect the MU195020A MU196020A data outputs to the MU195050A data inputs 4 Using coaxial cables conn...

Page 84: ...o account for measurement noise a tolerance of 1 0 dB is used for measured preshoot and de emphasis that are defined as 0 0 dB in the PCI Express Base Specification Due to measurement sensitivity havi...

Page 85: ...ct the network address of the MX190000A BERT application followed by Connect to link up with the MX190000A 6 In the MX183000A PCIe Link Training window select the Link Training tab Select the Setting...

Page 86: ...ing a add in card DUT the Preset 0 waveform should be saved as Add In Card_Ln00_TXResponse_P00_d_acq000 If using a system board DUT the Preset 0 waveform should be saved as System Board_TXResponse_P0_...

Page 87: ...emphasis that are defined as 0 0 dB in the PCI Express Base Specification Due to measurement sensitivity having more impact on higher boost preset a tolerance of 1 5 dB is used for P10 preshoot The d...

Page 88: ...g and then Start 4 In the next window select the network address of the MX190000A BERT application followed by Connect to link up with the MX190000A 5 In the MX183000A PCIe Link Training window select...

Page 89: ...Hint Tx DUT Target Preset Change Preset P0 P4 P0 P1 P4 P1 P2 P4 P2 P3 P7 P3 P4 P7 P4 P5 P7 P5 P6 P7 P6 P7 P4 P7 P8 P4 P8 P9 P7 P9 Set Link EQ to Preset if testing for Tx Response Preset or Cursor if...

Page 90: ...e saved as System Board_TXResponse_P0_d_acq000 10 Repeat steps 1 to 8 for each Preset change 11 Repeat steps 1 to 9 for each Cursor change 12 Perform post processing analysis for each waveform to loca...

Page 91: ...e stress signal generator for error detection To enable this loopback mode the error detector on the stress signal generator will run link training procedure on the DUT When the DUT enters loopback st...

Page 92: ...the Variable ISI Nominal 19 75 22 75 dB 5 Using 1 ft cables connect between both the CBB Rx Lane 0 and Variable ISI 6 Using coaxial cables connect the MU181500B sub rate clock outputs 100 MHz referenc...

Page 93: ...zation of the Return Path DUT Tx to BERT error detector Refer to Appendix B or C for details 1 Using a SMA SMA short cable connect the MU181000A B clock output to the MU181500B Ext clock input 2 Using...

Page 94: ...he MU195040A data inputs for loopback error detection 8 Using the J1627A GND connection cable connect the CLB to ground 8 3 3 Link Training Initialization and Testing The Anritsu MX183000A High Speed...

Page 95: ...83000A PCIe Link Training window select the Link Training tab Select Recovery Full EQ under the Loopback Method drop down field The Recovery mode is a recommended setting for the DUT loopback state 6...

Page 96: ...ccessful perform troubleshooting for any of the following cases that may have been encountered during testing a The LTSSM state for link training is repeated at 2 5 GT s Check that the instruments and...

Page 97: ...once the DUT has passed the link training loopback tests as described in the previous section 1 Enable all calibrated stresses on the BERT 2 In the same link training window from the previous test the...

Page 98: ...graniteriverlabs com GRL PCIE5 CEM RXA User Guide and MOI Rev7 0 Granite River Labs 2022 Version 7 0 June 2022 Updated 06 29 2022 Page 98 of 123...

Page 99: ...or Detector Refer to Section 9 3 for information on how to set up the J1890A PCIe5 Re Driver Set Note While it is not necessary to use a Re Driver for the Add In Card Rx Link EQ Test the same method o...

Page 100: ...pback is established through the LTSSM State displayed ii If Loopback cannot be established even if CTLE is set to 12 dB set the Preset setting of steps 3 ii 3 iii to P8 set CTLE to 0 dB and check the...

Page 101: ...with Preset and CTLE settings specified in step 5 to measure BER i Adjust CTLE to locate the setting that gives the best BER ii Execute CDR Tune iii Execute Auto Search Click on the Operate MP1900A bu...

Page 102: ...re up to step 6 ED setting parameters for optimizing the Return Path are determined Each parameter is as follows Preset setting confirmed in step 5 o DUT Initial Preset Preset Hint Tx o DUT Target Pre...

Page 103: ...dB 2 Labelled 1877A 3 J1645A Passive Equalizer 3 dB V connector 2 Labelled REQ M05 F0 0 28 0 S3 0 V ITI R 4 34VKF50A Precision Adapter 4 Labelled 34VKF50A 5 J1820A Electrical Length Specified Coaxial...

Page 104: ...of AH54192A 01 There are three types of supply voltages Set each voltage with the following typ settings VCC Core voltage of AH54192A Vamp Gain setting of output signal VBT Output current adjustment...

Page 105: ...54192A 01 1 Remove the dedicated DC power cable with the AH54192A 2 While checking the voltage monitor switch between VCC Vamp VBT with the voltage selector and adjust each to the typ value 3 Turn off...

Page 106: ...tion 10 3 for information on how to set up the MACOM Re Driver Note While it is not necessary to use a Re Driver for the Add In Card Rx Link EQ Test the same method of optimizing the Return Path shoul...

Page 107: ...LTSSM State is not Loopback Active Lead increase the EQ preset of the Re Driver as such EQ_P0 EQ_P4 EQ_P20 by four steps and re execute Link Training Confirm every time whether Loopback is establishe...

Page 108: ...e setting that gives the best BER ii Set the EQ confirmed in step 6 iii Execute Auto Search Click on the Operate MP1900A button to switch to the MP1900A User Interface Click on the Auto Search button...

Page 109: ...re up to step 7 EQ setting of the Re Driver and ED setting parameters for optimizing the Return Path are determined Each parameter is as follows Preset setting confirmed in step 6 o DUT Initial Preset...

Page 110: ...graniteriverlabs com GRL PCIE5 CEM RXA User Guide and MOI Rev7 0 Granite River Labs 2022 Version 7 0 June 2022 Updated 06 29 2022 Page 110 of 123 Preset setting Clock Delay...

Page 111: ...el 1 Ch1 Tx and Channel 2 Ch2 Rx J1728A Electrical Length Specified Coaxial Cable 0 4 m K Connector 2 J1728A or equivalent J1627A GND Connection Cable 1 For GND connection between U0099A and MP1900A N...

Page 112: ...A and power up the Re Driver with an external 3 3 VDC power supply to the banana jacks J1 and J8 5 Once the necessary hardware connections for the Re Driver are in place launch the User Control softwa...

Page 113: ..._EQ_LF dB EQ_P0 28 2 3 0 7F 3 3 0 EQ_P1 20 2 3 0 7F 3 3 0 EQ_P2 18 2 3 0 7F 3 3 0 EQ_P3 10 1 3 0 7F 3 3 0 EQ_P4 8 1 3 0 7F 3 3 0 EQ_P5 1 1 3 0 7F 3 3 0 EQ_P6 1 1 3 0 78 3 3 0 EQ_P7 1 1 3 0 70 3 3 0 EQ...

Page 114: ...m the GRL PCIe CEM 5 0 Rx Test Application menu to access the Setup Configuration page FIGURE 57 SETUP CONFIGURATION PAGE 2 Select the SigTest Tool tab FIGURE 58 PERFORM SIGTEST DEBUGGING 3 Select the...

Page 115: ...v7 0 Granite River Labs 2022 Version 7 0 June 2022 Updated 06 29 2022 Page 115 of 123 FIGURE 59 RUNNING OFFLINE SIGTEST VERIFICATION 5 Once test is completed the results will be displayed like in the...

Page 116: ...e DUT using appropriate offline PCIe compliant waveforms This function is used for debugging purposes 1 Select from the GRL PCIe CEM 5 0 Rx Test Application menu to access the Setup Configuration page...

Page 117: ...cted the GRL software will automatically run the Tx link EQ time response preset cursor test for the waveform as shown in below example FIGURE 64 RUNNING TX LINK EQ TIME RESPONSE PRESET CURSOR TEST 5...

Page 118: ...2 Updated 06 29 2022 Page 118 of 123 FIGURE 65 VIEWING TX LINK EQ TIME RESPONSE PRESET CURSOR TEST RESULTS 6 For further analysis of the test results respective traces for the decoded and electrical t...

Page 119: ...ite River Labs 2022 Version 7 0 June 2022 Updated 06 29 2022 Page 119 of 123 FIGURE 66 VIEWING TX LINK EQ TIME RESPONSE PRESET CURSOR TEST TRACE FOR TRANSITION TIME Note The Decoded transition time se...

Page 120: ...he Keysight Scope can be connected to the PC through GPIB USB or LAN 1 Download the latest version of the Keysight IO Libraries Suite software from the Keysight website and install on the PC 2 When in...

Page 121: ...the Keysight Scope to the PC through GPIB USB type in the VISA address into the Address field on the Equipment Setup page of the GRL PCIe CEM 5 0 Rx Test Application If connected via LAN type in the S...

Page 122: ...ment Manager application FIGURE 69 OPENCHOICE INSTRUMENT MANAGER IN START MENU 3 The left Instruments panel on the OpenChoice Instrument Manager will display all connected instruments The functional b...

Page 123: ...beforehand Then select the Search Criteria function to ensure that LAN connection is enabled and type in the Scope IP address When the Scope shows up in the list select it followed by Search The Scop...

Reviews: