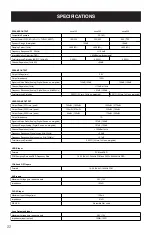
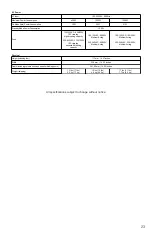
background image

20

environments and rooms with carpets. 

If the unit is behaving erratically 

afterwards, power it down completely 

by turning off the rear panel AC 

switch, letting it sit for a minute or so, 

then powering it back on. If the issue 

persists, please contact your reseller 

or Peachtree Audio.

The connected streaming device 

(including the Bluesound NODE 2i) 

makes popping sounds or other audio 

bursts when the sample rate changes in 

a  playlist. Note this affects the nova500 

DAC only.

Hold down the desired digital audio 

input button on the front panel (COAX, 

OPT-1, or OPT-2) when bringing the 

unit out of standby. Whichever button 

is being held down, that’s input’s 

dropout prevention option will toggle 

between ON and OFF.
The standby LED will flash a certain 

number of times to indicate that input’s 

current state:

6 flashes for OFF; used for most 

players and TV sets.

7 flashes for ON; used for Bluesound 

and others. (Use this mode if the 

attached streaming device has noise 

during sample rate changes).
NOTE: it will show the state for 

the button that was held down, not 

necessarily the current input 

(eg. if you were last on COAX input, 

but held down the OPT-1 button 

coming out standby, the flashing will 

show the state for the OPT-1, even 

though the current input is COAX).

If there is a random loss of audio, 

accompanied by a click sound inside 

the nova and switching sources restores 

audio.

To disable the “power failure mute” 

feature (firmware version 1.9 and 

above), press and hold the volume 

control knob in for ~15 seconds, until 

the standby LED blinks 5 times. 
This is useful in some instances where 

electrical interference on the AC Mains

causes random unexpected loss of 

audio. Pressing and holding the knob 

in for ~15 seconds again reverts to the 

factory default mode (4 blinks). 
Note that disabling the “power 

failure mute” can cause noise in the 

speakers if AC mains power suddenly 

is removed (when a power failure 

occurs for example). You can find the 

latest firmware update at https://www.

peachtreeaudio.com/support/usb-drivers.

html.

If  something  is  connected  to  the  USB-A  port  that  does  not  support  audio  (Apple 

Watch Magnetic Charger for example), the red standby LED will flash in sequence: 5 

quick flashes, pause, 5 quick flashes, pause…until it is disconnected. Note that while 

connected,  5V  is  provided  to  the  device.  For  example,  the Apple  Watch  Magnetic 

Charger will still charge the Apple Watch if it is attached.

Summary of Contents for nova 150

Page 1: ......

Page 2: ......

Page 3: ...r cord from being walked on or pinched particularly at the plugs convenience receptacles and at the point where they exit from the apparatus L Only use attachments accessories specified by the manufacturer M Use only with the cart stand tripod bracket or table specified by the manufacturer or sold with the apparatus When a cart is used use caution when moving the cart apparatus combination to avoi...

Page 4: ...sk of electric shock The external wiring connected to the terminals requires installation by an instructed person or the use of ready made insulated leads or cords X Correct disposal of this product This marking indicates that this product should not be disposed with other household wastes throughout the EU To prevent possible harm to the environment or human health from uncontrolled waste disposa...

Page 5: ...nd found to comply with the limits for a class B digital device pursuant to part 15 of the FCC Rules These limits are designed to provide reasonable protection against harmful interference in a residential installation The equipment generates uses and can radiate radio frequency energy and if not installed and used in accordance with the instructions may cause harmful interference to radio communi...

Page 6: ... Back Panel 12 Front Panel 14 Remote Control 16 Home Theater Bypass Input Mode 17 Volume Control Bypass Input Mode 17 Loop Feature 18 Useful Tips 19 Troubleshooting 21 Warranty and Repair 22 Specifications Rev 11 2020 ...

Page 7: ...ng 32 bit 384kHz PCM and 5 6MHz DSD This includes compressed audio uncompressed audio high resolution audio and ultra high resolution audio The nova accepts them all Built around the DAC is an extensive multi point regulated power supply that keeps the DAC operating optimally and faithful to the input signal providing the most natural sounding and musical DAC section we have ever designed The nova...

Page 8: ...lifier the overall value is remarkable The power amplifier sections in the nova are some of the cleanest neutral and most powerful ones available today At an impressive 150 Watts Per Channel WPC into 8 ohms the nova150 has ample power to satisfy the majority of speakers rooms and listeners However there is no such thing as too much power so we also created the nova300 that packs an amazing 300 WPC...

Page 9: ... or a different room Please contact us if you need more technical details regarding the IR protocol Note To enable the rear panel IR input connector and disable the front panel IR receiver press the current input button 10 times in succession until the standby LED blinks 3 times To disable the rear panel IR input connector and enable the front panel IR receiver repeat the procedure above until the...

Page 10: ...e similar to a processor or tape monitor loop with an output and input that are tied together to allow an audio processing device to be inserted into the signal path The loop is active when the button on the front panel is lit blue Please note that when the loop is active the audio signal from the nova is output on the LOOP OUTPUT connectors and the audio signal output from the connected device is...

Page 11: ...sen loop around post or insert through hole on the post tighten Note To enable the rear panel IR input connector and disable the front panel IR receiver press the current input button 10 times in succession until the standby LED blinks 3 times To disable the rear panel IR input connector and enable the front panel IR receiver repeat the procedure above until the standby LED blinks 2 times BANANA P...

Page 12: ...nput mode the input has additional gain and equalization settings applied that 2 3 4 5 6 8 9 10 11 1 7 FRONT PANEL LOOP FRONT PANEL B On Standby Button With the AC power cord connected and the rear panel POWER switch set to ON this button toggles the unit between On mode which selects the last input used and Standby mode which lights the LED red C USB B Button This button selects the USB B input a...

Page 13: ...ova is making output level changes automatically the input LEDs will blink The blinking stops when the nova reaches the correct output level This occurs when mute is disengaged volume control bypass is selected and or home theater bypass is selected This is to minimize the chance of sudden unexpected output level changes L HEADPHONE Output 1 4 headphone output connection Inserting a headphone conn...

Page 14: ... reaches the correct output level This occurs when mute is disengaged volume control bypass is selected and or home theater bypass is selected This is to minimize the chance of sudden unexpected output level changes E DIM Button Dims the front panel LED brightness Note the brightness will continually cycle through all of the available settings maximum high medium low maximum high F Asterisk Button...

Page 15: ...e 17 for more details Caution the volume control in the nova is completely bypassed in the volume control bypass mode L AUX 1 HTB Button This button selects the AUX 1 input and lights the LED blue or green if the Home Theater Bypass mode is engaged please see the Home Theater Bypass instructions on page 16 for more details Caution the volume control in the nova is completely bypassed in the Home T...

Page 16: ... source connected to this input To set up Home Theater Bypass 1 Turn off the Surround Sound Processor SSP or Audio Video Receiver AVR and the nova 2 Connect the front LEFT and RIGHT preamp output from the SSP or AVR to the AUX 1 HTB input on the nova 3 Turn on the nova and select the AUX 1 HTB input 4 Press and hold the AUX 1 HTB button for 5 seconds to engage the HTB input mode indicated by the i...

Page 17: ...s not taken significant damage to the speakers or power amplifier may occur Peachtree Audio does not accept any responsibility for damage caused by improper setup or use of this feature LOOP FEATURE LOOP OUTPUT LOOP INPUT This is a loop feature similar to a processor or tape monitor loop with an output and input that are tied together to allow an audio processing device to be inserted into the sig...

Page 18: ...her music application and enjoy Once you set up your computer using the instructions above it should automatically recognize the nova each time you use it If you unplug the USB connection or re boot your computer you may have to repeat some of the steps above This is typical Other useful tips For the best sound when listening to music from your computer set your computer and music program volume c...

Page 19: ...ith the sensor on the front panel The USB signal from a computer is intermittent Try re launching the music application iTunes etc If the computer doesn t recognize the nova unplug the USB cable from the computer and the nova wait a few seconds then reconnect the USB cable Try re starting the computer The nova is designed to remain locked on USB signals at all times but computers drop connections ...

Page 20: ...ere last on COAX input but held down the OPT 1 button coming out standby the flashing will show the state for the OPT 1 even though the current input is COAX If there is a random loss of audio accompanied by a click sound inside the nova and switching sources restores audio To disable the power failure mute feature firmware version 1 9 and above press and hold the volume control knob in for 15 sec...

Page 21: ...shipping costs Visit www peachtreeaudio com for complete warranty details Repair Process In the event that a product fails please repack it in its original carton and contact an authorized Peachtree reseller for further instructions If the reseller is unable to assist please contact Peachtree Audio directly at service peachtreeaudio com or 1 704 391 9337 to obtain a Return Authorization RA number ...

Page 22: ...750mW 1600mW 1200mW 2770mW Output Power 300Ω rms peak 130mW 275mW 330mW 700mW Output Power 600Ω rms peak 64mW 135mW 170mW 350mW Output Impedance 1Ω Signal to Noise Ratio Analog Digital Source un weighted 107dB 106dB Dynamic Range Analog Digital Source un weighted 107dB 100dB Channel Separation 1kHz 100dB at 1kHz Frequency Response Digital source 8Hz 20kHz 0 5dB Frequency Response Analog source 8Hz...

Page 23: ...g 15 lbs 19 lbs 6 8 kg 8 6 kg 17 lbs 21 lbs 7 7 kg 9 5 kg 19 lbs 23 lbs 8 6 kg 10 5 kg Maximum Voltage rms peak to peak 3 5V 10V Impedance input output 100kΩ 100Ω AC Power AC Input 100 240VAC 50 60Hz Maximum Power Consumption 400W 1200W 1500W On Mode Idle Power Consumption 15W 32W 41W Standby Mode Power Consumption 0 5W Fuse 100 120VAC 6 3A 250V IEC time lag high breaking capacity 220 240VAC 3 15A...

Page 24: ......

Reviews: