8
3.
Secure the remaining end of the fuse holder or circuit breaker to the positive (+) cable. Connect
the positive (+) cable to the red positive terminal on the
Mobile Power Outlet
. Tighten the screw
connector securely.
4.
Connect the negative cable between the negative (-) terminal of the power source and the black
negative (-) terminal on the
Mobile Power Outlet
. Tighten the screw connector securely.
Do not connect the grounding wire to the negative (-) terminal of the power source.
Only connect this wire to a clean grounding point on the vehicle.
FIRE HAZARD
Verify that all connections are secured. A loose connection may cause damage to the Mobile
Power Outlet and/or create a spark.
5.
Verify that the positive (+) cable is connected between the positive (+) terminal of the power source
and the red positive (+) terminal on the
Mobile Power Outlet
. Also, verify that the negative (-) cable
is connected between the negative (-) terminal of the power source and the black negative (-)
terminal on the
Mobile Power Outlet.
If the cables are not connected correctly, the Mobile Power Outlet will be damaged.
6.
Install the fuse in the fuse holder or turn on the circuit breaker.
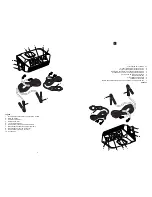
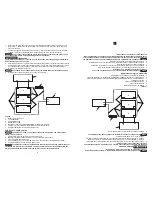
1
3
4
2
5
6
2
2
7
Legend
1.
Battery Charging Source
2.
12-volt Batteries
3.
200-amp ANL Fuse
4. Mobile Power Outlet
5.
Negative (-) Cable (see SPECIFICATIONS for cable requirements)
6.
Positive (+) Cable (see SPECIFICATIONS for cable requirements)
7.
Additional Batteries Connected in Parallel Circuit
USB Power Outlet Operation
The USB power outlets do not support data communications. The outlets have a
maximum of 5 volts/2.1A.
1.
Plug the USB-powered device into a USB power outlet.
2.
Make sure the Mobile Power Outlet is correctly connected to the battery.
3.
Turn on the USB-powered device.
4.
When shutting down, turn off the USB device first, then disconnect the Mobile Power Outlet.
5.
Unplug the USB device from the USB power outlet.
The USB power outlet on the Mobile Power Outlet is an unswitched outlet. Whenever
the Mobile Power Outlet is connected to a battery, there will be power to the USB outlets. The
ON/OFF switch does not need to be turned on to have power at the USB outlets.
8
AVISO
No
conecte el cable de tierr
a al terminal negativ
o (–) de la fuente de energía.
Sólo
conecte este cable
a un punto de tier
ra limpio
en el vehículo
.
ADVERTENCI
A
PELIGR
O DE FUE
GO
Verifiq
ue que todas las cone
xiones están seguras
. Una
conexión
floja podrá causar
le daños
al Tomacor
riente
Móvil y/o
crear
una chispa.
5.
Verifique que el cable positiv
o (+) esté conectado entre el terminal positiv
o (+) de la fuente de
energía y el terminal positiv
o (+) en el Tomacorriente Móvil
. También, v
erifique que el cable
negativo (–) esté conectado entr
e el terminal negativo (–) de la fuente de ener
gía y el terminal
negativo negr
o (–) en el Tomacorriente Móvil
.
AVISO
Si los cables no
están cor
rectamente conectados
, el
Tomacor
riente
Móvil se
dañará.
6.
Instale el fusible en el porta fusible o encienda el dis
yuntor.
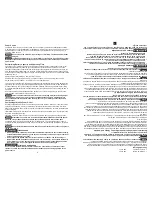
1
3
4
2
5
6
2
2
7
Ley
enda
1.
Fuente de C
arga de las Baterías
2.
Baterías de 12 voltios
3.
Fusible de 200 amperios ANL
4.
Tomacorriente Móvil
5.
Cable Negativ
o (–) (consulte las ESPECIFIC
ACIONES par
a obtener los requisitos de cable)
6.
Cable P
ositivo (+) (consulte las ESPE
CIFICACIONES par
a obtener los requisitos de cable)
7.
Baterías Adicionales Conectadas en Cir
cuito Par
alelo
Operación del
Tomacorriente USB
AVISO
Los
tomacorrientes USB
no apoyan las comunicaciones
de datos
. L
os
tomacorriente tienen
un máximo
de 5 v
oltios/2,1 A.
1.
Enchufe el dispositiv
o energiz
ado por USB dentro del tomacorriente USB
.
2.
Asegúrese de que el
Tomacorriente Móvil esté conectado corr
ectamente a la batería.
3.
Encienda el dispositivo accionado por USB
.
4.
Al apagar, apague primer
o el dispositivo USB
, luego desconecte el Tomacorriente Móvil.
5.
Desenchufe el dispositiv
o USB del tomacorriente USB.
AVISO
La salida de ener
gía USB en el
Tomacorr
iente Móvil es una salida no contr
olada por
un interruptor
. Siempr
e que el
Tomacor
riente Móvil esté conectado
a la
batería habr
á energía
en las tomas de corr
iente USB
. El inter
ruptor de
ON/OFF no necesita
ser encend
ido par
a que
haya ener
gía en las
tomas de
corriente USB
.


