background image


  Document No.:


  17 / 91 


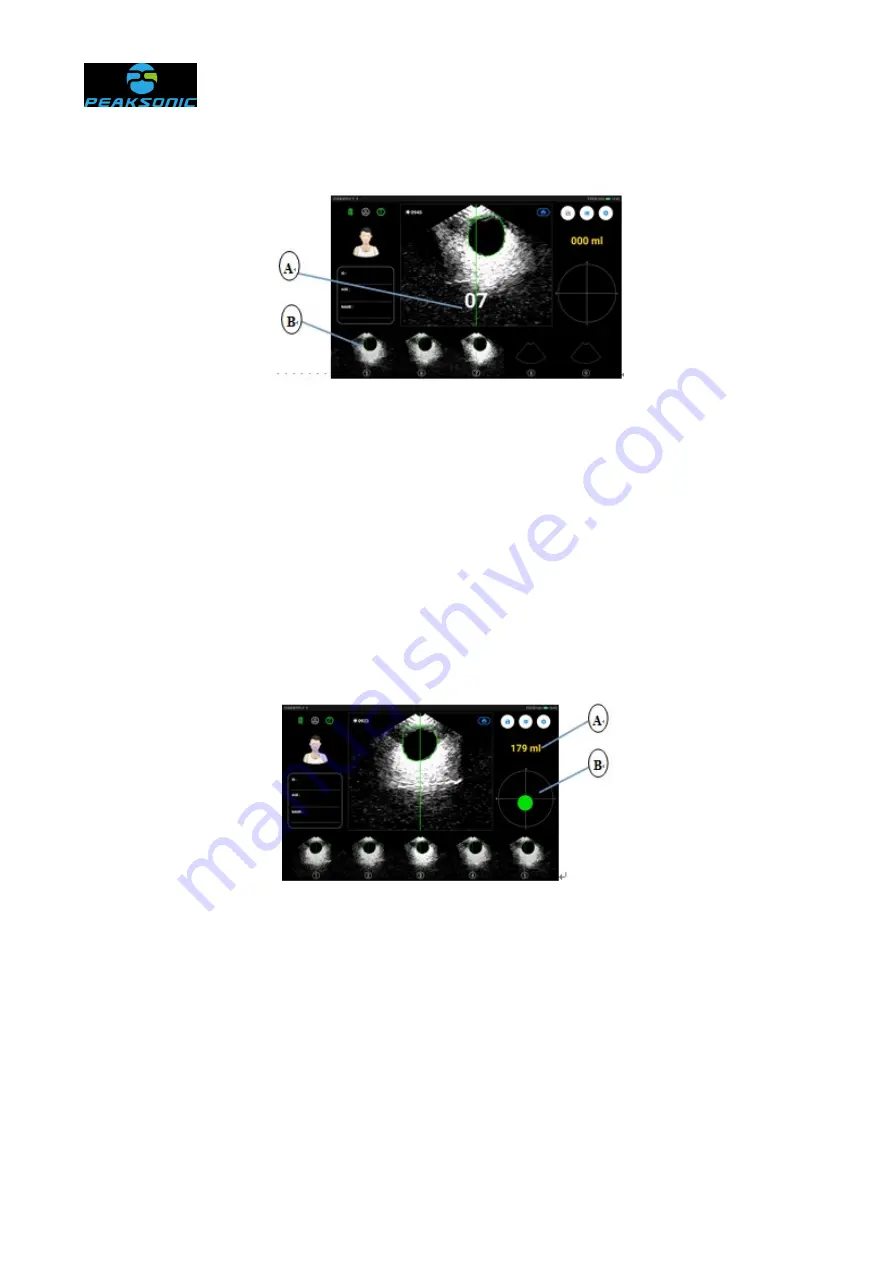
5.5.2 Scanning start interface of the expert mode 


Figure 5-5-2 Scanning start interface of M4-HD expert mode 

A: Represent the increase from 01, and when it becomes 12, represent the end of 

scanning and image analysis and calculation; Display bladder volume value 

B: The bladder image will be displayed one by one with the scanning progress, until 

12 images are scanned and displayed. 


5.5.3 Scanning end interface of the expert mode 


Figure 5-5-3 Scanning end interface of M4-HD expert mode 

A: Display the bladder volume after 

scanning 

B: Display the bladder projection after 

scanning 


Summary of Contents for M4-HD

Page 1: ...Scanner Model M4 HD User Manual Version M4 HD_V1 0 0 1 Product standard XXX J XXXX 2018 Production license No YSYJXSCX No XXXXXXX Registration certificate No JSYJX Z ZI 2014 No XXXXX Suzhou PeakSonic...

Page 2: ...ed 2 2 6 Relevant matters concerning moving the instrument 3 2 7Operations in case of fault 3 2 8 Inspect and maintain the instrument regularly 3 2 9 Do not disassemble the instrument and probe arbitr...

Page 3: ...f patient history information 23 5 11 4 Interface of patient history information and 3D model 23 5 11 5 Projection interface of patient history information 24 5 11 6 Batch delete and upload selection...

Page 4: ...history information 44 6 9 6 Browse scanned images 3D images and projection positioning images of the bladder 45 6 10 Settings 45 6 10 1 Mode selection setting 46 6 10 2 Calibration setting 47 6 10 3...

Page 5: ...n 65 9 3 If the fault cannot be eliminated please contact Suzhou PeakSonic Medical Technology Co Ltd 65 9 4 Maintenance instructions 65 Appendix A Schematic Diagram of the Complete Machine Identificat...

Page 6: ...on The M4 HD bladder scanner manufactured by Suzhou PeakSonic Medical Technology Co Ltd provides non invasive measurement of urinary bladder volume using ultrasonic imaging and measurement principle T...

Page 7: ...age selection Volume preset alert Bluetooth wireless print report Information management storage and printing The instrument is composed of a handheld wireless scanning device with an injection moldin...

Page 8: ...equipment Description of instrument nameplate and identification Product serial No Follow the instructions Production date of the product Type B equipment Authorized representative information of the...

Page 9: ...ed fault rate of the product and unexpected risks Warning All risks arising from the continued use of this product after its service life shall be borne by the user Note Scrapping disposal of the prod...

Page 10: ...he measurement At this time the instrument shall be stopped to prevent mismeasurement and can be reused after the electromagnetic interference is eliminated Warning If the user replaces with non confo...

Page 11: ...out by personnel approved by Suzhou PeakSonic Medical Technology Co Ltd Relevant electrical equipment complies with national standards The instrument is used according to operation guidance In case of...

Page 12: ...r Scanner on following cases a Fetal use or pregnant patients b Patients with ascites c Patients with open or damaged skin d Wounds in the suprapubic region 1 9 Release of heat index and mechanical in...

Page 13: ...uses the battery of other specifications and models it may cause safety hazards to the user or the instrument 2 2 Safety preparation before operation Check whether the instrument is in good condition...

Page 14: ...Dust environment 6 Saliferous or sulfurous gas 7 Chemical medicine or gas 8 Strong vibration and collision 9 The company is not liable for any risks arising from the disassembly or modification of the...

Page 15: ...intain the instrument regularly 2 9 Do not disassemble the instrument and probe arbitrarily 2 10 Startup Long press about 2 seconds the power button of the scanning device to start it click the App ic...

Page 16: ...4 91 Chapter III System Introduction 3 1 Profile of scanning device Figure 3 1 Front schematic diagram of M4 HD scanning device Figure 3 2 Left schematic diagram of M4 HD scanning device Power switch...

Page 17: ...5 seconds Battery capacity 2400mAh Operation mode Touch keys on the tablet computer Have 2D tissue harmonic imaging image 3D scanning display Real time scanned image volume value outline information...

Page 18: ...sion number view software update Multi language selection The instrument has three operation modes Expert mode easy mode and intelligence mode Display screen Display on the tablet computer Power 13VA...

Page 19: ...Document No 7 91 3 3 Block diagram Figure 3 4 Block diagram of electrical principle of M4 HD...

Page 20: ...y points of L1 L2 L3 L4 and L5 The volume of the right part of the bladder scanning section is the sum of the volume values corresponding to L1 L2 L3 L4 and L5 The volume of the left part shall be cal...

Page 21: ...to drive the crystal oscillator on the top of the probe to rotate and swing Of which the lower stepping motor drives the crystal oscillator to rotate for 180 degrees and the upper stepping motor drive...

Page 22: ...rsion User manual Lithium battery model NCA653864SA 2400 mAh PC015 2S1P 7 4Vd c 2400mAh Certificate of quality Warranty certificate Packing list Trolley Instructions The user can choose the standard t...

Page 23: ...rements and methods specified in 4 2 4 2 Installation 4 2 1Schematic diagram of the base for the scanning device of the instrument Figure 4 1 Schematic diagram of the base for M4 HD scanning device 4...

Page 24: ...inter Figure 4 2 Schematic diagram of installation and disassembly of M4 HD printer 4 3 Power supply Power supply mode of the scanning device battery powered 4 3 1 Battery powered Press the power butt...

Page 25: ...s fully charged Printer battery is charged through the charger 1 Plug the charger output plug into the DC 8 4V round hole socket on the base 2 Plug the AC input plug of the charger into the power sock...

Page 26: ...Figure 5 2 Main interface of M4 HD expert mode A Battery power display B Bluetooth printer connection identification C wifi scanning device connection identification D Calibration brightness value di...

Page 27: ...rasonic images R Serial No of 12 scanned ultrasonic images S Real time bladder ultrasound image display area 5 3Main interface of the easy mode Figure 5 3 Main interface of M4 HD easy mode A Display a...

Page 28: ...ntal line of the cross of the display area of the positioning diagram D Vertical line of the cross of the display area of the positioning diagram E Display area of 2D bladder B ultrasound image 5 5 Sc...

Page 29: ...end of scanning and image analysis and calculation Display bladder volume value B The bladder image will be displayed one by one with the scanning progress until 12 images are scanned and displayed 5...

Page 30: ...e Figure 5 6 1 Pre scanning interface of M4 HD easy mode A Bladder scanning section area 5 6 2 Scanning start interface of the easy mode Figure 5 6 2 Scanning start interface of M4 HD easy mode 5 6 3...

Page 31: ...terface of M4 HD intelligence mode A Real time projection of bladder scanning B 2D B ultrasound image of bladder 5 7 2 Scanning start interface of the intelligence mode Figure 5 7 2 Scanning start int...

Page 32: ...Instructions The scanning end interface of the intelligence mode is the same with that of the expert mode 5 8 Bladder projection interface of the expert mode Figure 5 8 Bladder 3D interface of M4 HD e...

Page 33: ...3D interface of the intelligence mode is the same with that of the expert mode 5 11 Saved patient information browsing 5 11 1 Patient history information view login interface Figure 5 11 1 M4 HD pati...

Page 34: ...Saved patient age information E Saved patient name information F Icon key for returning to the main interface G Icon key for editing patient information H Icon key for deleting the selected patient i...

Page 35: ...of M4 HD patient history information A Edit patient ID code information B Edit patient age information C Edit patient name information 5 11 4 Interface of patient history information and 3D model Figu...

Page 36: ...lay area of projection 5 11 6 Batch delete and upload selection interface of patient history information Figure 5 11 6 Batch delete and upload selection interface of M4 HD information A The gender box...

Page 37: ...Password C Cancel login and return key D Login key 5 11 8 Upload prompt interface of patient history information Figure 5 11 8 Upload prompt interface of M4 HD patient history information A Host compu...

Page 38: ...Delete confirmation window B Delete confirmation prompt C Delete cancellation key D Delete confirmation key 5 11 10 Batch delete confirmation interface of patient history information Figure 5 11 10 B...

Page 39: ...setting E Volume alert setting F Password management G System information view H Setting interface window prompt I View field of setting items J Confirmation field of setting items K Return to the mai...

Page 40: ...Figure 5 12 2 M4 HD calibration setting interface A Select the calibration item from the setting list B Bright Calibrate setting item C Auto Calibrate setting item D Auto Calibrate setting confirmati...

Page 41: ...he setting list B Espa ol Spanish C Svenska Swedish D Portugu s Portuguese E Suomi Finnish F Traditional Chinese interface language G English English H Simplified Chinese I Fran ais French J Dansk Dan...

Page 42: ...0min poweroff F Turn off automatic poweroff function G Automatic poweroff is set as close confirmation item 5 12 5 Volume alert preset setting interface Figure 5 12 5 M4 HD volume alert preset setting...

Page 43: ...ck mark C Login password management and password input field D Login key 5 12 6 2 Password management interface Figure 5 12 6 2 M4 HD password management interface A Select the password management set...

Page 44: ...e key press this key to save the new password 5 12 6 3 wifi auto connect interface Figure 5 12 6 3 M4 HD wifi auto connect interface A wifi auto connect prompt window B Auto connect cancel key 5 12 7...

Page 45: ...n upgrade interface Figure 5 12 7 1 M4 HD software version upgrade interface A Software version upgrade window B Software version upgrade key 5 13 Printer Bluetooth scanning interface Figure 5 13 M4 H...

Page 46: ...Bluetooth auto connect interface Figure 5 14 M4 HD Bluetooth auto connect interface A Bluetooth auto connect prompt window B Auto connect cancel key 5 15 Battery power identifier Figure 5 15 M4 HD ba...

Page 47: ...the wifi connection status white icon at the top of the main interface of the instrument enter the wifi setting list of the tablet computer and search for the name of Peak_M4_XXXXXXXX the last 8 digi...

Page 48: ...er is Male by default Click area to switch the gender Male Female FemaleH Child and Phantom 6 3 2 Bladder pre scanning Apply the coupling agent to the contact area between the probe surface of the sca...

Page 49: ...ite they are not connected 2 When pre scanning the gender selection is locked the operation cannot be performed and the save and setting functions cannot be operated the setting function icon changes...

Page 50: ...t side of the screen displays the 3D projection of the bladder and the current bladder volume value 12 scanned bladder section diagrams are displayed at the bottom of the screen Under the easy mode th...

Page 51: ...bladder and 3D images respectively The image scanning projection is displayed in the round frame with a cross in the right middle of the main interface Click the scanning projection in the round fram...

Page 52: ...ice type After selection the Bluetooth connection status is green icon indicating that the tablet computer has connected to the Bluetooth printer and can control to print patient information After the...

Page 53: ...y and enter the main interface of patient history information On the main interface of patient history information there are patient information list patient information edit key patient information p...

Page 54: ...on Figure 5 11 2 On the main interface of patient history information there are patient information list patient information edit key patient information print key delete patient information key patie...

Page 55: ...interface or the main interface of patient history information Delete batch information On the main interface or the editing interface of patient history information long press certain patient inform...

Page 56: ...rface or the editing interface of patient history information There are four operations in the operation bar of delete and upload batch information selection interface i e select all key batch delete...

Page 57: ...unchanged and the host computer reconnects according to the connection IP address on the prompt interface and the device port No After successful connection patient information transmission will be co...

Page 58: ...observe the bladder B ultrasound image of the patient move the probe to center the image and maximize the section area of the bladder During scanning 12 real time bladder B ultrasound images Figure 5...

Page 59: ...n of the bladder will be displayed on the screen At this time click the scanning projection in the round frame to view the 3D image of the bladder Or click the 3D images of the bladder to view the sca...

Page 60: ...300 350 400 ml or OFF The default option is OFF i e the volume alert is off After the selection the will automatically appear in the setting item confirmation field behind the selected alert preset P...

Page 61: ...n and return to the main interface If the Auto Connect on the password management interface is off i e Manual Connect and the Use Wifi Password is off i e Manual Connect which doesn t require to enter...

Page 62: ...box on the system information view interface to enter the software version upgrade interface Figure 5 12 7 1 click the Upgrade Bar on this interface to pop up the APP update page click Install on this...

Page 63: ...sword C Login key 6 11 2 Main interface of host computer There are four menu items host computer information company LOGO patient information and12 bladder ultrasound images on the main interface Amon...

Page 64: ...area K Patient ID item 6 11 3 Import Data Click the Import Data on the main interface of host computer to pop up the drop down menu including 2 options From Wifi wireless import from Wifi and From Us...

Page 65: ...tion interface Click the Option on the main interface of host computer to pop up the drop down menu select Settings to pop up option interface dialog box and enter corresponding information in the inp...

Page 66: ...es Click the selection box of 6 or 12 Images and select 6 Images to display 6 bladder ultrasound images on the print interface Figure 6 5 and click the Print key for printing the printing contents don...

Page 67: ...er print interface 6 images A Display 6 or 12 image selection box B Print key C Patient information D 6 bladder ultrasound images E Hospital name F Department name The host computer print interface 12...

Page 68: ...Save to PDF on the main interface of host computer to pop up the Save to PDF dialog box Operations possible Select the file save path enter the file name and select the file save type Among them the...

Page 69: ...password C New password input confirmation box D Save key 6 12 Battery power identifier The battery power identifier Figure 5 15 is displayed at the upper left of the main interface of the instrument...

Page 70: ...adder B ultrasound image during pre scanning During scanning just keep the probe still During pre scanning and scanning under the easy mode there is a green indicator line in the center of the circle...

Page 71: ...ter The operation mode of positioning first and scanning later is realized In the process of projection positioning when the projection is green it means that the bladder is in the scanning area If th...

Page 72: ...al requirements 4 Dry the surface of the system or dry it with cleaning cloth according to the method described on the detergent label 5 Clean fingerprints or other contaminants on the display screen...

Page 73: ...and the examination part of the patient If the coupling agent does not meet the standard it will damage the probe and irritate the patient s skin 3 The window surface of the probe shall be cleaned aft...

Page 74: ...r charger and dispose it according to the disposal regulations on scrapped battery 7 There is a fuse in the attached battery charger which is non replaceable If the attached battery charger cannot wor...

Page 75: ...humidity range 10 80 Atmospheric pressure range 50kpa 106kpa 8 3 Transportation The marks on the packaging boxes of the instrument shall meet the requirements of GB T191 200 Packaging Pictorial markin...

Page 76: ...Document No 64 91 The interior shall be well ventilated and avoid intense sunlight and corrosive gas erosion...

Page 77: ...e instrument battery is normal 2 Environment inspection for interference of electric field and magnetic field in the surrounding space of the instrument The tablet computer cannot connect with the sca...

Page 78: ...cument No Appendix A Schematic Diagram of the Complete Machine Identification Schematic diagram of the nameplate of M4 HD complete machine Schematic diagram of the nameplate on M4 HD outer packaging b...

Page 79: ...Document No Schematic diagram of the nameplate of M4 HD base Schematic diagram of the nameplate of M4 HD charger...

Page 80: ...Document No Appendix B Ultrasound Output Report...

Page 81: ...Document No...

Page 82: ...Document No...

Page 83: ...e manufacturer electromagnetic immunity M4 HD bladder scanner is intended for use in the electromagnetic environment specified below The purchaser or user shall ensure that it is used in such an envir...

Page 84: ...nded installation site shall be measured to ensure that it is low enough Note UT refers to the AC network voltage prior to the application of test voltage Table 204 Guideline and statement of the manu...

Page 85: ...ed that the field strength of the place where M4 HD bladder scanner locates is higher than the above RF compliance level observe M4 HD bladder scanner to verify that it can operate normally If abnorma...

Page 86: ...quency of the transmitter wherein P is the maximum rated output power of the transmitter in watt W provided by the transmitter manufacturer Note 1 At the frequency points of 80 MHz and 800 MHz the for...

Page 87: ...e pursuant to part 15 of the FCC Rules These limits are designed to provide reasonable protection against harmful interference in a residential installation This equipment generates uses and can radia...

Page 88: ...by SUZHOU LISCHKA MEDTECH CO LTD 2F BuildingG4 Kunshan Hi Tech Medical Device Industrial Park NO 999 Qujia Road Qiandeng Town Kunshan City Suzhou Jiangsu CHINA 215300 After sales service address Kunsh...

Page 89: ...Caresono is the only applicable calibration phantom model designated Since the purchased phantoms provided by the supplier are manufactured separately the consistency cannot be guaranteed The materia...

Page 90: ...the Auto Calibrate is completed Press cancel key on the Auto Calibrate progress interface Return to the Auto Calibrate interface Step IV The calibration result interface Figure 4 appears after the Au...

Page 91: ...libration confirmation interface prompt box C Auto Calibrate start key D Auto Calibrate cancel key Figure 3 M4 HD Auto Calibrate progress interface A Auto Calibrate progress prompt box B Auto Calibrat...

Reviews: