background image

1. Safety Precautions


This  product  complies  with  the  requirements  of  the  following  European  Community  directives: 
2004/108/EC  (Electromagnetic  Compatibility)  and  2006/95/EC  (Low  Voltage)  as  amended  by 
2004/22/EC (CE-Marking). 
 
To  ensure  safe  operation  of  the  equipment  and  eliminate  the  danger  of  serious  injury  due  to  short 
circuits (arcing), the following safety precautions must be observed. 
Damages resulting from failure to observe these safety precautions are exempt from any legal claims 
whatever. 
 

Prior  to  connection  of  the  equipment  to  the  mains  outlet,  check  that  the  available mains  voltage 
corresponds to the voltage setting of the equipment. 

Connect the mains plug of the equipment only to a mains outlet with earth connection. 

*    Do not practice device unattended. 
*   The instrument must be set up so that the power plug can be removed from the socket easily. 

do not place the equipment on damp or wet surfaces. 

do not subject the equipment to direct sunlight or extreme temperatures. 

do not subject the equipment to extreme humidity or dampness 

replace  a  defective  fuse  only  with  a  fuse  of  the  original  rating.  Never  short  circuit  fuse  or  fuse 
housing 

do not exceed the maximum permissible input rating. 

conduct measuring works only in dry clothing and in rubber shoes, i. e. on isolating mats. 

comply with the warning labels and other info on the equipment 

do not cover the ventilation slots of the cabinet to ensure that air is able to circulate freely inside. 

do not insert metal objects into the equipment by way of the ventilation slots 

do not place water-filled containers on the equipment (danger of short-circuit in case of knock over 
of the container) 

do not operate the equipment near strong magnetic fields (motors, transformer etc.) 

do not subject the equipment to shocks or strong vibrations 

keep hot soldering iron or guns away from the equipment 

allow the equipment to stabilize at room temperature before taking up measurement (important for 
exact measurements) 

do not modify the equipment in any way 

do  not  place  the  equipment  face-down  on  any  table  or  work  bench  to  prevent  damaging  the 
controls at the front. 

Do not operate the meter before the cabinet has been closed and screwed safely as terminal can 
carry voltage. 

*


Periodically  wipe  the  cabinet  with  a  damp  cloth  and  mid  detergent.  Do  not  use  abrasives  or 
solvents. 

The meter is suitable for indoor use only. 

Do not store the meter in a place of explosive, inflammable substance. 

Opening the equipment and any service- and repair work must be performed by qualified service 
personal.  Repair  work  should  be  performed  in  the  presence  of  a  second  person  trained  to 
administer first aid, if needed. 

*

    - Measuring instruments do not belong to children hands- 

 
Cleaning the cabinet


Prior to cleaning the cabinet, withdraw the mains plug from the power outlet.  Clean only with a damp, 
soft cloth and a commercially available mild household cleanser. Ensure that no water gets inside the 
equipment to prevent possible shorts and damage to the equipment. 


-9- 

Summary of Contents for 6070

Page 1: ...PeakTech 6070 Bedienungsanleitung Operation Manual Labornetzgeräte Laboratory Power Supplies ...

Page 2: ...m Inneren der Geräte keine metallenen oder andere Gegenstände durch die Ventilationsschlitze stecken keine Flüssigkeiten auf den Geräten abstellen Kurzschlussgefahr beim Umkippen des Gefäßes Geräte nicht in der Nähe starker magnetischer Felder Motoren Transformatoren usw betreiben starke Erschütterungen der Geräte vermeiden Vor Aufnahme des Messbetriebes sollten die Geräte auf die Umgebungstempera...

Page 3: ... Ablesen von Werten Fernerhin ist hervorzuheben dass die Spannung über den gesamten Bereich fest eingestellt werden kann wodurch der Bedienkomfort erhöht wird und überflüssige ungenaue Arbeitsschritte verhindert werden Achtung Die PeakTech 6070 verfügt über die Möglichkeit der Aktivierung einer Tastensperre Bitte lesen Sie Kapitel 5 3 auf Seite 7 für weitere Informationen Achtung Labornetzgeräte s...

Page 4: ...aststabilität bei 0 100 Last CV 0 01 3mV CC 0 02 3mA Restwelligkeit bei 100 Last CV 0 5mVeff CC 1mAeff Überlastschutz konstante Strombegrenzerschaltung und kurzschlussfest Genauigkeit der Spannungsanzeige 0 5 5 Stellen Genauigkeit der Stromanzeige 1 0 5 Stellen Betriebstemperatur 0 C 40 C 80 RH Abmessungen B x H x T 135 x 165 x 275 mm Gewicht 5 5 kg Zubehör Netzkabel und Bedienungsanleitung 3 ...

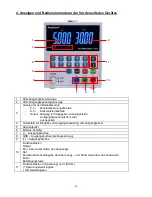
Page 5: ...nung strom wird ausgegeben 4 Tastenfeld zur Eingabe von Ausgangsspannung und Ausgangsstrom 5 Dezimalpunkt 6 Ein Aus Schalter 7 Ausgangsbuchse 8 GND Ausgangsbuchse Gehäuseerdung 9 Ausgangsbuchse 10 Funktionstasten Output Ein bzw Ausschalten des Ausganges Del Korrekturtaste bei Eingabe der Spannungs und Stromwerte über das Tastenfeld Enter Bestätigungstaste 11 Funktionstasten V Spannung und I Strom ...

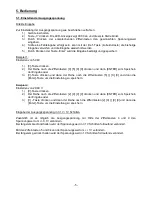
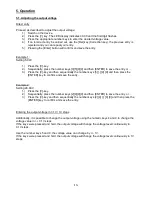
Page 6: ...zum Speichern der Eingabe oder 3 V Taste drücken und dann der Reihe nach die Zifferntasten 5 9 9 und dann die Enter Taste um die Einstellung zu speichern Beispiel 2 Einstellen von 29 99 V 1 V Taste drücken 2 Der Reihe nach die Zifferntasten 2 9 9 9 drücken und dann ENTER zum Speichern der Eingabe oder 3 V Taste drücken und dann der Reihe nach die Zifferntasten 2 9 9 9 und dann die Enter Taste um d...

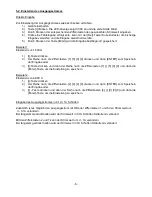
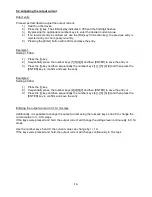
Page 7: ...zum Speichern der Eingabe oder 3 I Taste drücken und dann der Reihe nach die Zifferntasten 1 5 9 9 und dann die Enter Taste um die Einstellung zu speichern Beispiel 2 Einstellen von 4 999 A 1 I Taste drücken 2 Der Reihe nach die Zifferntasten 4 9 9 9 drücken und dann ENTER zum Speichern der Eingabe oder 3 I Taste drücken und dann der Reihe nach die Zifferntasten 4 9 9 9 und dann die Enter Taste um...

Page 8: ...ston ertönt 3 Korrekturtaste Del Kommt es bei der Eingabe des Spannungs bzw Stromwertes zu einer Fehleingabe und die Enter Taste wurde noch nicht betätigt so kann die aktuelle Eingabe durch Drücken der Del Taste verworfen werden Die Anzeige wechselt dann zurück in den Anfangszustand 0000 erste Stelle blinkt 6 Achtung Im Falle eines Kurzschlusses am Ausgang wird der Strom begrenzt durch die Stromko...

Page 9: ...it schriftlicher Genehmigung des Herausgebers gestattet Letzter Stand bei Drucklegung Technische Änderungen des Gerätes welche dem Fortschritt dienen vorbehalten Hiermit bestätigen wir dass alle Geräte die in unseren Unterlagen genannten Spezifikationen erfüllen und werkseitig kalibriert geliefert werden Eine Wiederholung der Kalibrierung nach Ablauf von einem Jahr wird empfohlen PeakTech 10 2015 ...

Page 10: ...inet to ensure that air is able to circulate freely inside do not insert metal objects into the equipment by way of the ventilation slots do not place water filled containers on the equipment danger of short circuit in case of knock over of the container do not operate the equipment near strong magnetic fields motors transformer etc do not subject the equipment to shocks or strong vibrations keep ...

Page 11: ...tion and the reading of the values Henceforth should be emphasized that the voltage can be fixed over the whole range making the convenience is increasing and unnecessary inaccurate steps can be prevented Caution The PeakTech 6070 provides a keylock function Please read chapter 5 3 on page 15 for more detailed information Caution Laboratory Power Supplies are not designed for charging batteries An...

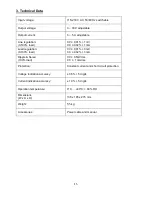
Page 12: ... 0 02 1mA Load regulation 0 100 load CV 0 01 3mV CC 0 02 3mA Ripple Noise 100 load CV 0 5mVrms CC 1mArms Protection Constant current and short circuit protection Voltage indication accuracy 0 5 5 digits Current indication accuracy 1 0 5 digits Operation temperature 0 C 40 C 80 RH Dimensions W x H x D 135 x 165 x 275 mm Weight 5 5 kg Accessories Power cable and manual 11 ...

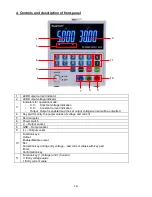
Page 13: ... output voltage current will be outputted 4 Key pad for entry the output values of voltage and current 5 Decimal point 6 Power switch 7 Output socket 8 GND Output socket 9 Output socket 10 Function keys Output Enable Disable output Del Correction key during entry voltage and current values with key pad Enter Confirmation key 11 Function key V Voltage und I Current V Entry voltage value I Entry cur...

Page 14: ...y and then sequentially the number keys 5 9 9 and then press the ENTER key to confirm and save the entry Example 2 Setting 29 99 V 1 Press the V key 2 Sequentially press the number keys 2 9 9 9 and then ENTER to save the entry or 3 Press the V key and then sequentially the number keys 2 9 9 9 and then press the ENTER key to confirm and save the entry Entering the output voltage in 0 1V 1V steps Ad...

Page 15: ...e I key and then sequentially the number keys 1 5 9 9 and then press the ENTER key to confirm and save the entry Example 2 Setting 4 999 A 1 Press the I key 2 Sequentially press the number keys 4 9 9 9 and then ENTER to save the entry or 3 Press the I key and then sequentially the number keys 4 9 9 9 and then press the ENTER key to confirm and save the entry Entering the output current in 0 1A 1A ...

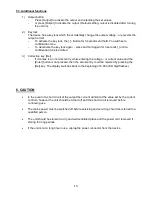
Page 16: ...to an incorrect entry while entering the voltage or current value and the Enter button is not pressed then the actual entry could be rejected by pressing the Del key The display switches back to the beginning of 0 000 first digit flashes 6 CAUTION In the event of a short circuit at the output the current will limit at the value set by the current controls however the unit should be turned off and ...

Page 17: ...al knowing Technical changings which are in the interest of progress reserved We herewith confirm that the units are calibrated by the factory according to the specifications as per the technical specifications We recommend to calibrate the unit again after one year PeakTech 10 2015 Po PeakTech Prüf und Messtechnik GmbH Kornkamp 32 DE 22926 Ahrensburg Germany 49 0 4102 42343 44 49 0 4102 434 16 in...

Reviews: