25
* Mow twice, at different height settings, (high, then low),
* Remember that horsepower requirements will vary with
if grass is extra tall.
the mowing conditions such as type and height of turf
the grass blade length at any given time.)
grass, moisture content, amount of leaves, whether the
(Experts recommend not cutting off more than 1/3 of
terrain is flat or hilly, etc.
PTO MODELS
C. With the mower at high idle speed, engage the
mower
A. Perform BEFORE EACH USE the maintenance list
ENGINE DRIVEN MODELS
deck.
General Safety
levers of the mower.
A. Perform BEFORE EACH USE the maintenance list
in the next section.
deck.
B. Start the engine/blower/blade assembly.
will increase horsepower requirements.
SECTION III
B. Start mower.
B. Start mower.
engagement handle of the collection system away
OPERATING INSTRUCTIONS
Only qualified people familiar with this operator’s manual
and the mower’s operator’s manual should operate this
machine.
Operation And Tips On Mowing
in the next section.
D. While seated in the operator’s seat, rotate the
from the mower. Continue to rotate the handle until it
stops in an over-center position. With the blower
engaged, you can proceed to operate the control
C. With the mower at high idle speed, engage the
mower
D. Proceed to operate the control levers of the mower.
NOTE:
If the collection system does not appear to be
collecting the grass clippings, disengage the deck
and PTO assembly, then, engage the parking brake and
turn the mower off. Check upper and lower hoses for any
clogs.To obtain the maximum effectiveness from your
collection system, the tips listed below should be
followed:
* Watch your speed- Normal conditions will allow a
speed of up to approximately 4 mph, but thick, heavy
damp conditions will require reduced ground speed.
* Mow with sharp blades- A sharp blade cuts cleaner.
* Wet grass and leaves will decrease effectiveness and
* Mow at higher cutting heights- Remove and mulch no
more than 2” of grass length with each mowing.
ENGINE DRIVEN MODELS
Disengagement Of The PTO Assembly
B. Disengage the mower deck.
A. To disengage the PTO assembly, move Bagger PTO
WARNING:
The PTO assembly blades will continue to
spin. DO NOT TOUCH the PTO assembly, pulleys, or
the belt until the tractor is turned off. DO NOT adjust the
belt tension until the mower is turned off. Refer to the
Belt Installation section of the manual.
PTO MODELS
switch to the off position.
B. (Briggs & Stratton 900 Series) To stop the engine,
throttle the engine to the stop position.
C. (6.5HP Briggs & Stratton Vanguard) To stop the
engine, move the fuel lever to the OFF position.
Unloading The Collection System
NOTE:
To determine when the collection bags are full,
follow the following steps:
A. Stop the forward movement of the mower.
D. Engage the parking brake.
F. To remove the bags from the frame, slide bags out
and turn bags over to deposit clippings.
C. Disengage the PTO assembly.
E. Once the parking brake has been engaged, then and
only then, walk behind the mower and check the
collection bags by first unhooking the rubber strap
with S-hook that secures the plastic top, then lift the
plastic hood. Load in bags should not exceed the
height of the installed bag.
G. Slide empty bags back onto the frame and secure
plastic top with the rubber strap with S-hook.
NOTE:
Do not allow collection bags to become over-
filled as potential damage may occur to your
equipment. Also, be sure to clean the hood screen as
needed.
sharpen blades while still attached to the mower.
Maintenance Checklist
wrapped around them.
MAINTENANCE
Before each use:
1. Check blades and spindles to be sure that no foreign
objects, such as wire or steel strapping bands, are
necessary to sharpen the blades, remove the blades
SECTION IV
2. Inspect blades for wear. Replace if necessary. If it is
from the spindles before sharpening. DO NOT
2017 (v1.0)
Summary of Contents for Pro 12 DFS 49621203
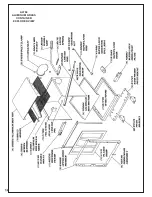
Page 18: ...18 A0794 ALUMINUM GRASS CONTAINER EXPLODED VIEW...
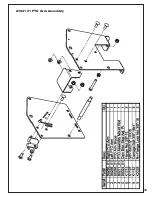
Page 19: ...19 A1841_01 PTO Arm Assembly...
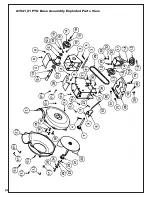
Page 20: ...20 A1941_01 PTO Base Assembly Exploded Parts View...
Page 21: ...21 A1941_01 PTO Base Assembly Exploded Parts List...
Page 22: ...22 A0623 PTO Assembly w Small Pulley Guard Exploded Parts View...
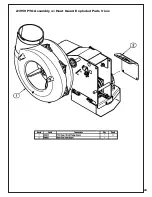
Page 23: ...23 A1950 PTO Assembly w Heat Guard Exploded Parts View...
Page 24: ...24...
Page 28: ...28...

