background image

10

2016-04-21    #:220-9010-1

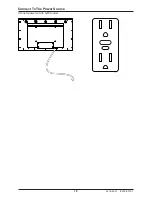
Connect To The Power Source

Connect power cord to GFCI outlet.

Summary of Contents for UV491

Page 1: ...1 2016 04 21 220 9010 1 ULTRAVIEW OUTDOOR TELEVISION MODEL UV491 UV551 User Manual www peerless av com ...

Page 2: ... TV For Mounting 11 Prepare The TV For Usage 12 Battery Installation And Replacement 12 Operating Instructions 13 Power On Off the TV 13 Onboard Controls 13 Navigating The On Screen Menu 14 Picture 14 Audio 14 Setup 14 Time 15 Lock 15 Channel 15 RS 232C Serial Control Of The TV 16 Tips 17 Troubleshooting 17 Care Of Screen 17 Mobile Telephone Warning 17 End Of Life Directives 17 License Agreement T...

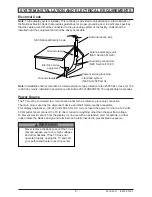
Page 3: ...nding connection The main plug is used as the disconnect device and shall remain readily accessible This display operates on 100 240 volts 50 60 Hz AC current Insert the power cord into a 120 volts 60 Hz outlet Never connect the TV to direct current or anything other than the specified voltage To prevent electric shock from the display do not use with an extension cord receptacle or other outlet u...

Page 4: ...ersonnel Servicing is required when the apparatus has been damaged in any way such as electrical supply cord or plug is damaged does not operate normally or has been dropped Only use attachments accessories specified by the manufacturer In case of emergency such as fire or electric shock caused by the product immediately contact 911 or proper emergency police fire service agencies in your country ...

Page 5: ...roducts to fall Do NOT install the product near any poisonous gas or chemically unstable atmosphere as it may cause fire Do NOT submerge TV in water Do NOT pressure wash TV Although the IP55 rating protects against jets of water high pressure force may compromise the TV Do NOT install the product near any strong magnetic or electrical current field as it may cause fire electric shock or severe dam...

Page 6: ...ng measures 1 Reorient or relocate the receiving antenna 2 Increase the separation between the equipment and receiver 3 Connect the equipment into an outlet on a circuit different from that to which the receiver is connected 4 Consult the dealer or an experienced radio TV technician for help This device complies with Part 15 of the FCC Rules Operation is subject to the following two conditions Thi...

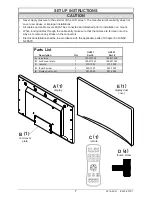
Page 7: ...XIT CBL DVD MUTE POWER VCR SAT SOURCE TV 1 4 7 2 5 8 0 3 6 9 VOL REW PLAY FF MENU REC STOP PAUSE GUIDE CH Never apply pressure to the exterior of the LCD screen The manufacturer s warranty does not cover user abuse or improper installations All cables and cable covers MUST be connected and attached prior to installation on mount When routing cables through the cable entry make sure that the cables...

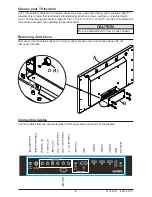
Page 8: ... R Component 1 PR Component 1 PB Component 1 Y HDMI 1 VGA PC Audio USB Audio Out HDMI 3 A B D 4 b r Choose your TV location The TV should be installed in a location where the screen will not be facing direct sunlight Ideal TV placement is an area that is shaded by landscaping structures trees awnings or elevated patio cover The operating temperature range of the TV is 24 to 122 F Do NOT use the TV...

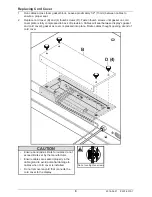
Page 9: ...back of television Cables will seal between display s gasket and cord cover s gasket as cover is pressed into place Route cables thought opening at end of cord cover B D 4 Ensure bend radius limits for cables do not exceed limits set by the manufacturer Ensure cables are seated properly in the cable gland to avoid potential damage to cables when cord cover is installed Do not remove lanyard that c...

Page 10: ...10 2016 04 21 220 9010 1 Connect To The Power Source Connect power cord to GFCI outlet ...

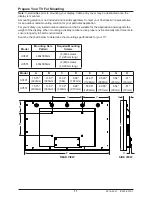
Page 11: ...cation and supports the weight of the display When mounting a display outdoors use proper environmentally rated mounts to ensure longevity in harsh environments Examine the chart below to determine the mounting specifications for your TV B F D Model Mounting Hole Pattern Required Mounting Screws UV491 400x300mm 4 M8 screws 12 20mm long UV551 400x300mm 4 M8 screws 12 20mm long Model A B C D E F G H...

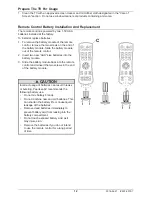
Page 12: ... batteries This can shorten the battery life or cause liquid leakage of the batteries Remove dead batteries immediately to prevent battery acid from leaking into the battery compartment Do not touch exposed battery acid as it may injure skin Remove the batteries if you do not intend to use the remote control for a long period of time CAUTION Prepare The TV For Usage 1 Clean the TV with an approved...

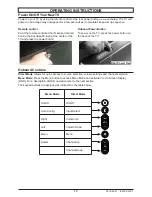
Page 13: ...rd Power Button To power on the TV press the power button on the back of the TV Rear Power Key OPERATING INSTRUCTIONS Onboard Controls Direct Mode Allows for quick access to source selection volume settings and channel selection Menu Mode Press the Menu button to access Menu Mode and activate the On Screen Display OSD For a description of OSD operation refer to the next section The keypad buttons ...

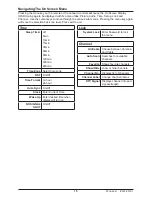
Page 14: ... PCM Raw Surround On Off AVC On Off Navigating The On Screen Menu Pressing the menu key on the remote or the onboard controls will cause the On Screen Display OSD main page to be displayed with five menu tabs Picture Audio Time Setup Lock and Channel Use the cursor keys to move through the various sub menus Pressing the menu key again will move the selection back one level Press exit to quit Setup...

Page 15: ...e Sleep Timer off 5min 10min 15min 30min 60min 90min 120min 180min 240min Time Zone Select time zone DST On Off Time Format 12 hour 24 hour Auto Sync On Off Clock Enter Current Time Wake Up Enter desired time when display will turn on NO SIGNAL SHUT On Off Lock System Lock Enter Password to lock the menu Channel Air Cable Choose between Antenna and Cable Auto Scan Searches for available channels F...

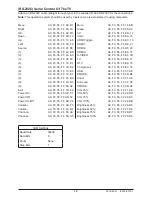
Page 16: ... F3 A0 F0 55 FF 01 FE A0 F0 55 FF 42 BD A0 F0 55 FF 43 BC A0 F0 55 FF 0F F0 A0 F0 55 FF 1E E1 A0 F0 55 FF 1D E2 A0 F0 55 FF 1C E3 A0 F0 55 FF 18 E7 A0 F0 55 FF 45 BA A0 F0 55 FF 4C B3 A0 F0 55 FF 56 A9 A0 F0 55 FF 1B E4 A0 F0 55 FF AE 51 A0 F0 55 FF AD 52 A0 F0 55 FF 0B F4 A0 F0 55 FF 0A F5 A0 F0 55 FF 40 BF A0 F0 55 FF 55 AA A0 F0 55 FF 5A A5 A0 F0 55 FF 14 EB A0 F0 55 FF 53 AC A0 F0 55 FF ED 12 ...

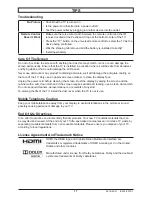
Page 17: ...fe Directives In an effort to produce environmentally friendly products Your new TV contains materials that can be recycled and reused At the end of your TV life specialized companies can minimize TV waste by separating reusable materials from non reusable materials Please ensure you dispose of your TV according to local regulations License Agreement And Trademark Notice Troubleshooting TIPS No Pi...

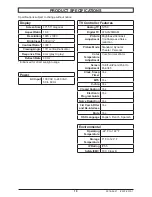
Page 18: ...ightness Contrast Tint Sharpness Noise reduction Picture Mode Standard Dynamic Theater Personal Color Temperature Adjustment Cool Normal Warm Screen Adjustment 16 9 Full Zoom Point to Point 4 3 Clock Sleep Timer Yes MTS Yes V chip Yes Closed Caption Yes Electronic Program Guide Yes Noise Reduction Yes 3 D Comb Filter and De interlace Yes Mute Yes OSD Language English French Spanish Enhanced for di...

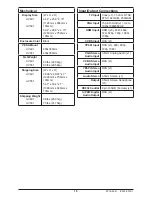
Page 19: ... RCA x1 Audio Stereo 3 5mm Stereo x1 Output 3 5mm Stereo Headphone x1 RS232 Control 9 pin D SUB Female x1 S PDIF Digital Audio Output RCA x1 Mechanical Display Size UV491 UV561 W x H x D 44 4 x 25 9 4 15 1128mm x 658mm x 105mm 50 4 x 29 6 x 4 15 1280mm x 752mm x 105mm Enclosure Color Black VESA Mount UV491 UV551 400x300mm 400x300mm Net Weight UV491 UV551 53 lbs 24 04kg 63 lbs 28 58kg Shipping Size...

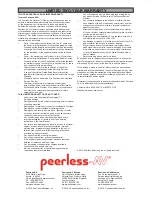
Page 20: ...intenance improper storage alteration to the unit or failure by the consumer to follow operating instructions provided by the user manual Any owner other than the original owner Any unit purchased from an unauthorized seller If the original product serial number has been removed defaced or tampered with in any way Any packaging or transportation charges incurred in connection with warranty service...

Reviews: