background image

TECHNICAL INSTRUCTIONS

4853989
10/ 2003

Our policy is one of continuous improvement and we reserve the right to alter specifications of our products at any time.

- 19 -

Recommended grease:

Texaco Regal Multifak All purpose EP2 (or equivalent)

4.3

BEARINGS - GENERAL

These instructions do not supersede any information issued by the bearing manufacturers, to whom
application should be made for more comprehensive literature.

Care and maintenance of bearings is a matter of ensuring that they are:

a. Correctly lubricated at intervals.

b. Removed, cleaned and refitted with care.

c. Tools used and work areas should be clean.

To remove a bearing, use correctly suited withdrawal equipment.

If other means are not available, a

hammer and soft metal drift may be used to tap evenly around the circumference of the inner ring.

CAUTION: Damage can be caused by exerting force against the outer ring of a ball bearing.

Ball bearings should not be dismantled.

Clean bearings thoroughly with an approved fluid.

Dry the bearings with dry compressed air. Do not spin a clean dry bearing. All the cleaning fluid must be
removed from the bearing since it might damage the lubricating properties of the grease.

Inspect the bearing for wear, fractures, cracks, corrosion or other damage which may necessitate bearing
replacement.

Work approximately 1 ounce of grease into both sides of bearing immediately after drying and inspecting, to
prevent corrosion.

Check that the bearing, shaft and housing are clean and undamaged.

When fitting the bearing on the shaft, the use of a soft drift and hammer should be avoided if possible. The
drift could shed flakes of metal into the bearing. If a lock nut is used to "push-home" the bearing then a
special hook or "C" spanner must be used to turn it. A drift and hammer applied to one slot would cause
damage to the nut and introduce flakes of metal into the bearing. The tab washer should not be in place
during this procedure since there is a risk of shearing off the inner tab. The nut should be removed when
the bearing is fully pushed home then the tab washer placed in position and the nut refitted.

In general soaking bearings in a hot oil bath prior to fitting to the shaft is recommended.

After assembly and when the bearing housings are in position, the bearing housing cavity incorporating the
grease nipple should be fully charged with the recommended grease leaving the cavity on the other side of
the bearing free of grease.

Summary of Contents for HYF

Page 1: ...cifications of our products at any time 1 Peerless Pump Company MODEL THF TYF TXF and HYF HORIZONTAL SPLIT CASE FIRE PUMPS INSTALLATION OPERATION and MAINTENANCE Peerless Pump Company 2005 Dr Martin Luther King Jr Street P O Box 7026 Indianapolis Indiana 46207 7026 Phone 317 925 9661 Fax 317 924 7388 www peerlesspump com ...

Page 2: ......

Page 3: ...6 2 3 PREPARATION 7 2 4 LOCATION 7 2 5 FOUNDATION 7 2 6 INSTALLATION OF BASE PLATES 7 2 7 ALIGNMENT PROCEDURE 11 2 7 1 ANGULAR 12 2 7 2 PARALLEL 12 2 7 3 AXIAL 12 2 8 SUCTION and DISCHARGE PIPING 12 3 OPERATION 13 3 1 BEFORE STARTING After Installation or Maintenance 13 3 2 STARTING 13 3 3 RUNNING 14 3 4 STOPPING 14 TABLE 1 FAULT FINDING CHART 15 TABLE 2 FAULT RECTIFICATION CHART 16 4 MAINTENANCE ...

Page 4: ... operation maintenance installation modification or adjustment This warranty does not cover parts repaired outside Seller s factory without prior written approval Seller makes no warranty as to starting equipment electrical apparatus or other material not of its manufacture since the same are usually covered by warranties of the respective manufacturers thereof In the event notwithstanding the ter...

Page 5: ...chemical hazards c Endangering the environment by releasing hazardous substances Ill COMPLIANCE WITH SAFETY AT WORK REGULATIONS When operating the pump unit the instructions contained in this manual the relevant national accident prevention regulations and any other service and safety instructions issued by the operator are to be observed IV UNAUTHORIZED ALTERATIONS AND FITTING OF SPARE PARTS Modi...

Page 6: ...icuous notice is displayed warning that the unit is under repair If a major overhaul is being carried out it is advisable to have a qualified electrician temporarily disconnect the unit 1 4 2 2 PUMP HAZARDS 1 Ensure that the pump has no air in the suction line and casing The pump rotating components rely on the liquid being pumped for cooling and lubrication A failure to prime could result in pump...

Page 7: ... motor pump feet and flanges b Bent shafts c Damaged motor end bells bent eyebolts or damaged boxes d Missing items Loose parts are often wrapped individually and or fastened to the equipment If any damage or losses have occurred notify the transit company immediately and PEERLESS PUMP COMPANY When unloading pump units only lift using the lifting eyes on the base plate or support frame DO NOT USE ...

Page 8: ...rigid enough to avoid any twisting or misalignment As a rough guide it should be 12 inches wider on all sides with the weight at least 1 1 5 times as heavy as the pump unit Depth should be sufficient to achieve the necessary weight and deep enough to accommodate holes for foundation bolts A suitable concrete mixture by volume is 1 2 3 Cement Sand Aggregate The foundation should be reinforced with ...

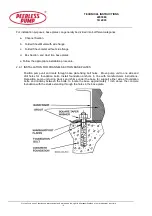
Page 9: ...Iron base plates e Follow the appropriate installation procedure 2 6 1 INSTALLATION FOR CHANNEL SECTION BASE PLATES Position pump unit and mark through base plate fixing bolt holes Move pump unit to one side and drill holes for foundation bolts Install foundation anchors in line with manufacturers instructions Reposition pump unit using blocks and shims under the base for support either side of fo...

Page 10: ...on either flange and that both pump and pipe flanges are square to each other GROUTING PROCEDURE Grouting compensates for uneven foundations distributes weight of unit and prevents shifting Use an approved non shrinking grout as follows Soak top of concrete foundation thoroughly then remove surface water Completely fill base plate with grout After grout has thoroughly hardened check foundation bol...

Page 11: ...roved grouting procedure See procedure detailed under Channel Section base plate The suction and discharge piping should be installed after the pump unit ensuring that no pipe strain is placed on either flange and both pump and pipe flanges are square to each other 2 6 3 INSTALLATION FOR FOLDED METAL BASE PLATE WITHOUT SIDE FLANGES Position base plate and using a long enough bit drill through the ...

Page 12: ...etting and leveling unit Build strong form work around foundation to contain grout Soak top of concrete foundation thoroughly then remove surface water Completely fill base plate with grout After grout has thoroughly hardened torque down foundation bolts then re check alignment Flat plain washers should be used on top of the base plate Approximately 14 days after the grout has been poured or when ...

Page 13: ... not be used to compensate for excessive misalignment of the pump and driver shafts Inaccurate alignment results in vibration and excessive wear on the bearings sleeve or shaft and wear rings There are three forms of misalignment a Angular b Parallel c Axial 2 7 1 ANGULAR shafts with concentric axes but not parallel To check for angular alignment mount a dial gauge on either flange and rotate it a...

Page 14: ...e to comply with this may cause the formation of air pockets in the piping and thus prevent the correct operation of the pump The suction pipe should be as short and direct as possible and should be flushed clean before connecting to the pump Horizontal suction lines must have a gradual rise to the pump The discharge pipe is usually preceded by a non return valve or check valve and a discharge gat...

Page 15: ...lied Prime the pump and start the pump driver When the pump is operating at full speed open the discharge valve slowly Do not operate the pump for prolonged periods with a closed discharge valve so as to avoid overheating The pump should be shut down at once and the trouble corrected if the pump is running at its rated speed and found to have any of the following defects a No liquid delivered b No...

Page 16: ... of continuous improvement and we reserve the right to alter specifications of our products at any time 15 c Successful operation of the pump depends on accurate coupling alignment It is recommended that the alignment is re checked after the preliminary run ...

Page 17: ...rimed 1 Speed too low 2 Speed too high 3 Air leak on suction 4 Air or gas in liquid 5 Discharge head too high above rating 6 Suction lift too high 7 Not enough suction head for hot liquid 8 Inlet pipe not sufficiently submerged Liquid viscosity greater than rating 9 Liquid density greater than rating 10 Insufficient net inlet head 11 Impeller plugged up 12 Wrong direction of rotation 13 Excessive ...

Page 18: ...onsult supplier for recommended size 11 Insufficient net inlet head Increase positive suction head on pump by lowering pump 12 Impeller plugged up or partially choked Dismantle pump and clean impeller 13 Wrong direction of rotation Check motor rotation with directional arrow on pump casing 14 Excessive wear ring clearance Dismantle inspect and replace if necessary 15 Damaged impeller Inspect impel...

Page 19: ...ing all maintenance procedures 4 1 2 FREQUENCY OF INSPECTIONS A general guide is shown in Table 3 Depending on operation and environmental conditions together with a comparison of previous inspections the frequency may be altered to maintain satisfactory operation of the plant to suit established operating procedures 4 2 LUBRICATION GREASE LUBRICATED BEARINGS Bearings are initially lubricated duri...

Page 20: ...nce it might damage the lubricating properties of the grease Inspect the bearing for wear fractures cracks corrosion or other damage which may necessitate bearing replacement Work approximately 1 ounce of grease into both sides of bearing immediately after drying and inspecting to prevent corrosion Check that the bearing shaft and housing are clean and undamaged When fitting the bearing on the sha...

Page 21: ... at 45 a s s h o w ni nF i g u r e4 4 1 u s i n ga dummy shaft of the same diameter as the pump shaft SOFT PACKING INSERTION 4 4 1 Soft packing lantern ring Insert the first packing ring and tap to the bottom of the stuffing box Each following ring should be installed in the same manner ensuring that the cut in each packing ring is rotated approximately 120 o to the last Install the lantern ring i...

Page 22: ...ure adjust the follower nuts by one sixth of a turn every 10 minutes until there is a small leakage only This leakage is essential to ensure packing is lubricated TABLE 4 ROUTINE MAINTENANCE CHART Every Week Visually check for leaks Check for vibration Hand test bearing housing for any sign of temperature rise Adjust gland as necessary to maintain slight leakage Every Month Check bearing temperatu...

Page 23: ...Our policy is one of continuous improvement and we reserve the right to alter specifications of our products at any time 22 Maintenance Record Date Summary of maintenance and repairs done replacement parts installed etc Installed and Startup ...

Page 24: ...continuous improvement and we reserve the right to alter specifications of our products at any time 3 Peerless Pump Company 2005 Dr Martin Luther King Jr Street P O Box 7026 Indianapolis Indiana 46207 7026 Phone 317 925 9661 Fax 317 924 7388 www peerlesspump com ...

Reviews: