background image

TABLE 1 

BEARING DEFECTS 

(Failures – Replace if found) 

DEFECT (Failure) 

Flaking and cracking 

APPEARANCE 

In the early stages, the surface of the inner and 
outer races develop small cracks, which flake. 
The cracks and flaking ultimately spread over 
the entire race surface. 

PROBABLE CAUSE 

1. 

Normal fatigue failure. 

2. 

Bearing loads in excess of bearing capacity 
caused by misalignment. 

Indentations 

Indentations or cavities in the inner and outer 
races. 

1. 

Dirt in the bearings. 

2.     Excessive impact loading of the bearings  
        such as improper mounting or removal. 

Broken separator (cage) 

Cracked separator or separator in pieces. 

1. 

Poor Lubrication. 

2. 

Misalignment of shaft. 

3. Excessive 

shaft 

deflection. 

Wear 

Bore and OD of outer ring of bearing galled or 
braided. 

1. 

Fit on shaft or in housing too loose. 

2.     Bearing locked by dirt and turning on shaft  
        or in housing. 

Fractured ring 

Hairline cracks or complete ring fracture. 

1. 

Forcing a cocked bearing on or off a shaft. 

2. 

Too heavy a press fit. 

Discoloration 

Rolling elements and races darker than normal 
appearance of bearing metal.(Moderate 
discoloration of rolling elements and races not 
a reason for discard.) 

        1.     Inadequate lubrication. 

Corrosion 

Rolling elements and raceways rusted. 

1. 

Water entering the housing. 

2. 

Condensation inside the housing. 

3. 

Lubricant breaks down into acid. (Wrong 
lubricant. 


pump) and push the bushings (63) to the rear of the stuffing 
boxes. Insert the same number of packing rings as were 
found during disassembly, on each side of the lantern ring 
Insert each ring separately and stagger the joints of 
successive rings 90 degrees.  Insert the glands (17) and set 
the nuts finger tight – DO NOT USE A WRENCH. 
h. Rotate shaft by hand to check that it runs free. 
i. Replace all drain plugs removed during disassembly. 

3-3. Reinstall plumbing (if used) for water-cooled bearings. 
a. Re-lubricated the bearings. Refer to Bulletin No. 2880549 
for grease type recommendation. 

It is most important to provide proper lubrication and keep 
bearings clean. Frequency of lubrication must be determined 
by experience as it depends upon bearing size, speed, 
operating conditions and location (environment).  Table II 
should be used as a guide for grease re-lubrication. Oil 
bottles should have a visible supply at all times. 
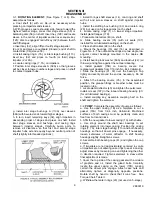
b. Oil. (Pumps are shipped without oil in the bearing 
housings.) Be sure to fill and adjust constant level oilers 
before initial start of pump. See Figure 9. 
   (1) Adjust dust cap to lowest possible position on base 
fittings. 
   (2) The pipe nipple and base fitting must be level – check 
with spirit level. If the pipe nipple is bent, replace it. A 
constant level oiler that is not level will not provide proper 
lubrication to the bearings. 
   (3) Fill bottle, screw it into the dust cap as far as it will go- 
do not force.  Allow the oil to flow into the bearing housing.  
Repeat this procedure until there remains a supply of oil in 
the bottle.  Never fill bearing housing through base fitting. 
   (4) Check the breather tube for cleanliness. The breather 
tube must be used with the oil lubrication system. 
 
3-4. Follow instructions in Bulletin No. 2880549 to check out 
the pump after repair and place the pump in service. 


2883819 


LUBRICATION INSTRUCTIONS 


1. The pump is shipped without oil in the  

                         bearing housings. 

 2. Change the first oil after operating 1000 
 hrs. or 60 days, whichever occurs sooner. 

                        3. Frequency of oil change thereafter is 
                        dictated by service conditions, It is  
                        suggested, however, that oil changes 
                        occur at least every 3,000 hrs. of operation. 
                        4. In order to keep the bearing housings 
                        vented, the breather tubes and filters  
                        must be kept clean. 
 

Lubrication Oils 


A high quality turbine oil of 330 SSU viscosity at 100 degrees F. 

     with rust and oxidation inhibitors should be used. 
 

RECOMMENDED OIL MANUFACTURERS 

Atlantic Richfield 

DURO S-315, DURO AW S-315 

Chevron 

CHEVRON OC TURBINE OIL 68 

Exxon TERESSTIC 

68 

Gulf 

GULF HARMONY 68 

Mobil 

DTE 26 300SSU 

Sunoco SU VIS 

968 

N


FIGURE 9 

3-5. TROUBLES. To reliably establish the malfunctioning of 
either the pump or driver, instruments such as tachometers, 
pressure gauges and electric meters must be in proper 
working condition and preferably of recent calibration. In 
many cases, much time and expense have been expended 
with faulty instruments. Table V lists a number of troubles 
commonly occurring. If unable to determine the cause and 
remedy the problem from this list, refer the problem to the 
Peerless Pump Company representative. 


10 

Summary of Contents for TUT 4-Stage

Page 1: ...replace or adjust Equipment or parts without Seller s prior written approval Seller is relieved of any further obligation to Purchaser under this section with respect to such Equipment or parts unless such repair replacement or adjustment was made after Seller failed to satisfy within a reasonable time Seller s obligations under this Paragraph of the manufacturer and may also result in bodily inju...

Page 2: ...und housings 31 33 to remove Do not cock or force housings off as to do so may damage the 2883819 without the consent of Peerless Pump Company or its authorized representatives Disregard of this warning can result in pump failure and serious personal injury or death SECTION 1 DISASSEMBLY bearings 16 18 or the oil seal 107 e Loosen and remove bearing locknut 22 and lock washer 69A f Remove bearings...

Page 3: ...Casing Ring 58 Inter stage Sleeve 7A Left Hand Casing Ring 58A Inter stage Sleeve A 13 Packing 63 Stuffing Box Bushing 14 Shaft Sleeve 68 Shaft Collar 16 Outboard Bearing 69A Bearing Lock washer 17 Packing Gland 73A Casing Gasket Not Shown 17B Gland Bolt 73B Bearing Cover Gasket 18 Outboard Bearing 113 Inter stage Bushing 22 Bearing Locknut 113A Inter stage Bushing A 29 Lantern Ring 127 Seal Pipin...

Page 4: ... Shaft Collar 14 Shaft Sleeve 69A Bearing Lock washer 16 Outboard Bearing 73A Casing Gasket Not Shown 17 Packing Gland 73B Bearing Cover Gasket 17B Gland Bolt 107A Oil Retaining Shield 18 Outboard Bearing 113 Inter stage Bushing 22 Bearing Locknut 113A Inter stage Bushing A 29 Lantern Ring 125 Constant Level Oiler Not Shown 31 Inboard Bearing Housing 127 Seal Piping 32 Impeller Key 128 Inter stage...

Page 5: ...ing Ring 53 Base 7A Left Hand Casing Ring 56 Balancing Disc 13 Packing 58 Inter stage Sleeve 14 Shaft Sleeve 63 Stuffing Box Bushing 16 Outboard Bearing 68 Shaft Collar 17 Packing Gland 69A Bearing Lock washer 17B Gland Bolt 73A Casing Gasket Not Shown 17D Gland Flange 73B Bearing Cover Gasket 18 Outboard Bearing 76 Balance Disc Key 22 Bearing Locknut 113 Inter stage Bushing 29 Lantern Ring 115 Ba...

Page 6: ...8 Inter stage Sleeve 14 Shaft Sleeve 63 Stuffing Box Bushing 16 Outboard Bearing 68 Shaft Collar 17 Packing Gland 69A Bearing Lock washer 17B Gland Bolt 73A Casing Gasket Not Shown 17D Gland Flange 73B Bearing Cover Gasket 18 Outboard Bearing 76 Balance Disc Key 22 Bearing Locknut 113 Inter stage Bushing 29 Lantern Ring 115 Balance Disc Ring 31 Inboard Bearing Housing 125 Constant Level Oiler Not ...

Page 7: ...R SHAFT IN CONTACT WITH THE INNER RING OF THE BEARING 3 APPLY HAMMER ALTERNATELY AT OPPOSITE POINTS AVOID COCKING USING A BEARING PULLER 1 PLACE BEARING PULLER BEHIND BEARING INNER RING SET PULLER JAWS SO THAT THEY WILL NOT SLIP OVER THE INNER RING AND DAMAGE SPARATOR OR SHIELD WHEN PRESSURE IS APPLIED 2 FORCE BEARING OFF SHAFT BY A STRAIGHT PULL DO NOT COCK BEARINGS USING AN ARBOR PRESS 1 REST TH...

Page 8: ...le I FIGURE 5 2883819 d Place bearing on a screened surface e Using a spray gun with air filter and clean Stoddard solvent flush each bearing until all grease and sludge is removed f Blow solvent out of bearings with dry filtered air g Lubricate bearings immediately after cleaning with light spindle oil and place them in a covered container h Do not spin bearings any time during cleaning 2 2 REPAI...

Page 9: ...No 4 The outboard bearings are two single row angular contact bearings mounted in the duplex DB mounting p Install bearing lock washer 69A and locknut 22 oil thrower and tighten against the outboard bearing q Install gaskets 73B on bearing covers Cut replacement gaskets from 1 16 inch No 444 Vellumoid r Slide the housings 31 33 over the bearings Tap lightly and evenly around the end as necessary D...

Page 10: ...tions and location environment Table II should be used as a guide for grease re lubrication Oil bottles should have a visible supply at all times b Oil Pumps are shipped without oil in the bearing housings Be sure to fill and adjust constant level oilers before initial start of pump See Figure 9 1 Adjust dust cap to lowest possible position on base fittings 2 The pipe nipple and base fitting must ...

Page 11: ...mpeller Foot valve too small or restricted by dirt Re prime Check for low motor voltage or motor over load Other drives increase driver speed when possible Check to see that all discharge valves are opened and the discharge line is free from obstructions In some cases the installation has to be altered or a pump of suitable rating must be provided Check NPSH requirements of pump and increase syste...

Page 12: ...e foundation Replace bearings Check lubricants for proper Grade Check pump alignment Check for Condensation on water cooled bearings Always obtain new trim diameter from Peerless Pump Company representative 3 6 SPARE PARTS To keep delays to a minimum when pump repairs are required we suggest that the following spare parts be stocked The number of each part required depends upon the application For...

Reviews: