ISSUED: 08-08-08 SHEET #: 055-9094-1
Visit the Peerless Web Site at www.peerlessmounts.com
For customer care call 1-800-865-2112 or 708-865-8870.
11 of 16
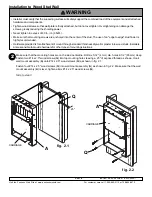
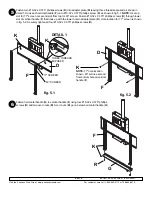
Hook brackets (
E
) into adapter plate (
D
) as shown in fig. 8.1 and
detail 4. The hooks will go over the flange on the top and the bottom of
hook bracket (
E
) into the slots as shown in detail 4 and detail 6. Fasten
#10-32 x 1-3/8" socket pin screws (
T
) on each hook bracket (
E
), using
security allen wrench (
V
) and tighten to wall plate as shown in
detail 5.
To remove screen from mount, loosen safety/security screws and lift screen
off of mount.
• Do not tighten screws with excessive force.
Overtightening can cause damage to mount.
Tighten
screws to 40 in. • lb (4.5 N.M.) maximum torque.
CAUTION
8
SIDE VIEW
fig 8.1
DETAIL 4
DETAIL 5
E
T
D
E
D
E
D
CONNECTION
BLOCK
CAPTIVE
SCREW
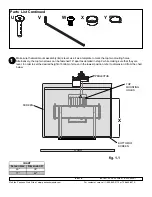
Disengage connection block from projector mount assembly (
J
) by unscrewing captive screw and sliding out
connection block as shown.
J
9
DETAIL 6
fig 8.2
HOOK
FLANGE
BOTTOM OF HOOK
BRACKET (
E
)
D

