background image

6 of 7

ISSUED: 03-21-05  SHEET #: 090-9103-3 08-03-07

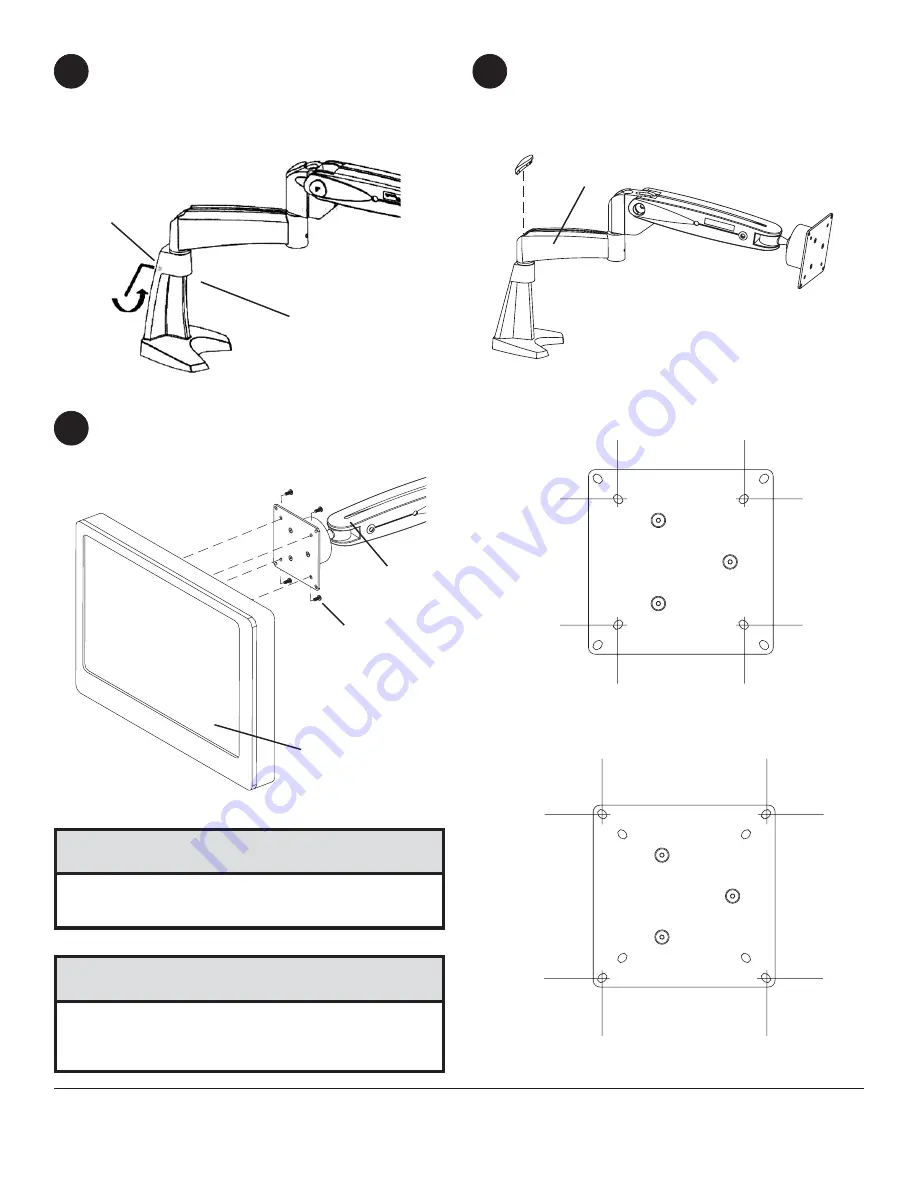
Snap plastic cap (

C

) into top of arm assembly

(

B

).

Place set screw (

H

) into the back of desk base

(

A

). Tighten with the M2.5 hex wrench (

J

).

H

A

J

7

C

B

Installing monitor

(Vesa 75 mm x 75 mm)

(Vesa 100 mm x 100 mm)

Mount the LCD monitor directly to the front plate of arm assembly (

B

) using the M4 x 10 mm phillips screws (

V

) or

M4 x 6mm phillips screws (

U

).

B

U or V

LCD MONITOR

• Do not tighten screws with excessive force.

Overtightening can cause damage to screen.

 Tighten

screws to 40 in. • lb (4.5 N.M.) maximum torque.

CAUTION

• It is important to always use the mounting screws

provided by the manufacturer of the LCD monitor.

CAUTION

8

9

Summary of Contents for LCT Series

Page 1: ...5 lbs 11kg 3215 W North Ave Melrose Park IL 60160 800 729 0307 or 708 865 8870 Fax 708 865 2941 www peerlessmounts com ISSUED 03 21 05 SHEET 090 9103 3 08 03 07 Installation and Assembly LCT Series LC...

Page 2: ...of 25 lb 11 kg Always use an assistant or mechanical lifting equipment to safely lift and position equipment Tighten screws firmly but do not overtighten Overtightening can damage the items greatly r...

Page 3: ...round head cap screw 1 F M8 washer 1 G M8 disk spring washer 1 H set screw 1 I M5 hex wrench 1 J M2 5 hex wrench 1 P base cushion with double sided adhesive 1 Q u bracket 1 R M8 threaded rod 1 S wing...

Page 4: ...Installation with bolt option Drill a 12 mm hole through the desk Attach base cushion P to desk base assembly A and place directly on top of the bolting hole Tighten the M8 threaded rod R through the...

Page 5: ...on arm Optional A B Place plastic spacer D and extension arm B onto the main shaft of the desk base A as shown D B A Insert round head cap screw E M8 washer F and disk spring washer G into extension a...

Page 6: ...sa 100 mm x 100 mm Mount the LCD monitor directly to the front plate of arm assembly B using the M4 x 10 mm phillips screws V or M4 x 6mm phillips screws U B U or V LCD MONITOR Do not tighten screws w...

Page 7: ...must be in a horizontal position If the monitor does not hold its position or it is too tight adjust the four tensioning screws located around the ball joint cover of arm assembly B To tighten adjust...

Reviews: