background image

  ISSUED 08-09-06 SHEET #: 055-9470-1

Visit the Peerless Web Site at www.peerlessmounts.com

3 of 11

For customer care call 1-800-729-0307 or 708-865-8870.

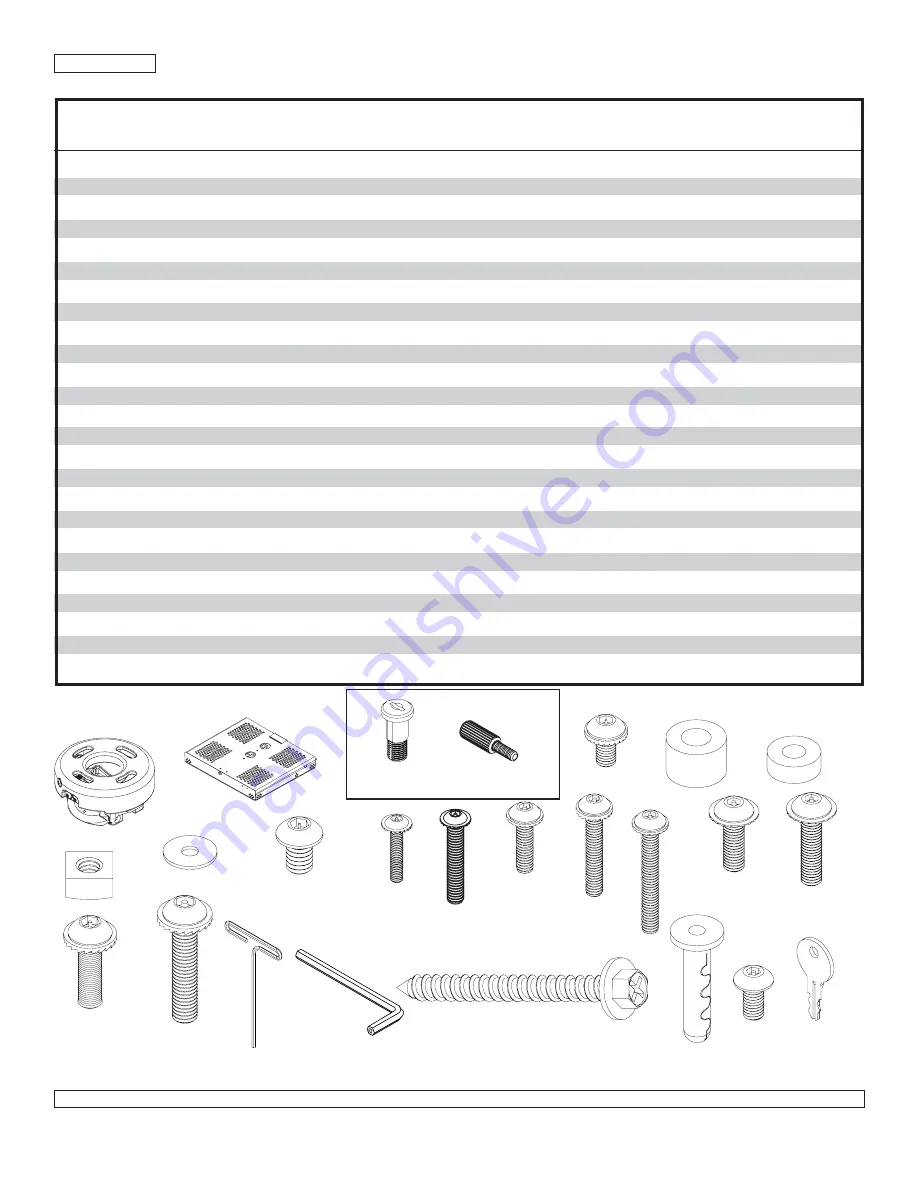
Note: Actual parts may appear slightly different than illustrated.

IMPORTANT!  Read entire instruction sheet before you start installation and assembly.

Before you start check the parts list below to make sure all of the parts shown are included.

Parts List

F

G

H

M

P

N

R

S

U

K

Q

O

L

Description

Qty.

PSMU-PRS

PSMU-PRS-S

PSMU-PRS-W

A

projector mount assembly

1

055-0420

055-0421

055-0422

B

tray

1

055-0725

055-0725-S

055-0725-W

C

lock plug

1

3022-502

3022-502

3022-502

D

thumb screw

1

560-0106

560-0106

560-0106

E

#10-32 x 3/8 serrated washer head socket pin screw

2

520-1151

520-2151

520-2151

F

spacer

12

540-9416

540-9416

540-9416

G

bushing

4

590-1116

590-1116

590-1116

H

square nut

4

530-1022

530-1022

530-1022

I

washer

4

540-1025

540-1025

540-1025

J

1/4 x 3/8 socket pin

4

520-1109

520-1109

520-1109

K

M3 x 16mm serrated washer head socket pin screw

4

510-1083

510-1083

510-1083

L

M3 x 25mm serrated washer head socket pin screw

4

510-1127

510-1127

510-1127

M

M4 x 16mm serrated washer head socket pin screw

4

510-1087

510-1087

510-1087

N

M4 x 25mm serrated washer head socket pin screw

4

510-1082

510-1082

510-1082

O

M4 x 35mm serrated washer head socket pin screw

4

510-1097

510-1097

510-1097

P

M5 x 16mm serrated washer head socket pin screw

4

510-1161

510-1161

510-1161

Q

M5 x 25mm serrated washer head socket pin screw

4

510-1122

510-1122

510-1122

R

M6 x 20mm serrated washer head socket pin screw

4

510-9554

510-9554

510-9554

S

M6 x 30mm serrated washer head socket pin screw

4

510-1067

510-1067

510-1067

T

4 mm T-WRENCH

1

560-1718

560-1718

560-1718

U

2mm allen wrench

1

560-1097

560-1097

560-1097

V

wood screw

2

5S1-015-C03

5S1-015-C04

5S1-015-C04

W

alligator anchor

2

590-0097

590-0097

590-0097

X

key

1

0000-322

0000-322

0000-322

Y

#10-32 x 1/4" socket pin screw

1

520-1196

520-2196

520-2196

A

B

V

W

E

I

J

Y

T

Note: Assembled to tray
assembly (B)

D

C

X

Summary of Contents for PSMU-PRS

Page 1: ...W North Ave Melrose Park IL 60160 800 729 0307 or 708 865 8870 Fax 708 865 2941 www peerlessmounts com Tray Style Projector Mount ISSUED 08 09 06 SHEET 055 9470 1 Models PSMU PRS PSMU PRS S PSMU PRS W Max Load Capacity 30 lb 13 6 kg ...

Page 2: ...ter of the joists Use of an edge to edge stud finder is highly recommended Always use an assistant or mechanical lifting equipment to safely lift and position equipment Tighten screws firmly but do not overtighten Overtightening can damage the items greatly reducing their holding power WARNING Accessories LightweightAdjustable Suspended Ceiling Kit CMJ 500 Lightweight Suspended Ceiling Kit CMJ 455...

Page 3: ...x 3 8 socket pin 4 520 1109 520 1109 520 1109 K M3 x 16mm serrated washer head socket pin screw 4 510 1083 510 1083 510 1083 L M3 x 25mm serrated washer head socket pin screw 4 510 1127 510 1127 510 1127 M M4 x 16mm serrated washer head socket pin screw 4 510 1087 510 1087 510 1087 N M4 x 25mm serrated washer head socket pin screw 4 510 1082 510 1082 510 1082 O M4 x 35mm serrated washer head socke...

Page 4: ...pen the top cover attach connection block to tray B using two 10 32 x 3 8 serrated washer head socket pin screws E as shown Note Make sure that the connection block shoulder is facing the back of projector CONNECTIONBLOCK E B 1 Disengage connection block from projector mount assembly A by unscrewing captive screw and sliding out connection block as shown CONNECTIONBLOCK CAPTIVESCREW CONNECTIONBLOC...

Page 5: ... 10 mm socket wrench until projector mount assembly A is firmly attached Note Be sure to drill holes into the joist CENTER Skip to step 4 Installation To Wood Joist Finished Ceilings Exposed Wood Joists or Wood Beam Ceilings V V A WOOD JOIST FRONTOF MOUNT I I FRONTOF MOUNT WOOD JOIST A figure 1 figure 2 Make sure that the supporting surface will safely support the combined load of the equipment an...

Page 6: ...al bracket plaster dry wall CORRECT concrete metal bracket plaster dry wall FOR DIRECTATTACHMENT TO LOAD BEARING CONCRETE ONLY Concrete expansion anchors are not intended for attachment to concrete ceilings covered with a layer of plaster drywall or other finishing material If mounting to concrete ceiling covered with plaster drywall is unavoidable plaster drywall must be counterbored as shown bel...

Page 7: ... extension columns reducer ACC 913 will be required as shown in figure 2 2 Tighten swivel stop screw against extension column or reducer using 4 mm allen wrench S Note Swivel stop screw is used to jam against threads of extension column or reducer to prevent any excess movement of projector mount assembly A Do not overtighten screw overtightening screw will damage threads making it difficult to se...

Page 8: ... appropriate number of screws K L M N O P Q R S washers I and spacers F as shown Use 4 mm allen wrench S to tighten screws Important If projector does not have at least three mounting holes do not use this tray assembly Note Some projectors have feet which can be removedandthecorrespondingthreadedinsert can be used for a mounting hole Note Projector may differ slightly in appearance Installation o...

Page 9: ...ww peerlessmounts com 9 of 11 For customer care call 1 800 729 0307 or 708 865 8870 Slide upper tray into the lower tray as shown UPPER TRAY LOWER TRAY Attach thumb screw to mount as shown to lock the upper tray to the lower tray UPPER TRAY THUMB SCREW LOWER TRAY 6 7 ...

Page 10: ...s Inc Allrightsreserved PeerlessisaregisteredtrademarkofPeerlessIndustries Inc VertorProandArmorLockaretrademarksofPeerlessIndustriesInc Allotherbrandandproductnamesaretrademarksorregisteredtrademarksoftheirrespectiveowners C 8 9 CONNECTIONBLOCK B PROJECTORMOUNT ASSEMBLY Do not lift more weight than you can handle Use additional man power or mechanical lifting equipment to safely handle placement ...

Page 11: ...rojector mount assembly A indicated below until projector mount can be rotated Rotate mount to desired position and retighten screw To adjust pitch forward and backward tilt Loosen two screws on projector mount assembly A indicated below Tilt mount to desired position and retighten screws To adjust roll side to side tilt Loosen two screws on projector mount assembly A indicated below Tilt mount to...

Reviews: