background image

7 of 9

ISSUED: 08-02-05  SHEET #: 202-9010-1

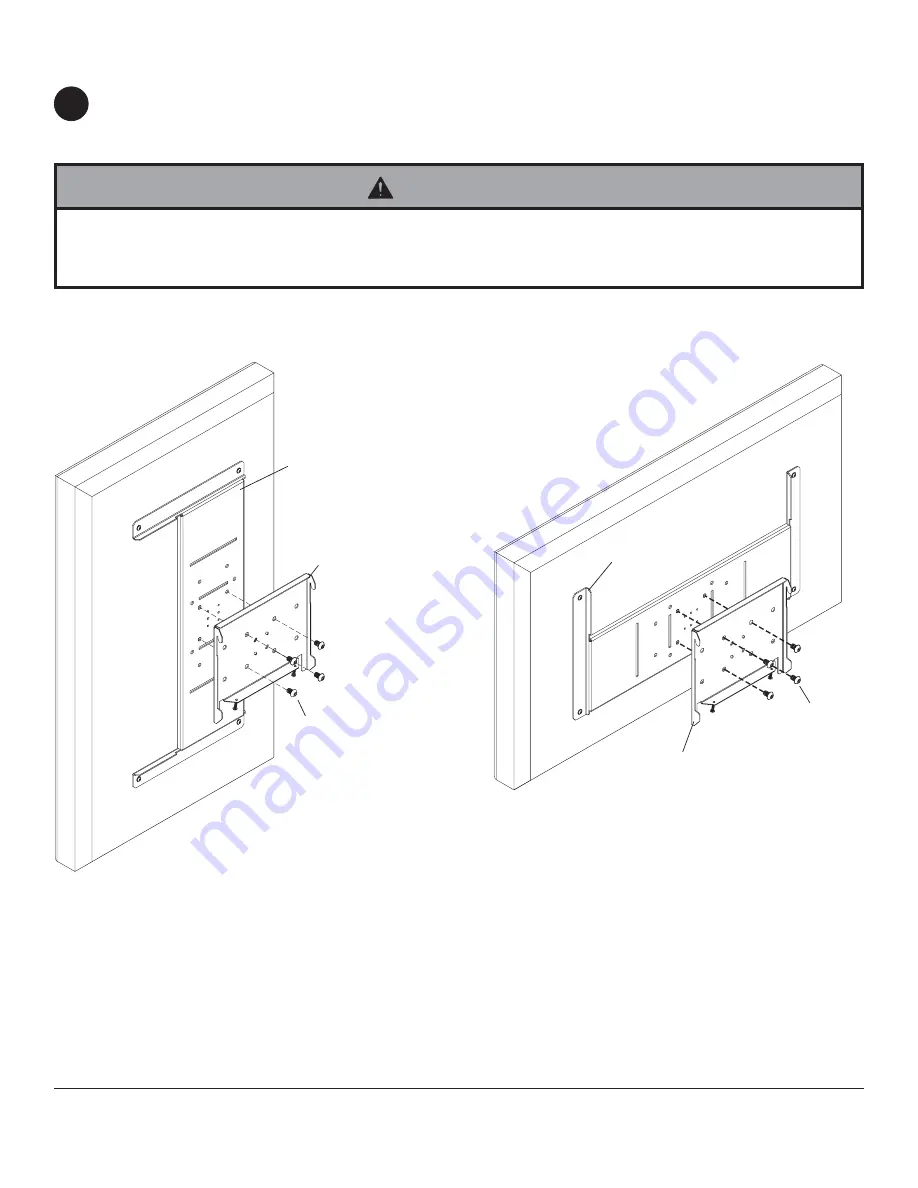
To prevent scratching the screen, set a cloth on a flat, level surface that will support the weight of the screen. Place
screen face side down. Attach the interface bracket (

BB

) to the PLP adapter plate (sold separately) using four M10 x

15 mm socket head screws (

EE

) as shown in figures 2.1 (portrait) or 2.2 (landscape).

2

Installing Interface Bracket to PLP Adapter Plate

• Tighten screws so adapter brackets are firmly attached. Do not tighten with excessive force. Overtightening can cause

stress damage to screws, greatly reducing their holding power and possibly causing screw heads to become
detached.


Tighten to 40 in. • lb (4.5 N.M.) maximum torque.

WARNING

fig. 2.1

(portrait)

EE

BB

GENERIC PLP
ADAPTER PLATE

fig. 2.2

(landscape)

EE

GENERIC PLP
ADAPTER PLATE

BB

Summary of Contents for SMART MOUNT SF 16D

Page 1: ... 8870 Fax 708 865 2941 www peerlessmounts com ISSUED 08 02 05 SHEET 202 9010 1 Installation and Assembly Dedicated Flat Wall Mount for Flat Panel Screens Models SF 16D Features Ultra slim design holds the screen flat against the wall Integrated security features provide effective theft deterrence ...

Page 2: ...ccessories Metal Stud Fastener Kit ACC 415 Do not begin to install your Peerless product until you have read and understood the instructions and warnings contained in this Installation Sheet If you have any questions regarding any of the instructions or warnings please call Peerless customer care at 1 800 729 0307 This product should only be installed by a qualified professional Make sure that the...

Page 3: ...iption Qty Part AA wall plate 1 200 1797 BB interface plate 1 200 0860 CC 14 x 2 5 wood screw 4 5S1 015 C03 DD Alligator anchor 4 590 0097 EE M10 x 1 5 x 15 mm socket head screw 4 520 9262 FF 4 mm security allen wrench 1 560 1146 Parts List AA EE FF BB ...

Page 4: ...sing three 14 x 2 5 wood screws CC as shown in figure 1 2 Skip to step 2 on page 7 Installer must verify that the supporting surface will safely support the combined weight of all attached equipment and hardware WARNING Tighten wood screws so that wall plate is firmly attached but do not overtighten Overtightening can damage the screws greatly reducing their holding power Never tighten in excess o...

Page 5: ...all plate is level secure it using four 14 x 2 5 wood screws CC as shown in figure 1 4 Skip to step 2 on page 7 Installer must verify that the supporting surface will safely support the combined weight of all attached equipment and hardware WARNING Tighten wood screws so that wall plate is firmly attached but do not overtighten Overtightening can damage the screws greatly reducing their holding po...

Page 6: ...vity Concrete must be 2000 psi density minimum Lighter density concrete may not hold concrete anchor Make sure that the supporting surface will safely support the combined load of the equipment and all attached hard ware and components WARNING CUTAWAY VIEW INCORRECT concrete surface 1 3 2 DD Drill holes and insert anchors DD CORRECT Place plate AA over anchors DD and secure with screws CC Tighten ...

Page 7: ... screws EE as shown in figures 2 1 portrait or 2 2 landscape 2 Installing Interface Bracket to PLP Adapter Plate Tighten screws so adapter brackets are firmly attached Do not tighten with excessive force Overtightening can cause stress damage to screws greatly reducing their holding power and possibly causing screw heads to become detached Tighten to 40 in lb 4 5 N M maximum torque WARNING fig 2 1...

Page 8: ...ate as shown in figures 2 3 portrait or 2 4 landscape 2 Installing Interface Bracket to LC Adapter Plate Tighten screws so adapter brackets are firmly attached Do not tighten with excessive force Overtightening can cause stress damage to screws greatly reducing their holding power and possibly causing screw heads to become detached Tighten to 40 in lb 4 5 N M maximum torque WARNING fig 2 3 portrai...

Page 9: ...horizontally if desired Note To lock the screen down tighten security screw to wall plate using security allen wrench as shown in detail 1 To remove screen from mount loosen security screw swing screen away from mount and lift screen off of mount 3 Always use an assistant or mechanical lifting equipment to safely lift and position the plasma television WARNING DETAIL 1 SECURITY SCREW 2005PeerlessI...

Reviews: