background image

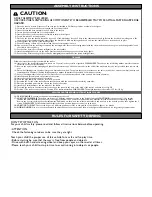
CAUTION:

ADULT ASSEMBLY  REQUIRED.
USE CARE WHEN UNPACKING AS COMPONENTS TO BE ASSEMBLED MAY POSE A SMALL PARTS/SHARP EDGE
HAZARD.

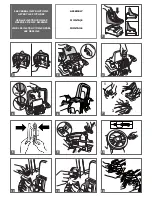
1 • Place the seat on its base. Please note: The seat can be installed in 2 different positions, as shown in the figure.
2 • Secure the seat in the desired position with the 2 screws provided.
3 • Insert the seat and base assembly in the 2 slots in the chassis.
4 • Secure it at the rear with the 2 screws provided.
5 • Insert the roll bar in the rear fender assembly, as shown in the figure.
6 • Secure it with the 2 screws provided.
7 • Place the hood on the chassis. Insert the loose end of the black hinge into the 2 slots in the chassis until they lock. Rotate the hood down, making sure it fits

correctly over the simulated engine panels. Place the black hood latch key through the hood and into the chassis. Turn to lock the hood in place.

8 • Click together the 2 parts of the steering wheel.
9 • Push the steering column up from below and slot the steering wheel onto it.

10 • Line up the holes in the steering column and the steering wheel. Secure the steering wheel with the screw and the nut: the nut goes in the hexagonal hole and

the screw in the round hole.

11 • Put the silver decals (for reflective taillights) on the rear fenders.
12 • Install the taillight lenses; slot in the lower part first and then the upper part, as shown in the figure.
13 • Put the silver decals on the grill (for reflective headlights), then install the clear plastic headlight lense.

TRAILER

Follow the instructions below to assemble the trailer.
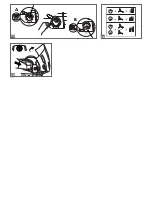
14 • Insert one of the 4 self-locking washers (there are 2 spares) in the special tool provided. PLEASE NOTE: The tabs on the self-locking washer must face towards

the inside of the tool (see detail A).

15 • Remove the axle from the packaging and take off its protective caps. Use a hammer to drive the axle all the way down into the tool provided, then remove the

tool.

16 • Place wheel bushings into the wheels; large end fits inside the wheel.  Then place these components onto the axles, in this order: a washer, a wheel (hubcap end

toward washer) 2nd wheel (hubcap facing outward), a washer (4 washers are provided, 2 of which are spares)

.

17 • Put a self-locking washer in the special tool. Place the tool over the unsecured end of the axle and hit it with a hammer.
18 • Install the axle assembly onto the bottom of the trailer.
19 • Insert the red clip in the tongue of the trailer.
20 • Press the pegs firmly into the holes in the bed as shown.
21 • Assemble the 3 sides of the trailer. Ensure that the parts with the wooden effect are facing outwards.
22 • Place the assembled parts into the slots in the body of the trailer.
23 • Install the 2 small hubcaps onto the wheels of the trailer.
24 • To attach the trailer to the tractor, insert the clip on the trailer in the hole at the back of the tractor and turn it (see fig. 25).
25 • Position 1: The trailer can be removed. Position 2: The trailer is attached. PLEASE NOTE: The weight capacity of the trailer is 22 lbs - 10 kg.

VEHICLE FEATURES AND INSTRUCTIONS FOR USE

26 • DRINK HOLDER: A convenient drink holder situated near the seat.
27 • ADJUSTING THE PEDALS: The pedals can be put in 2 different positions to cater to the height of the child. POSITION 

A

(the upper one) is for smaller

children and POSITION 

B

(the lower one) is for bigger children. The 2 positions are marked with 2 different colored dots on the corresponding sticker.

Remove the 3 screws holding the pedal adjustment disk (which are shown on the sticker with symbols) and rotate it to the desired position, then tighten the 3
screws. PLEASE NOTE: Put both adjustment disks in the same position (upper or lower) on both sides.

28 • ADJUSTING THE SEAT: The seat can be put in 2 different positions to cater to the growth of the child. See figure 1 for details.
29 • OPENING HOOD: Use a coin to turn the black hood latch key as far as the position shown in the figure. Inside the hood is a large storage compartment.

ASSEMBLY INSTRUCTIONS

DON'T STOP THE FUN
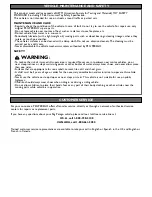
For your child’s safety: please read and follow all instructions below before operating.

• ATTENTION:

Check the fastening retainers to be sure they are tight.

Teach your child the proper use of this vehicle for a safe and fun play time.
• Before starting be sure that the way is free from people and objects.
• Drive with both hands steering wheel and keep your eyes on the road at all times.
• Please teach your child to stop in time to avoid running into objects or people.

RULES FOR SAFETY DRIVING

Summary of Contents for CASE IH Agriculture IGCD0554

Page 1: ...erbal instructions Assembly verbal instructions are several pages deeper into the manual NOTA este manual contiene 3 idiomas por lo tanto las ilustraciónes para ensamblaje estan aparte de las instrucciónes de ensamblaje escritas Las instrucciónes de ensamblaje escritas estan varias paginas adelante en el manual NOTE puisque ce manuel est traduit en 3 langues les illustrations d assemblage ne se tr...

Page 2: ...OK 2 3 4 5 6 8 10 9 1 11 12 13 SEE VERBAL INSTRUCTIONS AFTER THE PICTURES VER LAS INSTRUCCIONES DESPUÉS DE LOS DISEÑOS VOIR LES INSTRUCTIONS APRÈS LES DESSINS ASSEMBLY MONTAJE MONTAGE 1 2 7 3 ...

Page 3: ...A 14 15 16 17 18 19 20 21 22 23 24 1 2 25 VEHICLE FEATURES AND INSTRUCTIONS FOR USE CARACTERÍSTICASY USO DEL VEHÍCULO CARACTERISTIQUES ET EMPLOI DU VEHICULE 26 ...

Page 4: ...OR OR 28 29 27 A B ...

Page 5: ...2N 10 SPST9192JN 11 ASGI0217NRY 12 SPST8297N 13R SPST8295DRY 13L SPST8295SRY 14 SPST8294N 15 SMCT0002 16 SPST8307A 17 SOGI0060SL30 18 SPST8550GP 19R SARP9130KDNGR 19L SARP9130KSNGR 20 SPST9132GR 21 SPST8517JN 22 SPST9339N 23 SPST9133N 24 SPST9131GR 25 SPST3813N 26 SPST3814Y 27R SARP9129JDNGR 27L SARP9129JSNGR 28 SPST8308N 29 SPST9343GP 30 SPST8509N 31 SPST9134GR 32 SARP8311JNGR 33 SOFF0164Z 34 SPS...

Page 6: ... 45 minutes for assembly Year 3 7 Weight capacity 55 lbs 22 lbs Do not exceed the maximum total weight capacity of 55 lbs 25 kg 22 lbs 10 kg Contents 1 CASE IH Tractor Trailer riding vehicle partially assembled assembly hardware parts to be assembled decals Use this vehicle ONLY outdoors Most interior flooring can be damaged by riding this vehicle indoors Peg Perego will not be responsible for dam...

Page 7: ...re provided 2 of which are spares 17 Put a self locking washer in the special tool Place the tool over the unsecured end of the axle and hit it with a hammer 18 Install the axle assembly onto the bottom of the trailer 19 Insert the red clip in the tongue of the trailer 20 Press the pegs firmly into the holes in the bed as shown 21 Assemble the 3 sides of the trailer Ensure that the parts with the ...

Page 8: ...otor vehicles on or near steep inclines or steps swimming pools or other bodies of water always wear shoes and never allow more than one rider Surfaces that are appropriate for use asphalt cement tiles dirt and short grass A child must be 3 years of age or older for the necessary coordination and maturation to operate this vehicle safely Never use the vehicle on steep slopes or near steps or stair...

Page 9: ...E SEGURIDAD ASTM TOY incluido el F 963 Especificaciones de seguridad en juguetes para consumidores y C R C c 931 el Regulaciones Peligrosas Canadienses De los Productos Juguetes Herramientas necesitadas para el ensamblaje destornilladores de la Phillips medio y martillo no incluido Su vehículo nuevo se premonta parcialmente Requiere a ensamblaje de un adulto Puesto a un lado por favor por lo menos...

Page 10: ...l interior de la herramienta ver el detalle A 15 Retirar los ejes del embalaje Retirar las tapas de protección de los ejes Insertar los ejes golpeando con un martillo en la herramienta adecuada hasta el fondo remover sucesivamente la herramienta 16 Colocar los cojinetes de rueda en las ruedas encajando la parte más ancha en la rueda A continuación colocar estos componentes en los ejes por este ord...

Page 11: ...en carreteras cerca de vehículos a motor o en pendientes pronunciadas o cerca de escaleras piscinas u otras superficies de agua los niños deben usar siempre zapatos durante el uso del vehículo El vehiculo esta construido para 1 niño Se puede usar sobra superficies lisas asfalto cemento baldosas tierra y prado corto No apto para niños menores de 36 meses por sus características funcionales y dimenc...

Page 12: ...libre appel à 1 800 661 5050 Ce produit réponde et ou dépasse tous les CONDITIONS DE SECURITE ASTM TOY et il est conforme à la NORME DE SURETE F 963 pour les utilisateur des jouets électriques et C R C c 931 le Règlements Dangereux Canadiens de Produits Jouets Outils requis pour l assemblage tournevis de Phillips moyen et marteau non inclus Votre nouveau véhicule est partiellement prémonté Il exig...

Page 13: ...insi préparé et taper jusqu au fond 18 Placer le groupe de roues sur la base de la remorque 19 Enfiler le pivot rouge dans le trou situé à l extrémité de la remorque 20 Emboîter le fond de la remorque assemblé précédemment sur la caisse en faisant pression tel qu illustré sur le schéma 21 Assembler les 3 côtés de la remorque en veillant à ce que les parties effet bois soient tournées vers l extéri...

Page 14: ...ile légère les parties mobiles comme roulements à billes direction etc surtout là où ils tournent ou entrent en contact Les surfaces du jouet peuvent être nettoyées avec un chiffon humide Ne jamais utiliser des détergents abrasifs Les opérations de nettoyage doivent être effectuées exclusivement par des adultes Ne jamais démonter les mécanismes du jouet sauf autorisation de PEG PEREGO SECURITE ATT...

Page 15: ......

Page 16: ... pas votre véhicule à la mémoire Nous sommes un appel téléphonique en service libre appel loin et nous pouvons aider Si vous êtes les pièces manquantes ou avez besoin d aide voir s il vous plaît l information de contact ci dessous Model Number IGCD0554 PEG PEREGO U S A Inc 3625 INDEPENDENCE Dr FORT WAYNE IN 46808 fax 260 484 2940 call us toll free 1 800 728 2108 llame USA gratis 1 800 225 1558 PEG...

Reviews: