background image

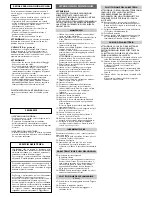
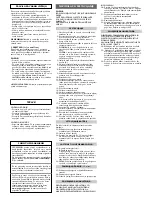
For the safety of the child, before starting up the
vehicle read and carefully follow the following
instructions.
• Teach the child how to use the vehicle properly for

safe and enjoyable driving.

• The toy must be used with caution, as it requires

substantial dexterity in order to avoid falls or
collisions which could cause injuries to the user or
third parties.

• Before starting, check that there are no people or

objects obstructing the vehicle’s path.

• Drive with hands on the handlebars/steering wheel

and always watch the road ahead.

• Brake in good time to avoid collisions.

ATTENTION! 

The item is equipped with a brake

system which needs to be appropriately illustrated to
the child by an adult.

2nd GEAR (if present)

Initially, use in 1st gear is recommended. Before
enabling 2nd gear, check that the child has learned to
use the handlebars/steering wheel, 1st gear and the
brake correctly, and has become familiar with the
vehicle.

WARNING!

• Check that all the wheel fixing studs/nuts are

fastened properly.

• If the vehicle is overloaded, as can happen on soft

sand, mud, or very uneven ground, the overload
switch will immediately disconnect the power. The
power supply will be restored after a few seconds.

• If the vehicle is overloaded on steep slopes, the

overload cut-out will immediately disconnect the
power. If this happens, REMOVE THE FOOT FROM
THE ACCELERATOR. The electrical brake will be
activated, slowing down the descent of the vehicle.

UNINTERRUPTED FUN: Keep a spare set of charged
batteries ready for use.

THE VEHICLE DOES NOT WORK?

• Check that there are no disconnected cables under

the accelerator plate.

• Check the operation of the accelerator button and

replace it if necessary.

• Check that the battery is connected to the

electrical system.

THE VEHICLE LACKS POWER?
• Charge the batteries. If after charging the problem

persists, have the battery and charger checked by
an assistance centre.

PROBLEMS?

RULES FOR SAFE DRIVING

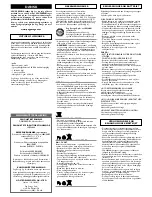
WARNING

ASSEMBLY MUST ONLY BE CARRIED OUT BY
ADULTS. TAKE  CARE WHEN  REMOVING THE
VEHICLE FROM ITS PACKAGING. ALL THE
SCREWS AND SMALL PARTS ARE CONTAINED IN
A BAG INSIDE THE PACKAGING. THE BATTERY
MAY ALREADY BE FITTED INSIDE THE ITEM.

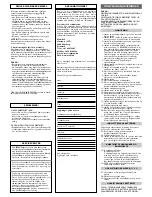
ASSEMBLY

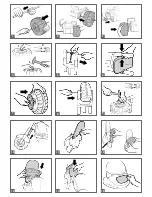
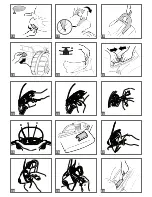
 1 • Slip a plastic washer and one of the two widest

wheels onto the axle.

 2 • Insert the axle all the way into the hole in the

reduction gear so that it protrudes from the
opposite part of the vehicle.

 3 • Slip an iron washer and the last large wheel onto

the axle.

 4 • Slip a plastic washer onto the axle and fasten the

wheels with an 11ø bolt.

     NOTE:  If the axle is too long, add another

plastic washer before fastening the bolt.

     ATTENTION: There are 4 different-sized bolts in

the bag.  It is possible to tell the bolts apart by
checking the different size of the central hole on
the bottom of them.

 5 • Remove the axle from the fork; discard the

bushing (A).

 6 • Insert the mudguard till it clicks as shown in the

figure.

 7 • Place the two hub-caps on the last wheel (the

narrowest one of the three wheels in the
package).

 8 • Position the wheel on the fork and insert pin

which you have previously taken out.

 9 • Insert the bolt 9 ø in the special tool; lock the

wheel as shown in the figure.

10 • Insert the fork.
11 • Position the windshield on the grill.
12 • Position the dashboard on the lower pins (shown

by the arrow). Press on the sides and on the
upper side of the dashboard to fit it properly.

13 • Insert the grill on the fork.
14 • Insert the handle till it clicks.
15 • Apply the glass on the front light till it clicks.
16 • Apply the indicators on the grill first inserting

the back notch, then pressing. A: Right turn
indicator, (you recognise it from the letter D
printed on the inner part).

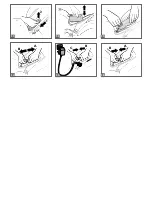
17 • Insert the roll-bar tabs into the body holes and

turn the roll-bar downwards.

18 • Screw the roll-bar.
19 • Insert the two exhaust pipes into the openings

on the back of the vehicle.  Press to click into
place.

20 • Rotate the red catch behind the saddle until

bringing it to the position shown on figure A. Lift
up the saddle.

21 • Connect the plugs. When you have finished,

remember to close and fix down the saddle. The
toy vehicle is now ready for use. 

INSERTING BATTERIES

To allow the lights and electronic sounds to work, do
as follows.
22 • Undo the screw of the cover of the battery

chamber on the dashboard.  Remove the battery
chamber.

23 • Take out the battery holder.
24 • Insert the two 1.5V AA batteries (not provided).

Reposition the battery holder inside the
dashboard and close the cover, screwing the
screw back in.

FEATURES AND USE OF THE VEHICLE

25 • A: button for intermittent lights

      B: button for horn
      C: ignition key; when the key is turned to the

right, you will hear the sound of the “engine’s
roar” and it will be possible to work the
intermittent lights and the horn.  Note: turn the
key to the left as soon as you have finished using
the various functions in order to preserve the
life of the batteries.

26 • PEDAL: Accelerator only, brake is automatic.

REPLACING BULBS

(2.5 Volt)

27 • Undo the screw of the fused indicator light.  Take

away the glass covering it.

28 • Replace the fused bulb.
29 • Put the glass back in place in front of the

indicator and screw the screw back in.

ASSEMBLY INSTRUCTIONS

REPLACING THE  BATTERY

PLEASE NOTE: THE PICTURES OF THE BATTERIES
ARE FOR ILLUSTRATIVE PURPOSES ONLY. YOUR
BATTERY MAY BE DIFFERENT FROM THE MODEL
SHOWN. THIS DOES NOT AFFECT THE
REPLACEMENT AND CHARGING PROCEDURES
DESCRIBED.
30 • Rotate the red catch behind the saddle until

bringing it to the position shown on figure 21.
Lift up the saddle. Unplug the terminals.
Unscrew the battery fastener.

31 • Push the battery clamp in the direction the

arrow points (1). Remove the battery clamp (2).

32 • Replace the battery.
33 • nsert the battery plug into the special opening in

the battery clamp. Re-position and screw down
the battery clamp.  Close and fasten the saddle.

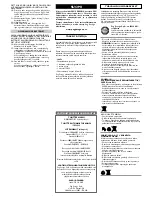
CHARGING THE  BATTERY

WARNING: BATTERY CHARGING AND ANY
OTHER WORK ON THE ELECTRICAL SYSTEM
MUST BE CARRIED OUT BY ADULTS.
THE BATTERY CAN ALSO BE CHARGED
WITHOUT REMOVING IT FROM THE TOY.
34 • Unplug vehicle wiring terminal A from battery

terminal B, by pressing terminals on side and
pulling apart.

35 • Plug the battery charger terminal to a wall

outlet following the instruction enclosed.
Connect the plug B to the battery charger plug
C.

      Once the charge is completed unplug recharger

from wall outlet. Unplug recharger cord terminal
C from battery terminal B.

36 • Plug battery terminal B into vehicle wiring

terminal A.

      When finished working on the battery, always

remember to close and fasten the saddle

PEG PEREGO

offers an after-sales assistance service,

directly or through a network of authorized
assistance centres, for any repairs or replacements
and the sale of original spare parts. To contact the
assistance centres refer to the “Assistance Centres”
booklet included in the packaging.

The item’s serial number must always be quoted.
See the page on spare parts to find out how to
identify the serial number.

Peg Perego always strive to best satisfy their
customers' needs. Knowing the opinions of our
customers is therefore very important and valuable
to us. We would be very grateful if, once you have
used the product, you would fill out the 

CONSUMER

SATISFACTION QUESTIONNAIRE 

which you can find on

the internet at: 

www.pegperego.com

, making

any observations or suggestions you might have.

CUSTOMER SERVICE

Summary of Contents for DESMOSEDICI IGED1048

Page 1: ... GEBRAUCH UND WARTUNG BRUGSANVISNING KÄYTTÖOHJE BRUKSANVISNING DA FI NO SV BRUKSANVISNING EMPLEOY MANUTENCION USO E MANUTENÇÃO KULLANIM VE BAKIM ЭКСПЛУАТАЦИЯ И УХОД MSGQG G SL UPORABA IN VZDRŽEVANJE H B s j O H L H g w h k m AR Official Licensed Product DESMOSEDICI Valentino Rossi cod IGED1048 FI001102G66 ...

Page 2: ...1 2 3 A 3 1 2 4 5 6 7 8 9 12 11 10 14 13 15 ...

Page 3: ...A A B C 1 2 A 28 25 22 23 26 29 27 24 21 18 17 20 19 16 30 ...

Page 4: ...A B C B 1 2 B A 32 33 36 35 34 31 ...

Page 5: ...tmalar наклейки 30 1 SPST3998R 2 SPST3992R 3 SPST3993 4 ASGI0172NPA 5 dx SPST8033DA 5 sx SPST8033SA 6 SPST3990NP 7 SPST3991N 8 SAGI0118 9 SPRP8001N 10 SPST8010NP 11 ASGI0101JNPN 12 SPST3997N 13 ASGI0102N 14 IAKB0016 15 SPST8274GLS 16 IKCB 17 SAGI8054N 18dx SPST3999DRF 18sx SPST3999SRF 19 SPST8034GR 20 SAGI9963KKKT 21 SOFF0074L30 22 SARP8002NNP 23 SPST3995NP 24dx SPST8008M 24sx ASGI0104M 25 SPST399...

Page 6: ...ul mondo Peg Perego sul nostro sito www pegperego com DENOMINAZIONE DEL PRODOTTO DESMOSEDICI Valentino Rossi CODICE IDENTIFICATIVO DEL PRODOTTO IGED1048 NORMATIVE di RIFERIMENTO origine Direttiva generale Sicurezza dei Giocattoli 2009 48 CE Standard EN71 1 2 3 9 Standard EN62115 Direttiva Compatibilità Elettromagnetica 2004 108 CE Standard EN55022 EN55014 Direttiva Europea RAEE 03 108 CE Direttiva...

Page 7: ... il fanale anteriore 16 Applicare le frecce alla mascherina fissandole prima nella tacca posteriore e poi premendo come in figura A freccia destra riconoscibile dalla lettera D stampata all interno 17 Inserire nei fori della scocca le linguette del roll bar e poi ruotarlo verso il basso 18 Fissare il roll bar con la vite 19 Inserire a scatto negli appositi fori dietro il veicolo i due tubi di scar...

Page 8: ...ith you as you take your children out in carriages just after they are born then in strollers and later on in pedal and battery powered toys Discover our complete range of products news and other information about the Peg Perego world on our web site www pegperego com PRODUCT NAME DESMOSEDICI Valentino Rossi PRODUCT IDENTIFICATION CODE IGED1048 REFERENCE STANDARD origin General Toy Safety Directiv...

Page 9: ...ressing A Right turn indicator you recognise it from the letter D printed on the inner part 17 Insert the roll bar tabs into the body holes and turn the roll bar downwards 18 Screw the roll bar 19 Insert the two exhaust pipes into the openings on the back of the vehicle Press to click into place 20 Rotate the red catch behind the saddle until bringing it to the position shown on figure A Lift up t...

Page 10: ...z les chocs risque d explosion et ou d incendie Pendant son chargement la batterie produit du gaz Mettre la batterie en charge dans un endroit bien aéré loin de toute source de chaleur et des matières inflammables Retirer la batterie déchargée du véhicule Il est déconseillé de poser la batterie sur des vêtements cela risquerait de les abîmer Utilisez uniquement des batteries ou des accumulateurs d...

Page 11: ... le ticket de caisse faisant foi contre vice ou défaut de fabrication à l exception de la batterie et du chargeur se reporter aux instructions d utilisation détaillées dans cette notice La garantie s applique dans le cadre d une utilisation normale du véhicule le fabricant se réservant le droit d expertiser les pièces Le fabricant ne saurait en aucune manière être tenu responsable en cas de non re...

Page 12: ...ie durchgestrichene Tonne weist darauf hin dass das Produkt der Mülltrennung unterliegt ENTSORGUNG DER BATTERIE Leisten Sie Ihren Beitrag zum Umweltschutz Die gebrauchte Batterie nicht mit dem Hausmüll entsorgen Sie können dieses Produkt an einem geeigneten Sammelplatz für gebrauchte Batterien oder für Problemmüll anliefern Informieren Sie sich bei Ihrer Gemeinde HINWEISE ZU DEN AA 1 5VOLT BATTERI...

Page 13: ...n die hintere Auskerbung einsetzt und dann daraufdrückt wie die Abbildung zeigt A Rechter Blinker erkennbar am auf die Innenseite gedruckten Buchstaben D 17 Die Federn des Überrollbügels in die Lõcher der Karosserie stecken und den Überrollbügel nach unten drehen 18 Den roll bar mit der Schraube befestigen 19 Die beiden Abzugsrohre in die dafür vorgesehenen Löcher hinten am Fahrzeug einschnappen l...

Page 14: ...o está sujeto a la recogida diferenciada ELIMINACIÓN DE LA BATERÍA Contribuya a la protección del medio ambiente La batería usada no se elimina con los residuos domésticos Pueden depositarla en un centro de recogida de baterías usadas o de eliminación de residuos especiales Infórmese en su ayuntamiento ADVERTENCIA PILAS AA 1 5 VOLT La colocación de las pilas debe ser efectuada y supervisada sólo p...

Page 15: ...esionando como se indica en la figura A Flecha derecha se identifica con la letra D impresa en su interior 17 Introducir en los agujeros de la carrocería las lengüetas de la barra cilíndrica y después girarlo hacia abajo 18 Fije el roll bar con el tornillo 19 Introducir a presión los dos tubos de escape en los agujeros que hay detrás del vehículo 20 Girar la tuerca roja situada detrás del sillín h...

Page 16: ...ue o produto deve ser sujeito a coleta seletiva DESCARTE DE BATERIAS Contribua para proteger o meio ambiente A bateria usada não pode ser jogada fora com os resíduos domésticos Podem ser depositadas num centro de coleta de baterias usadas ou de eliminação de resíduos especiais informe se junto ao setor competente ADVERTÊNCIAS PILHAS DESCARTE DE BATERIAS AA 1 5 VOLT A introdução das pilhas deve ser...

Page 17: ...rior e depois pressionando como mostra a figura A pisca pisca direito identificado pela letra D impressa no seu interior 17 Inserir nos furos da carcaça as linguetas do roll bar e logo depois girar lo para baixo 18 Fixar o roll bar com o parafuso 19 Introduza na traseira do veículo nos respectivos furos os dois tubos de escape 20 Gire a trava vermelha localizada atrás do selim até a posição indica...

Page 18: ... odpadkov VARNO ODLAGANJE AKUMULATORJA Prizadevajte si za varovanje okolja Iztrošenega akumulatorja ne zavrzite z gospodinjskimi odpadki Zavržete ga lahko v centru za zbiranje izrabljenih baterij in akumulatorjev ali za zbiranje posebnih odpadkov pozanimajte se v svoji občini OPOZORILA ZA BATERIJETIPAA 1 5VOLTA Baterije sme vstavljati le odrasla oseba Ne dovolite da bi se z baterijami igrali otroc...

Page 19: ...znate jo po tem da je na notranjem delu odtisnjena črka D 17 V odprtine na karoseriji vstavite jezičke varnostnega loka in ga zavrtite navzdol 18 Varnostni lok pritrdite z vijakom 19 S klikom vstavite v ustrezni odprtini na zadnjem koncu vozila izpušni cevi 20 Zavrtite rdeči zaustavitveni zatič za sedežem tako da ga zavrtite v položaj na sliki A 21 Povežite vtiče Ko končate vedno zaprite in pritrd...

Page 20: ...Et brugt batteri bør aldrig smides væk sammen med almindeligt husholdningsaffald De kan indleveres til et batteriindsamlingssted eller til specielle affaldsdepoter få yderligere oplysninger hos din kommune BEMÆRKNINGER OM BATTERIER AA 1 5 VOLT Batterierne må kun sættes i og kontrolleres af voksne Lad aldrig dine børn lege med batterierne Batterierne må kun udskiftes af en voksen Brug kun den af pr...

Page 21: ...n navet fastgøres indsætte en yderligere plastikspændskive PAS PÅ i posen findes der 4 nav med forskellig størrelse For at finde det rigtige nav skal man blot se på deres underside hvor midterhullet har forskellige størrelser se vedlægssedlen for skruerne 5 Træk hjuldornen ud fra gaflen fjern styrebøsningen 6 Indsæt skærmen så den går i indgreb som vist på illustrationen 7 Indsæt de to navskærme p...

Page 22: ...aita käsiä jalkoja tai muita kehon osia vaatteita tai muita esineitä lähelle liikkuvia osia Älä koskaan kastele ajoneuvon osia kuten moottoria järjestelmiä painikkeita jne Älä käytä ajoneuvon läheisyydessä bensiiniä tai muita tulenarkoja aineita Ajoneuvoa saa käyttää vain yksi lapsi kerrallaan ellei ajoneuvo kuulu kaksipaikkaisten ajoneuvojen luokkaan SÄHKÖ JA ELEKTRONIIKKALAITEROMUDIREKTIIVI WEEE...

Page 23: ...KETUKSIIN AKKUHAPON KANSSA Pese kohta runsaalla juoksevalla vedellä Ota välittömästi yhteys lääkäriin JOS AKKUHAPPOA JOUTUU NIELUUN Huuhdo suu ja sylje Ota välittömästi yhteys lääkäriin AKKUA KOSKEVIA HUOMAUTUKSIA Ei ole suositeltavaa jättää leikkikalua tilaan jonka lämpötila voi laskea nollan alapuolelle Leikkikalun käyttäminen ennen kuin sen lämpötila on nollan yläpuolella voi aiheuttaa moottori...

Page 24: ...haarukkaan ja aseta edellä irrottamasi tappi paikalleen 9 Aseta ø9 suojalevy asianmukaiseen varusteeseen kiinnitä pyörä kuvassa osoitetulla tavalla 10 Aseta haarukka paikalleen 11 Kiinnitä tuulilasi etukappaleeseen 12 Aseta kojelauta alatappeihin nuolen osoittamalla tavalla Paina reunoja ja kojelaudan yläpuolta niin että se on täysin paikallaan 13 Aseta etukappale haarukkaan 14 Aseta ohjaustanko n...

Page 25: ... elektrolytten Beskytt hendene dine Legg batteriet i en plastpose og følg miljøreglene for kassering av batterier DERSOM HUDEN ELLER ØYNENE KOMMER I KONTAKT MED ELEKTROLYTTEN Skyll nøye med rikelig vann det berørte området Kontakt lege med en gang DERSOM NOEN SKULLE KOMME TIL Å DRIKKE ELEKTROLYTTEN Skyll munnen og spytt Kontakt lege med en gang ADVARSLER FOR BATTERIET Det anbefales ikke å oppbevar...

Page 26: ...d det samme du har sluttet å bruke de forskjellige funksjonene sånn at batteriene varer lengre 26 PEDAL Gasspedal ved å løfte på foten vil bremsen automastisk kobles inn SKIFTING AV GLØDELAMPER 2 5 Volt 27 kru av skruen på det utbrente blinklyset Ta av glasset 28 Skift den utbrente glødelampen 29 Sett glasset på blinklyset igjen og skru på skruen igjen BYTTING AV BATTERIET OBS ILLUSTRASJONENE AV B...

Page 27: ...NAMN DESMOSEDICI Valentino Rossi PRODUKTENS IDENTIFIKATIONSKOD IGED1048 FÖRESKRIFTER FÖR REFERENS original Allmänt Direktiv avseende leksakers säkerhet 2009 48 EEG Standard EN71 1 2 3 9 Standard EN62115 Direktiv om elektromagnetisk kompatibilitet 2004 108 EG Standard EN55022 EN55014 Europeiska direktivet WEEE 03 108 EG Europeiska direktivet 2002 95 EG om begränsning av användning av vissa farliga ...

Page 28: ...feln 14 Sätt fast styret med ett klick 15 Sätt fast glaset med ett klick på den främre lyktan 16 Lägg pilarna på kylarmaskeringen och sätt fast dem alldeles före den bakre markeringen och tryck som bilden visar A höger pil du känner igen den på bokstaven D inuti 17 För in targabågens låstungor i hålen på karosseriet och vrid den sedan nedåt 18 Fäst targabågen med hjälp av skruven 19 För in de två ...

Page 29: ... yasal düzenlemelerin öngördüğü bağımsız laboratuar testlerine tabi tutulduğunu kendi sorumluluğu altında beyan etmektedir VERİLİŞYERİ VE TARİHİ İtalya 10 10 2011 Peg Perego S p A via A De Gasperi 50 20862 Arcore MB ITALIA TÜRKÇE UYGUNLUK BEYANI ÖNEMLİ BİLGİLER Oyuncaklarımız Avrupa Birliği Konseyinin oyuncaklar için öngördüğü güvenlik niteliklerine ve A B D Tüketici Oyuncak Güvenliği Nitelikleri ...

Page 30: ...nuz ARAÇ ÇALIŞMIYORSA Hız pedalının altındaki kablo bağlantılarının kesilmiş olup olmadığını kontrol edin Hız pedalının çalışıp çalışmadığını kontrol edin ve çalışmıyorsa yeni parçayla değiştirin Bataryanın elektrik aksamına takılı olup olmadığını kontrol edin ARAÇ GÜÇ KAYBEDİYORSA Bataryaları doldurun Sorun dolumdan sonra da devam ediyorsa bataryayı ve batarya şarj cihazını ilgili bir merkeze kon...

Page 31: ...и в любой момент изменения в модели и данные приведенные в настоящем издании по причинам технического или корпоративного характера PУССКИЙ ВАЖНАЯ ИНФОРМАЦИЯ Наши игрушки соответствуют Европейским нормам по безопасности игрушек требованиям по безопасности предусмотренным Советом ЕЭС и спецификации U S ConsumerToy Safety Specification Они также одобрены организацией I I S G Итальянским институтом по...

Page 32: ...едует СНЯТЬ НОГУ С ПЕДАЛИ АКСЕЛЕРАТОРА таким образом сработает электрический тормоз замедляя спуск игрушки РАЗВЛЕЧЕНИЕ БЕЗ ПЕРЕРЫВОВ держите запасной комплект заряженных батарей готовым к применению ИГРУШКА НЕ РАБОТАЕТ Проверьте не отсоединились ли кабели под пластиной акселератора Проверьте исправность кнопки акселератора и при необходимости замените ее Убедитесь что батарея подключена к электрич...

Page 33: ...jtjkouoqo m re dgl rioty dq loty G Peg Perego S p A e mai pirsopoigl mg jas ISO 9001 G pirsopo grg paq vei rsoty pek sey jai soty jasamakxs y sgm ecc grg liay diau meiay jai elpirsor mgy rsom sq po le som opo o dotke ei g esaiq a 24 4 Sa paidi pq pei p msa ma uoqo m papo sria jas sg di qjeia sgy vq rgy sot ov lasoy sam so vgla keisotqce pqor nse ma lgm b fotm sa paidi v qia p dia kka l qg sot r la...

Page 34: ...so vgl ray cia l a lec kg peq odo ma htl rse ma uoqs fese sg lpasaq a jai ma sgm jqas se aportmdel mg ap sgm ecjas rsarg epamak base so veiqirl epamau qsirgy sotk virsom j he sqeiy l mey G lpasaq a dem pq pei ma uoqs fesai amapodoctqirl mg Lgm nevm se sg lpasaq a re jas rsarg u qsirgy Ek cvese peqiodij Vqgrilopoie se l mo so uoqsirs lpasaqi m pot paq vesai jai siy cm riey lpasaq ey PEG PEREGO G lp...

Page 35: ... p p p 16 p p p p p p p A p D p p 17 p roll bar p p 18 roll bar 19 20 p p p p 21 p p 3 4 FE3 4 3 71 22 23 F 24 AA 1 5V 3 3 3 3 25 A B 8 1 C 26 Y3 p p p 13 3 3 371 471 2 5 Volt 27 28 29 13 3 3 3 4 3 3 3 3 3 3_ 3_ 3 3 3 3 Y 3_ 3z 3 YY z 3 3 3_ _ 3 3 3_ 3z 3 30 p p p p 21 p p p 31 p p p 1 p 2 32 p 33 p p p p p p p p _ 9 3 3 4 3 3 3 _ 3 3 F Y _ 3_ 3 3 3 Y3_ 3 3 3 3 _ 3 3 3 3 3 3 34 p p p p F p p p 35 ...

Page 36: ...m e L V I î g n s G 8 1 e f J H g Œ q F H g l k g R r a b l l o r f h g l s l h V 9 1 r L f j u a R k f f K H g j V t d H g e Œ F H g O h w m O g T H g u V f m 0 2 V H g Œ G H P l V H g l O g T H g l Œ u P j n j q f i t d H g q v H g l P t d H g a G A 1 2 r L f j w G H g Œ h f s K U k H k j h x ƒ I H g u l g h J j ƒ V H z l h K j y g R j e f J H g l Œ u H K H g u V f m h M g b s j O H L î O h G H ...

Page 37: ...l K H g s L H g l b f S a h x O V N f h g Œ V F l K H H x H g l j P V m B j f g G f H l k h J H g u V f m l e G H g l P V h J H M H V H V H g o B j s j O L H g f k K l H O V N r h f g m g b a j u h G f h g Œ V F l K H g u V f m F H s j O H L H g u V f m l K r ˆ f G G H P t Œ t d P h g m U L î V H h q l K t z m H g u V f h J H g l M f l h k K H g j h J H V f m E E A R t Œ g b j P h H V f d u ƒ H H ...

Page 38: ......

Page 39: ......
Page 40: ... 4842940 call us toll free 1 800 728 2108 llame USA gratis 1 800 225 1558 PEG PEREGO CANADA Inc 585 GRANITE COURT PICKERING ONT CANADA L1W3K1 phone 905 8393371 fax 905 8399542 call us toll free 1 800 661 5050 Tutti i diritti di proprietà intellettuale relativi ai contenuti di questo manuale d istruzione appartengono a PEG PEREGO S p A e sono tutelati dalle leggi vigenti All of the intellectual pro...

Reviews: