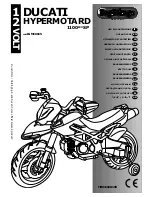
background image

For the safety of the child, before starting up the
vehicle read and carefully follow the following
instructions.
• Teach the child how to use the vehicle properly for

safe and enjoyable driving.

• The toy must be used with caution, as it requires

substantial dexterity in order to avoid falls or
collisions which could cause injuries to the user or
third parties.

• Before starting, check that there are no people or

objects obstructing the vehicle’s path.

• Drive with hands on the handlebars/steering wheel

and always watch the road ahead.

• Brake in good time to avoid collisions.

ATTENTION!
The item is equipped with a brake system which
needs to be appropriately illustrated to the child by
an adult.

2nd GEAR (if present)
Initially, use in 1st gear is recommended. Before
enabling 2nd gear, check that the child has learned to
use the handlebars/steering wheel, 1st gear and the
brake correctly, and has become familiar with the
vehicle.

WARNING: In order to avoid the risk of the vehicle
overturning on bends, it is recommended that you do
not use high speeds (2nd gear) when the stabilising
wheels are fitted.

WARNING!
• Check that all the wheel fixing studs/nuts are

fastened properly.

• If the vehicle is overloaded, as can happen on soft

sand, mud, or very uneven ground, the overload
switch will immediately disconnect the power. The
power supply will be restored after a few seconds.

• Only for 12 and 24 Volt vehicles: in first gear the

vehicle has a differential effect like a real motor
vehicle; on smooth terrain and with just one child
on board, the two wheels can turn at different
speeds and they can slip and slow down.

UNINTERRUPTED FUN: Keep a spare set of charged
batteries ready for use.

THE VEHICLE DOES NOT WORK?

• Check that there are no disconnected cables under

the accelerator plate.

• Check the operation of the accelerator button and

replace it if necessary.

• Check that the battery is connected to the

electrical system.

THE VEHICLE LACKS POWER?
• Charge the batteries. If after charging the problem

persists, have the battery and charger checked by
an assistance centre.

PROBLEMS?

RULES FOR SAFE DRIVING

PEG PEREGO

offers an after-sales assistance service,

directly or through a network of authorized
assistance centres, for any repairs or replacements
and the sale of original spare parts. To contact the
assistance centres refer to the “Assistance Centres”
booklet included in the packaging.

The item’s serial number must always be quoted. See
the page on spare parts to find out how to identify the
serial number.

Peg Perego always strive to best satisfy their
customers' needs. Knowing the opinions of our
customers is therefore very important and valuable
to us. We would be very grateful if, once you have
used the product, you would fill out the 

CONSUMER

SATISFACTION QUESTIONNAIRE 

which you can find on

the internet at: www.pegperego.com, making
any observations or suggestions you might have.

ASSISTANCE SERVICE

WARNING
THE VEHICLE MUST BE ASSEMBLED BY ADULTS.
BEWARE WHEN  EXTRACTING THE VEHICLE
FROM THE  PACKAGING.
ALL THE NECESSARY SCREWS AND SMALL
COMPONENTS ARE STORED IN A BAG INSIDE
THE PACKAGING.
THE BATTERY MAY ALREADY BE INSTALLED.

ASSEMBLY

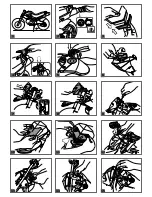
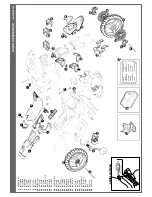
1 • Remove the motorcycle from its packaging and

lower the stand to facilitate assembly operations.

2 • Press the two ends of the exhaust pipes into place.
3 • Press the rear tail glass into place.
4 • Press the rear tail to the motorcycle frame.
5 • Press the fuel cap into place.
6 • Insert the dashboard tab in the upper part of the

top of the cover and then turn and press to
complete insertion.

7 • Insert the cover in the front fork sockets.
8 • Press down until it clicks.
9 • Secure the cover using the screws provided.

10 • Apply the silver adhesive contained in the packet

of adhesives.

11 • Apply the front headlight glass. To facilitate this

operation, attach the lower part first.

12 • Insert the handlebar.
13 • Connect the throttle terminal to the terminal

protruding from the fuel tank.

14 • Insert the terminals in the fuel tank.
15 • Apply the handlebar plate.
16 • Secure the handlebar plate using the two screws

provided.

STABILISING WHEELS

WARNING: IN ORDER TO AVOID THE RISK OF
THE VEHICLE OVERTURNING ON BENDS, IT IS
RECOMMENDED THAT YOU DO NOT USE HIGH
SPEEDS (2nd gear)WHEN THE STABILISING
WHEELS ARE  FITTED.

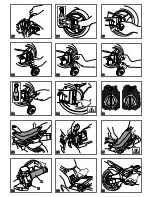
17 • To assemble the stabilising wheels unscrew the

bolts of the rear wheel with the spanner
provided. NOTE: If the bolt does not unscrew,
hold the bolt on the other side with a pair of
pliers.

18 • Remove the washer and spacer (WARNING: do

not dispose of the spacer; when you wish to
remove the stabilising wheels you will need to
return it to its place).

19 • Position the stabilising wheel.
20 • Insert the washer removed earlier.
21 • Replace the bolt.
22 • Secure with the spanner provided. Repeat the

above steps on the other side.

23 • To remove the stabilising wheels repeat the

above in the reverse order, remembering to
replace the spacer before the washer and bolt.

VEHICLE OPERATION 

24 • Release the saddle by turning the red latch on

the saddle to the position shown in panel A.

25 • Lift and remove the saddle.
26 • Connect the battery terminal to that of the

electrical system.

27 • Replace the saddle by sliding it under the fuel

tank. If needed, lift the tank as shown in the
figure. Turn the red latch on the saddle as shown
in panel B of figure 24. Warning: Always secure
the saddle with the latch. The vehicle is ready for
use.

• IMPORTANT NOTE: Charge the battery before

using the vehicle for the first time (see the
section IMPORTANT INFORMATION).

FEATURES AND USE OF THE VEHICLE

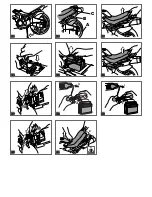
28 • A-Throttle: to operate the motorcycle, rotate

the throttle downwards as shown in the figure
by the arrow.
B-Horn: To operate the horn press the button.

29 • Speed Selector Button: when the motorcycle

leaves the factory it is set to travel at the first
speed (lower speed). To use the second speed
(higher speed), press the button shown in the
figure. NOTE: to access the button open and
remove the saddle. The button is situated below
the fuel tank.

30 • Brake Pedal: to brake, rotate the throttle

upwards and press your foot on the brake pedal.

31 • Stand: to be used when the motorcycle is

without stabilising wheels.

32 • A-Rubber tread for better grip and quietness.

B-Photoengraved details with carbon fibre effect.
C-Photoengraved saddle for better grip

ASSEMBLY INSTRUCTIONS

REPLACING THE  BATTERY

PLEASE NOTE: THE PICTURES OF THE BATTERIES
ARE FOR ILLUSTRATIVE PURPOSES ONLY. YOUR
BATTERY MAY BE DIFFERENT FROM THE MODEL
SHOWN. THIS DOES NOT AFFECT THE
REPLACEMENT AND CHARGING PROCEDURES
DESCRIBED.
33 • Open the saddle, as described above.
34 • Unscrew the battery holder screws. Remove the

battery holder.

35 • Disconnect the battery terminal from that of the

electrical system, pushing the terminals sideways.

• Remove and replace the battery. Reposition the

battery holder and tighten the screws. Reconnect
the terminals. Reposition the saddle and lock it
back in place.

CHARGING THE  BATTERY

WARNING: BATTERY CHARGING AND ANY
OTHER WORK ON THE ELECTRICAL SYSTEM
MUST BE CARRIED OUT BY ADULTS.
THE BATTERY CAN ALSO BE CHARGED
WITHOUT REMOVING IT FROM THE TOY.
36 • Open the saddle, as described above.
37 • Disconnect the battery terminal (B) from that of

the electrical system (A) by pushing sideways.

38 • Plug the battery charger terminal into a wall

socket following the instructions enclosed.
Connect terminal B to the battery charger
terminal C.

39 • Once charging is complete, unplug the charger

from the wall socket, then unplug terminal C
from terminal B.

40 • Push plug B, until it clicks, into plug A.
41 • At the end of this operation remember to close

and latch the saddle.

Summary of Contents for DUCATI HYPERMOTARD 1100 EVO SP

Page 1: ...ENTRETIEN EN FR DE ES PT TR RU EL GEBRAUCH UND WARTUNG BRUGSANVISNING KÄYTTÖOHJE BRUKSANVISNING DA FI NO SV BRUKSANVISNING EMPLEOY MANUTENCION USO E MANUTENÇÃO KULLANIM VE BAKIM ЭКСПЛУАТАЦИЯ И УХОД MSGQG G SL UPORABA IN VZDRŽEVANJE H B s j O H L H g w h k m AR Ducati Motor Holding S p A and Ducati Corse official licensed product ...

Page 2: ...1 2 3 4 5 6 7 8 9 12 11 10 15 14 13 ...

Page 3: ...1 2 A B A B 16 17 18 19 21 20 22 23 24 27 26 25 30 29 28 ...

Page 4: ...1 2 B C 1 2 B C 1 2 31 32 33 34 35 36 37 38 39 41 40 B C A A A B B ...

Page 5: ... SPST8688DMS 23 SPST8682GR 24 SARP8680N 25 SPST8682GR 26 SPST8688SMS 27 SAGI9217NR 28 SPST9212 29 SPST9213N 30 SPST9219N 31 ASGI0229SNGR 32 SAGI9221NGR 33 SPST9218GR 34 IKCB 35 IAKB0014 36 MMEV0806 DUCATI HYPERMOTARD cod IGMC0015 SERIAL NUMBER adesivi stickers autocollants Aufkleber pegatinas autocolantes nalepke klistermærker tarroja klistremerker klistermärken çıkartmalar наклейки 1 2 3 4 5 6 7 ...

Page 6: ...truzioni allegate al caricabatterie e comunque non superare le 24 ore Caricare per tempo la batteria non appena il veicolo perde velocità eviterete danni Se lasciate fermo il vostro veicolo per lungo tempo ricordatevi di caricare la batteria e di tenerla scollegata dall impianto ripetete l operazione di ricarica almeno ogni tre mesi La batteria non deve essere caricata capovolta Non dimenticare la...

Page 7: ...avvitare le viti Collegare le spine riposizionare e fissare la sella CARICA DELLA BATTERIA ATTENZIONE LA CARICA DELLE BATTERIE E QUALSIASI INTERVENTO ALL IMPIANTO ELETTRICO DEVONO ESSERE EFFETTUATE DA ADULTI LA BATTERIA PUÓ ESSERE CARICATA ANCHE SENZA RIMUOVERLA DAL GIOCO 36 Aprire la sella come descritto in precedenza 37 Scollegare la spina A dell impianto elettrico dalla spina B della batteria p...

Page 8: ... km h Speed in 2nd gear 7 4 km h Peg Perego reserve the right to make changes to the models and information in the present publication at any time for technical or company reasons Thank you for choosing a PEG PEREGO product For over 50 years PEG PEREGO have been with you as you take your children out in carriages just after they are born then in strollers and later on in pedal and battery powered ...

Page 9: ...er adhesive contained in the packet of adhesives 11 Apply the front headlight glass To facilitate this operation attach the lower part first 12 Insert the handlebar 13 Connect the throttle terminal to the terminal protruding from the fuel tank 14 Insert the terminals in the fuel tank 15 Apply the handlebar plate 16 Secure the handlebar plate using the two screws provided STABILISING WHEELS WARNING...

Page 10: ...s vêtements cela risquerait de les abîmer Utilisez uniquement des batteries ou des accumulateurs du type recommandé ou de type analogue EN CAS DE FUITE Protégez vos yeux éviter tout contact direct avec l électrolyte protégez vos mains Mettre la batterie dans un sac en plastique et suivre les instructions concernant l élimination de la batterie EN CAS DE CONTACT DE LA PEAU OU DES YEUX AVEC L ELECTR...

Page 11: ...cule le fabricant se réservant le droit d expertiser les pièces Le fabricant ne saurait en aucune manière être tenu responsable en cas de non respect des recommandations de ce manuel d utilisation de mauvaise utilisation du véhicule ou d endommagements accidentels de modifications techniques du véhicule qui pourraient endommager le véhicule et entraîner de graves dangers pour la sécurité de l enfa...

Page 12: ...bigen Zeitpunkt und aus technischen oder betrieblichen Gründen Abänderungen an den in dieser Ausgabe aufgeführten Modellen und technischen Daten vorzunehmen PEG PEREGO bedankt sich für den Kauf dieses Produktes Seit über 50 Jahren führt PEG PEREGO die Kinder spazieren Als Neugeborene im Kinderwagen dann im Kindersportwagen und später mit denTret und Batterie Spielfahrzeugen Entdecken Sie die kompl...

Page 13: ...s es wieder an seinen Platz gesetzt werden 19 Das Stützrad positionieren 20 Die zuvor entfernte Unterlegscheibe einsetzen 21 Den Schraubenbolzen wieder positionieren 22 Alles mit dem im Lieferumfang enthaltenen Schlüssel fest anziehen Die Vorgänge auf der anderen Seite wiederholen 23 Zum Entfernen der Stützräder auf umgekehrte Weise vorgehen und dabei daran denken das Abstandsstück vor der Unterle...

Page 14: ... dañar Usar sólo el tipo de baterías o cargadores que se aconseja o análogos SI HAY UNA PÉRDIDA Protegerse los ojos Evitar el contacto directo con el electrolito Proteger las manos Poner la batería en una bolsa de plástico y seguir las instrucciones para la eliminación de baterías SI PIEL Y OJOS ENTRAN EN CONTACTO CON EL ELECTROLITO Lavar abundantemente la parte afectada con agua Consultar un médi...

Page 15: ...l faro delantero Para facilitar la operación es aconsejable enganchar primero la parte inferior 12 Introducir el manillar 13 Conectar la clavija de la empuñadura acelerador con la clavija que sale del depósito 14 Introducir las clavijas en el depósito 15 Aplicar la placa del manillar 16 Fijar la placa del manillar con los dos tornillos provistos RUEDAS ESTABILIZADORAS ATENCIÓN NO SE RECOMIENDA UTI...

Page 16: ...AEE e portanto não deve ser eliminado como simples resíduo urbano mas deve ser sujeito à coleta seletiva Entregue este resíduo nas apropriadas e relativas ilhas ecológicas A presença de substâncias perigosas contidas nos componentes elétricos deste produto constitui fonte de potencial perigo para a saúde humana e para o meio ambiente caso tais produtos não forem corretamente eliminados O desenho p...

Page 17: ...tabilizadona 20 Introduza a arruela que foi removida anteriormente 21 Reposicione o perno 22 Fixe com firmeza todos os elementos removidos utilizando a chave fornecida Repita as operações no outro lado da moto 23 Para retirar as rodas estabilizadoras proceda de modo inverso lembrando que é necessário reposicionar o espaçador antes da arruela e do perno FUNCIONAMENTO DO VEÍCULO 24 Desbloqueie o sel...

Page 18: ... ampak je predmet ločenega zbiranja odpadkov Odpadek odložite na ustreznem vnaprej pripravljenem ekološkem otoku Prisotnost nevarnih snovi v električnih delih tega izdelka predstavljajo vir morebitne nevarnosti za človeško življenje in za okolje če izdelka ne zavržete na pravilen način Prekrižan smetnjak je oznaka ki sporoča da je treba izdelek zavreči kot predmet ločenega zbiranja odpadkov VARNO ...

Page 19: ... Vstavite podložko ki ste jo prej sneli 21 Znova namestite matico 22 Pritrdite jo s priloženim ključem Zgornje korake ponovite tudi na drugi strani 23 Za odstranitev pomožnih koles zgornje korake izvedite v obratnem vrstnem redu in med podložko in matico ne pozabite vstaviti distančnika PRIPRAVA VOZILA NA UPORABO 24 Odpnite sedež tako da obrnete rdeči zapah v položaj prikazan na sliki 26A 25 Dvign...

Page 20: ...ingssted Aflever det skrottede produkt på de dertil indrettede miljøpladser De elektriske dele i dette produkt indeholder farlige stoffer der indebærer fare for helbredet og for miljøet hvis produkterne ikke skrottes på korrekt måde Mærkaten med den overstregede skraldespand angiver at produktet skal bortskaffes til særlige opsamlingssteder BORTSKAFFELSE AF BATTERIET Vær med til at passe på miljøe...

Page 21: ... at der ikke er ting eller personer i vejen Kør med hænderne på styret rattet og hold altid øje med vejen fremad Brems op i tide for at undgå at køre ind i noget VIGTIGT Produktet er udstyret med et bremsesystem der kræver at en voksen viser barnet den korrekte brug 2 kørselshastighed hvis denne findes Det tilrådes kun at bruge den 1 kørselshastighed i begyndelsen Før 2 hastighed aktiveres skal du...

Page 22: ...agneettinen yhteensopivuus Standardi EN55022 EN55014 Euroopan direktiivi 03 108 EY WEEE Euroopan direktiivi 2002 95 EY RoHS Direktiivi 2005 84 EY Lelujen ja lastenhoitotarvikkeiden sisältämät ftalaatit Säännöstö EN 60825 1 Ei vastaa tieliikennesääntöjä eikä siis voi ajaa yleisillä teillä VAATIMUSTENMUKAISUUSVAKUUTUS Peg Perego S p A vakuuttaa omalla vastuullaan että kyseinen tuote on käynyt läpi s...

Page 23: ...a on jarrutusjärjestelmä jonka käyttäminen edellyttää että aikuinen on opettanut lapselle miten on toimittava TOINEN NOPEUS mallikohtainen Aluksi on suositeltavaa käyttää ensimmäistä vaihdetta Ennen toisen vaihteen kytkemistä on varmistettava että lapsi on oppinut käyttämään oikein ohjaustankoa pyörää ensimmäistä vaihdetta jarrua ja että hän on tottunut käyttämään ajoneuvoa HUOMIO älä käytä korkea...

Page 24: ...aimentamiseksi B Valokaiverrettuja yksityiskohtia hiilikuituvaikutelman antamiseksi C Valokaiverrettu satula pidon parantamiseksi ASENNUSOHJEET AKUN VAIHTO HUOMIO AKKUJEN PIIRROKSET OVAT AINOASTAAN VIITTEELLISIÄ AKKUSI SAATTAA EROTA ESITELLYSTÄ MALLISTA SEURAAVAT VAIHTO JA LATAUSTOIMINNOT OVAT KUITENKIN SAMAT 33 Avaa satula edellä annettujen ohjeiden mukaan 34 Ruuvaa irti akun kiinnittimen ruuvit ...

Page 25: ...n med vanlig husholdningsavfall Dere kan ta dtm med til en oppsamlingsstasjon for brukte batterier eller avsettingssted for spesialavfall Skaff informasjon hos kommunen eller avfallsselskapet SIKKERHETSNORMER Oppladingen av batteriet må utføres og overses av voksne La ikke barn leke med batteriet OPPLADING AV BATTERIET Lad opp batteriet etter anvisningene som følger med batteriladeren unngå opplad...

Page 26: ...det for å bruke andre høyeste hastighet MERK Knappen ligger under tanken og for å nå knappen må setet åpnes og tas av 30 Bremsepedal Drei gasspaken fra deg og trykk med foten på bremsepedalen for å bremse 31 Sidestøtte Må brukes når motorsykkelen er uten støttehjul 32 A Dekkbane i gummi for bedre veigrep og mindre støy B Fotoetsede detaljer med karbonfiber effekt C Fotoetset sete for bedre feste U...

Page 27: ...a era ögon och undvik direkt kontakt med elektrolyten skydda era händer Lägg batteriet i en plastpåse och följ instruktioner för bortskaffande av batterier OM HUDEN ELLER ÖGONEN SKULLE KOMMA I KONTAKT MED ELEKTROLYTEN Skölj den utsatta kroppsdelen i rikligt med rinnande vatten Rådfråga omedelbart läkare OM ELEKTROLYTEN SVÄLJS Skölj munnen och spotta Rådfråga omedelbart läkare VARNINGAR BATTERI Lek...

Page 28: ...OBS om bulten vrids utan motstånd håll fast bulten på motsatta sidan med hjälp av en tång 18 Dra ut brickan och distanshållaren VARNING kasta inte distanshållaren När du vill ta bort balanshjulen ska den sättas tillbaka på sin plats 19 Placera balanshjulet 20 För in brickan som togs bort tidigare 21 Sätt tillbaka bulten 22 Fäst det hela noggrant med nyckeln som erhålls Upprepa detta på andra sidan...

Page 29: ...alindeki arabaların bulunduğu halka açık yollarda dik yokuşlarda basamak ve merdivenlerin su kanallarının ve havuzların yakınında kullanmayınız Aracın kullanımı esnasında çocuklar daima ayakkabı giymiş olmalıdır Araç çalışırken çocukların ellerini ayaklarını veya vücutlarının diğer uzuvlarını giysilerini veya başka eşyalarını aracın hareketli aksamlarına koymadıklarına dikkat ediniz Aracın motorla...

Page 30: ...ir KESİNTİSİZ EĞLENCE yedekte bir batarya setini devamlı dolu olarak kullanıma hazır tutunuz ARAÇ ÇALIŞMIYORSA Hız pedalının altındaki kablo bağlantılarının kesilmiş olup olmadığını kontrol edin Hız pedalının çalışıp çalışmadığını kontrol edin ve çalışmıyorsa yeni parçayla değiştirin Bataryanın elektrik aksamına takılı olup olmadığını kontrol edin ARAÇ GÜÇ KAYBEDİYORSA Bataryaları doldurun Sorun d...

Page 31: ...одежду или другие предметы вблизи движущихся частей Ни в коем случае не смачивайте такие компоненты игрушки как двигатели системы кнопки и т д Не использовать бензин или прочие воспламеняющиеся вещества вблизи игрушки Игрушкой должен пользоваться обязательно один ребенок если она не входит в категорию игрушек для двух детей ДИРЕКТИВАWEEE только для Евросоюза В конце своего срока службы это изделие...

Page 32: ...СКОРОСТЯХ ПРИ УСТАНОВЛЕННЫХ ПОДДЕРЖИВАЮЩИХ КОЛЕСАХ 17 Для установки поддерживающих колес отвинтите болты заднего колеса с помощью гаечного ключа входящего в комплект ПРИМЕЧАНИЕ Если болт не отвинчивается удерживайте болт с другой стороны плоскогубцами 18 Снимите шайбу и проставку ВНИМАНИЕ Не выбрасывайте проставку вам придется установить ее на место когда вы захотите снять поддерживающие колеса 19...

Page 33: ... qhxsey bk bey rsg lpasaq a s m 3 vgla 1 h rgy 1 epamauoqsif lemg rsecam lpasaq a lok bdot sxm 12V 8Ah 1 jimgs qioy sqov y 2 jimgs qey sxm 165 W Sav sgsa rsgm 1g sav sgsa 3 5 Km h Sav sgsa rsgm 2g sav sgsa 7 4 Km h G Peg Perego diasgqe so dija xla ma epiu qei opoiad pose rsicl lesabok y re loms ka jai dedol ma pot peqicq uomsai rsgm paqo ra dglor etrg cia k coty sevmij y epiveiqglasij y u rgy PEG ...

Page 34: ... vi mi jkp vqgrilopoighe ep mx re llo k rpg lpoqe ma pqojak rei bk bey re pk jsqa jimgs qey jai leixs qey Kipa mese peqiodij le ekauq k di sa jimo lema l qg pxy jotfim sa sil mi jkp Oi epiu meiey sot ov lasoy lpoqo m ma jahaqirso m le ma tcq pam jai e m e mai apaqa sgso le lg diabqxsij pqo msa oijiaj y vq rgy Oi eqcar ey jahaqirlo pq pei ma ejseko msai l mom ap em kijey Lgm aportmaqlokoce se pos s...

Page 35: ... RTRJETARIA OKER OI BIDER JAI SA LIJQA SELAVIA BQIRJOMSAI RE EMA RAJOTKAJI RSO ERXSEQIJO SGR RTRJETARIAR G LPASAQIA LPOQEI MA EIMAI GDG SOPOHESGLEMG RSO PQO OM RTMAQLOKOCGRG 1 2 3 4 5 6 Y 7 8 9 10 z 11 12 13 14 15 16 ΠΡΟΕΙΔΟΠΟΙΗΣΗ ΣΥΝΙΣΤΑΤΑΙ ΝΑ ΧΡΗΣΙΜΟΠΟΙΕΙΤΕ ΤΙΣ ΧΑΜΗΛΕΣ ΤΑΧΥΤΗΤΕΣ ΟΤΑΝ ΕΧΕΤΕ ΒΑΛΕΙ ΤΟΥΣ ΒΟΗΘΗΤΙΚΟΥΣ ΤΡΟΧΟΥΣ ΓΙΑ ΝΑ ΑΠΟΦΥΓΕΤΕ ΤΟΝ ΚΙΝΔΥΝΟ ΑΝΑΤΡΟΠΗΣ ΤΟΥ ΟΧΗΜΑΤΟΣ ΣΤΙΣ ΣΤΡΟΦΕΣ 17 18 F 9 Y...

Page 36: ...b J H g j e f J 9 1 q v U g m H g j e f J t d l q u h H g w P p 0 2 e L O G H g V M H g j d V t u j h l K r f G 1 2 H s j f G H g w h l g m 2 2 j l K î P h L H g w h l g m f H s m H g l j h H g l j t V V V H g O H J H g s h f Œ m U k H g h k F H O V 3 2 f u h U b J H g j e f J l K j V H V H g O H J H g s h f Œ m g K f j V j F U s d l v H O ƒ t d H B U j f h V q v H g V M r f G H g w h l g m H g l ...

Page 37: ...j O L H g u V f m t d l s h P h J l j P m f u H U K H g l O h V B j s j O L H g u V f m t d H g V R H g u h l m P e l h l V V s h V H J l j r m ƒ g t R H g l k P V H J H g U V M f h g Œ V F l K H g V h J H g s b g L U k l h V D H g l h I P l h l h J H g s f h P m F U g n H h G H z l h H V j H x H P ƒ m e k h x H s j O H L H g u V f m U k l h j u l G H g u V f m H k j f i P j n B q v H h G L r H l ...

Page 38: ......

Page 39: ......

Page 40: ...088213 fax 039 3309992 numero verde solo da telefono fisso PEG PEREGO U S A Inc 3625 INDEPENDENCE Dr FORT WAYNE IN 46808 phone 260 4828191 fax 260 4842940 call us toll free 1 800 728 2108 llame USA gratis 1 800 225 1558 llame Mexico gratis 1 800 710 1369 PEG PEREGO CANADA Inc 585 GRANITE COURT PICKERING ONT CANADA L1W3K1 phone 905 8393371 fax 905 8399542 call us toll free 1 800 661 5050 ...

Reviews: