background image

THE VEHICLE DOES NOT WORK?

• Check that there are no disconnected cables under

the accelerator plate.

• Check the operation of the accelerator button and

replace it if necessary.

• Check that the battery is connected to the

electrical system.

THE VEHICLE LACKS POWER?
• Charge the batteries. If after charging the problem

persists, have the battery and charger checked by
an assistance centre.

PROBLEMS?

ASSEMBLY INSTRUCTIONS

WARNING

ASSEMBLY MUST ONLY BE CARRIED OUT BY
ADULTS. TAKE  CARE WHEN  REMOVING THE
VEHICLE FROM ITS PACKAGING. ALL THE
SCREWS AND SMALL PARTS ARE CONTAINED IN
A BAG INSIDE THE PACKAGING. THE BATTERY
MAY ALREADY BE FITTED INSIDE THE ITEM.
Do not use the toy if you find it damaged after
opening the packaging. Contact the shop where you
bought it or the customer support centre.
Take care in the presence of children while
assembling the toy, given the risks caused by small
parts (ingestion hazard) and the plastic bags that
contain them (choking hazard).
To assemble the toy, you will need a flat-head
screwdriver, a Phillips screwdriver, a hammer, and a
pair of pliers.

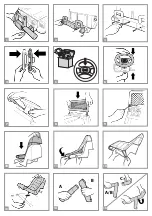
ASSEMBLY

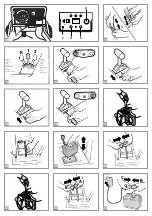
 1 • Place from bumper on body and tighten four

screws as shown in the drawing.

 2 • Place rear bumper on body.
 3 • Tighten three screws as shown in the drawing.
 4 • Assemble the two parts of the steering wheel.
 5 • Place the horn in the steering wheel’s central

hole, following the instructions in its packaging.

 6 • Insert the steering wheel on the steering wheel

column.

 7 • Align steering wheel column holes with steering

wheel: nut fits into haxagon hole, bolt into round
hole.

 8 • Insert the windscreen.
 9 • Secure it by means of the two screws.

10 • Fit the removable seat cover as shown in the

figure.

11 • Hook the front elastic bands.
12 • Position the other two elastic bands.
13 • Place seat on body. Adjust seat position. Secure it

with washer and thumb nut.

14 • Join A to part B of the Roll-Bar.
15 • join A-B to the upper section of the Roll-Bar C,

insert and rotate to secure.

16 • Insert the 2 plates in the slots at the base of the

Roll-Bar and hold them in place. Secure the
plates and the Roll-Bar with the 2 screws
provided (detail A).

17 • Insert the end of the safety belt in the slot

situated centrally in the bottom of the seat, as
shown in the figure.

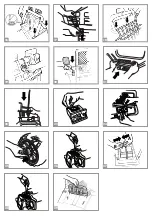
18•  Screw the net down to the body.
19 • Snap it around the roll-bar as shown in the

drawing.

20 • Insert the rearview mirrors in the direction

shown by the arrow.

21 • Press the two plastic writings into position.
22 • Insert the antenna, pressing down as you do so,

into its appropriate housing, situated on the right
rear mudguard.

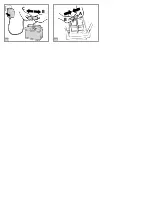
23 • Remove the radio from its packaging. Unscrew

the cover from the battery chamber. Insert two

Battery charging must be carried out and supervised
by adults only.
Do not allow children to play with the battery. 

CHARGING THE  BATTERY
• Charge the battery according to the instructions

enclosed with the battery charger and never for
more than 24 hours.

• To avoid damage, the battery should be charged as

soon as the vehicle starts to lose speed.

• If the vehicle is left unused for a long time,

remember to charge the battery and to keep it
disconnected from the electrical system. Repeat
the recharge procedure at least once every three
months.

• The battery must not be charged upside-down.
• Do not forget about the battery which is being

charged! Check it from time to time.

• Only use the battery charger provided and the

original PEG PEREGO battery.

• The battery is sealed and does not require

maintenance. 

• Do not remove the battery charger from the

socket by pulling the cable.

• Do not move the toy by pulling the battery

charger cable.

• Do not cover the battery charger cable, as this

would cause it to overheat.

• Do not place the cable and/or battery on hot

surfaces.

• Take care on how and where you wrap the cable

to so as not to damage it or compromise its
operation.

WARNING

• THE BATTERY CONTAINS CORROSIVE TOXIC

SUBSTANCES.

  DO NOT TAMPER WITH IT.

• The battery contains acid-based electrolytes.
• Do not create direct contact between the battery

terminals, avoid strong impacts: risk of explosion
and/or fire.

• While charging, the battery produces gas. Charge

the battery in a well-ventilated environment, away
from sources of heat and flammable materials.

• The flat battery must be removed from the vehicle.
• It is not advisable to bring the battery into contact

with clothes, as it could damage them.

• Only use batteries or accumulators of the

recommended kind.

IF THERE IS A BATTERY LEAK
Protect your eyes. Avoid direct contact with the
electrolyte. Protect your hands.
Put the battery in a plastic bag and follow the
instructions for battery disposal.

IF SKIN OR EYES COME INTO CONTACT WITH
THE ELECTROLYTE
Thoroughly rinse the area concerned with running
water.
Consult a doctor immediately.

IF THE ELECTROLYTE IS SWALLOWED
Rinse the mouth and spit out the water.
Consult a doctor immediately.

BATTERY WARNINGS

• Do not disassemble or try to repair the vehicle on

your own. Contact an authorised Peg Perego
customer support centre.

• The toy should not be left anywhere with a

temperature below 0°C. If it were to be used
without being warmed up to a temperature above
0°C, irreversible damage could be caused to the
motors and batteries.

• Check the condition of the vehicle regularly, paying

particular attention to the electrical system, the
plug connections, the terminal protectors and the
battery charger. If defects are identified, the
electrical vehicle and the battery charger must not
be used.

• Always disconnect the battery charger from the

toy before carrying out cleaning, maintenance, or
any type of intervention.

• For repairs use only original PEG PEREGO spare

parts.

• PEG PEREGO do not accept any responsibility for

cases of tampering with the electrical system.

• Do not leave the batteries or the vehicle close to

sources of heat like radiators, fireplaces, etc.

• Protect the vehicle from water, rain, snow, etc.

Using the vehicle on sand or mud may damage the
buttons, motors and gears.

• Lubricate moving parts like bearings, steering, etc.

periodically with light oil.

• The vehicle surfaces can be cleaned with a damp

cloth and, if necessary, with non-abrasive domestic
cleaning products.

• Cleaning must only be carried out by adults.
• Never dismantle the vehicle mechanisms or

motors, unless authorized by PEG PEREGO.

MAINTENANCE AND VEHICLE

CARE

For the safety of the child, before starting up the
vehicle read and carefully follow the following
instructions.
• Teach the child how to use the vehicle properly for

safe and enjoyable driving.

• The toy must be used with caution, as it requires

substantial dexterity in order to avoid falls or
collisions which could cause injuries to the user or
third parties.

• Before starting, check that there are no people or

objects obstructing the vehicle’s path.

• Drive with hands on the handlebars/steering wheel

and always watch the road ahead.

• Brake in good time to avoid collisions.

ATTENTION! 

The item is equipped with a brake

system which needs to be appropriately illustrated to
the child by an adult.

2nd GEAR (if present)

Initially, use in 1st gear is recommended. Before
enabling 2nd gear, check that the child has learned to
use the handlebars/steering wheel, 1st gear and the
brake correctly, and has become familiar with the
vehicle.

WARNING!

• Check that all the wheel fixing studs/nuts are

fastened properly.

• If the vehicle is overloaded, as can happen on soft

sand, mud, or very uneven ground, the overload
switch will immediately disconnect the power. The
power supply will be restored after a few seconds.

UNINTERRUPTED FUN: Keep a spare set of charged
batteries ready for use.

RULES FOR SAFE DRIVING

PEG PEREGO offers an after-sales assistance
service, directly or through a network of
authorized assistance centres, for any repairs or
replacements and the sale of original spare parts.

To contact a service center, visit our website:

http://www.pegperego.com

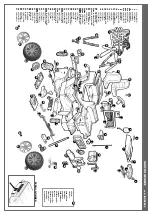
The item’s serial number must always be quoted.
See the page on spare parts to find out how to
identify the serial number.

CUSTOMER SERVICE

Summary of Contents for GAUCHO GRANDE

Page 1: ...UTILISATION ET ENTRETIEN EN FR DE ES PT TR RU EL GEBRAUCH UND WARTUNG BRUGSANVISNING KÄYTTÖOHJE BRUKSANVISNING DA FI NO SV BRUKSANVISNING EMPLEO Y MANUTENCION USO E MANUTENÇÃO KULLANIM VE BAKIM ЭКСПЛУАТАЦИЯ И УХОД MSGQG G SL UPORABA IN VZDRŽEVANJE H B s j O H L H g w h k m AR NL GEBRUIK EN ONDERHOUD ...

Page 2: ...C A B A B 7 8 9 10 A 1 2 3 4 5 6 7 8 9 14 15 10 11 12 13 ...

Page 3: ...A B 16 17 18 19 20 21 22 23 24 25 26 27 28 29 ...

Page 4: ...A B D C TUNE OFF ON VOL SET HR MIN MP3 1 2 4 3 2 1 30 31 B A B C 1 2 R davanti front devant vorn delante parte dianteira ön сперсди dietro posterior arriére heck trasera parte traseira arka сзади 32 33 34 35 36 37 38 39 40 41 42 43 ...

Page 5: ...B C B A 44 45 ...

Page 6: ...T0452N 15 SAGI0321GP 16 ASGI0043GRGP 17 SPST3867N 18 SPST3562N 19 SPST3055JA SPST3055JRF 20 MUCI1012GRN 21 MUCI1009GR 22dx SAGI8405KDNGR 22sx SAGI8405KSNGR 23 SPST9463N 24 CSGAUC00 RI53 25 SAGI0318KGP 26Adx SPST3824JDN 26Asx SPST3824JSN 26Bdx SPST3823JDN 26Bsx SPST3823JSN 27 SPST3508N 28 SAGI0183GR 29 SAGI9970 30 SPST3546JN 31 SAGI3977JKGPN 32 SOFF0401C30 33 SAGI9192NYGR 34 ASGI0188NGP 35dx SPST35...

Page 7: ... on the safety of toys 2009 48 EC Standard EN 71 1 EN 71 2 Standard EN 71 3 Standard EN 62115 Directive on the electromagnetic compatibility 1999 5 CE or RED 2014 53 UE Standard EN 55014 Standard EN 55022 Standard EN 61000 EN 60825 1 Safety of laser products Directive on WEEE RAEE 2003 108 EC Directive on batteries and accumulator 2008 103 EC Directive on RoHS 2011 65 UE EN 50581 2012 Reg CE n 190...

Page 8: ...l sedile come mostrato in figura 18 Applicare la rete prima avvitandola al corpo macchina 19 poi agganciandola al roll bar 20 Inserire gli specchietti retrovisori nel senso della freccia 21 Procedere applicando a pressione le 2 scritte in plastica 22 Infilare premendo l antenna nell apposita sede situata sul parafango anteriore destro ISTRUZIONI DI MONTAGGIO È sconsigliato appoggiare la batteria a...

Page 9: ...y 30 03 2018 Peg Perego S p A via A De Gasperi 50 20862 Arcore MB ITALIA DECLARATION OF CONFORMITY Our toys are compliant with European Safety Standards for toys safety requirements stipulated by the EEC Council and with the U S Consumer Toy Safety Specification They are also certified by notified toy safety bodies in accordance with Directive 2009 48 EC They are not compliant with the requirement...

Page 10: ...TH IT The battery contains acid based electrolytes Do not create direct contact between the battery terminals avoid strong impacts risk of explosion and or fire While charging the battery produces gas Charge the battery in a well ventilated environment away from sources of heat and flammable materials The flat battery must be removed from the vehicle It is not advisable to bring the battery into c...

Page 11: ...the battery charger terminal C 44 Once the battery has been recharged unplug the battery charger from the wall outlet then disconnect terminals C and B 45 Connect terminal B and A till you hear the final click Once recharging is complete don t forget to close the simulated motor with the screw Lisez attentivement ce manuel d instructions pour vous familiariser avec le modèle et apprendre à votre e...

Page 12: ...tir une conduite amusante en toute sécurité l usage du jouet requérant une grande habilité il doit être utilisé avec prudence de façon à éviter des chutes ou des collisions pouvant causer des lésions à l utilisateur ou à des tiers avant de démarrer vérifier qu il n y ait pas d obstacle et que personne ne se trouve sur le parcours conduire avec les mains sur le guidon volant et toujours regarder la...

Page 13: ...s indiqué par la flèche 21 Appliquer les 2 inscriptions en plastique en appuyant 22 Introduire l antenne dans le logement prévu à cet effet sur le garde boue avant droit 23 Retirer l auto radio de son emballage Dévisser le battant du compartiment à piles Insérer deux piles AA de 1 5 V non fournies dans l emplacement réservé en respectant la polarité Refermer ensuite le cache du compartiment à pile...

Page 14: ...FORMITÄTSERKLÄRUNG Unsere Spielwaren entsprechen den vorgesehenen Sicherheits Erfordernissen für Spielzeug die vom Rat der Europäischen Wirtschaftsgemeinschaft und von der U S Consumer Toy Safety Specification festgelegt wurden Darüber hinaus sind sie von zugelassenen Stellen für die Sicherheit von Spielzeug nach der EU Richtlinie 2009 48 EG zertifiziert Sie stimmen nicht mit den Richtlinien der S...

Page 15: ...endung dem Kind durch einen Erwachsenen genau erklärt werden muss 2 GANG sofern vorhanden Am Anfang ist es ratsam nur den 1 Gang zu nutzen Den 2 Gang erst einstellen wenn das Kind die Fahrt mit dem 1 Gang den Gebrauch des Lenkrads und der Bremse sicher erlernt und eine gewisse Fahrsicherheit erworben hat ACHTUNG Überprüfen ob sämtliche Nieten Befestigungsschrauben der Räder richtig festgezogen sin...

Page 16: ...ene Schlüssel stellt das Fahrzeug nicht ein oder aus sondern ist nur ein Spiel Schlüssel D Gaspedal elektrische Bremspedal Die mit elektrischer Bremse ausgestatteten Fahrzeuge bleiden automatisch stehen sobald der Fuß von genommen wird 31 Zum Lösen der Sicherheitsgurte 1 Zur Mitte hin schieben und gleichzeitig auf die Druckstaste drücken 2 Lösen 32 GANGHEBEL 1 Erste Fahrgeschwindigkeit 2 Zweite Fa...

Page 17: ...rucciones para la eliminación de baterías SI PIEL Y OJOS ENTRAN EN CONTACTO CON EL ELECTROLITO Lavar abundantemente la parte afectada con agua Consultar un médico inmediatamente SI SE INGIERE ELECTROLITO Enjuagar la boca y escupir Consultar un médico inmediatamente ADVERTENCIA BATERÍA Nuestros juguetes respetan los requisitos de seguridad previstos por el Consejo de la CEE cumple con las normas eu...

Page 18: ...ular 8 Insertar el perabrisas como en la figura 9 Enroscar los cuatro tornillos 10 Colocar el cubreasiento como en la figua 11 Sujetar los elasticos anteriores 12 Posicionar los 2 elasticos 13 Posicionar el asiento Fijarlo con el tirante de arandela a la base 14 Acople la pieza A con la B 15 acople A B con la parte superiore de la barra cilindrica C fijarla haciendola girar como en la figura 16 In...

Page 19: ...sta publicação por razões técnicas ou comerciais PEG PEREGO agradece pela escolha deste produto Há mais de 60 anos PEG PEREGO leva crianças a passear Logo que nascem com seus carrinhos e depois com as cadeirinhas de passeio e ainda depois com os brinquedos a pedais e bateria Descubra a linha completa dos produtos as novidades e outras informações acerca de Peg Perego através de nosso site www pegp...

Page 20: ...roduto constitui fonte de potencial perigo para a saúde humana e para o meio ambiente caso tais produtos não forem corretamente eliminados O desenho presente de um latão de lixo barrado significa que o produto deve ser sujeito a coleta seletiva DESCARTE DE BATERIAS Contribua para proteger o meio ambiente A bateria usada não pode ser jogada fora com os resíduos domésticos Podem ser depositadas num ...

Page 21: ...o atenção ao lado correto assim como mostra a figura 25 Aplique as tampas pressionando as nas quatro rodas 26 Apra a capota a girar os 2 ganchos laterais e remova o parafuso na placa frontal 27 Inserir firmemente até sentir o impulso a tomada B na tomada A 28 Feche a capota a girar os 2 ganchos laterais e atarraxe novamente o parafuso CARACTERÍSTICAS E USO DO VEÍCULO 29 Embaixo da mala existem qua...

Page 22: ...RANDE IDENTIFIKACIJSKA KODA IZDELKA IGOD0098 ZAKONSKA PODLAGA izvor Directive on the safety of toys 2009 48 EC Standard EN 71 1 EN 71 2 Standard EN 71 3 Standard EN 62115 Directive on the electromagnetic compatibility 1999 5 CE or RED 2014 53 UE Standard EN 55014 Standard EN 55022 Standard EN 61000 EN 60825 1 Safety of laser products Directive on WEEE RAEE 2003 108 EC Directive on batteries and ac...

Page 23: ...om obiščite našo spletno stran http www pegperego com Za vse pripombe morate imeti serijsko številko ki ustreza izdelku Da bi našli serijsko številko glejte stran na kateri so prikazani rezervni deli POMOČ UPORABNIKOM POZOR IZDELEK SMEJO SESTAVITI IZKLJUČNO ODRASLE OSEBE PAZITE KO IZDELEK VLEČETE IZ EMBALAŽE VSI VIJAKI IN MAJHNI DELCI SO V VREČKI V EMBALAŽI AKUMULATOR JE MORDA ŽE NAMEŠČEN V VOZILU...

Page 24: ...008 103 EC Directive on RoHS 2011 65 UE EN 50581 2012 Reg CE n 1907 2006 Reach allegato XVII 51 52 phthalates in toys Køretøjet er ikke konformt med forskrifterne i færdselsloven og det må derfor ikke anvendes på offentlig vej KONFORMITETSERKLÆRING Peg Pérego S p A erklærer under eget ansvar at dette produkt har undergået interne tests og er typegodkendt i henhold til gældende normer af eksterne o...

Page 25: ...e på at barnet ikke stikker hænder fødder eller andre legemsdele beklædningsstykker eller ting ind i de bevægelige dele Oversprøjt aldrig køretøjets dele som motor elanlæg trykknapper osv med vand Brug ikke benzin eller andre brandfarlige væsker i nærheden af køretøjet Køretøjet må kun anvendes af et barn med mindre det falder inden for kategorien køretøj med to pladser WEEE direktivet kun EU Ved ...

Page 26: ... skruer som vist på illustrationen 4 Saml de to ratdele 5 Indsæt hornet i rattets midterhul og følg anvisningerne der ligger i emballagen 6 Indsæt rattet på ratstangen 7 Sørg for at hullerne på ratstangen og rattet befinder sig ud for hinanden Stram skruen og møtrikken møtrikken skal sættes i det sekskantede hul og skruen i det runde hul 8 Indsæt forruden som vist på illustrationen 9 Stram de to s...

Page 27: ... VIITENORMIT alkuperä Directive on the safety of toys 2009 48 EC Standard EN 71 1 EN 71 2 Standard EN 71 3 Standard EN 62115 Directive on the electromagnetic compatibility 1999 5 CE or RED 2014 53 UE Standard EN 55014 Standard EN 55022 Standard EN 61000 EN 60825 1 Safety of laser products Directive on WEEE RAEE 2003 108 EC Directive on batteries and accumulator 2008 103 EC Directive on RoHS 2011 6...

Page 28: ...a akussa muodostuu kaasua Lataa akku hyvin tuuletetussa tilassa etäällä lämmönlähteistä ja tulenaroista aineista Tyhjä akku täytyy poistaa ajoneuvosta Vältä akun sijoittamista vaatteiden päälle ne saattavat vahingoittua Käytä ainoastaan suositeltuja paristo tai akkutyyppejä JOS AKKU VUOTAA Suojaa silmät Vältä suoraa kosketusta akkuhapon kanssa Suojaa kädet Laita akku muovikassiin ja noudata akkuje...

Page 29: ...S HUOMIO VAIN AIKUISET SAAVAT SUORITTAA ASENNUSTOIMENPITEET OLE VAROVAINEN PURKAESSASI AJONEUVOA PAKKAUKSESTA KAIKKI RUUVIT JA PIKKUOSAT OVAT PAKKAUKSEN SISÄLLÄ OLEVASSA PUSSISSA AKKU SAATTAA JO OLLA ASENNETTU TUOTTEESEEN Älä käytä lelua jos se vaikuttaa vaurioituneelta avattuasi pakkauksen Ota yhteyttä myyntipisteeseen tai soita huoltoliikkeeseen Pidä lapset etäällä asennuksen aikana pienten osie...

Page 30: ... Arcore MB ITALIA KONFORMITETSERKLÆRING Lekene våre er i samsvar med De Europeiske Sikkerhetsnormene for leketøy sikkerhetskrav utformet av EØF og med U S Consumer Toy Safety Specification De er også sertifisert av meldte organer for sikkerheten av leker i henhold til direktiv 2009 48 EF Det er ikke i samsvar med retningslinjer for ferdsel på vei og kan derfor ikke kjøres på offentlige veier OBS D...

Page 31: ...d rengjøring vedlikehold eller inngrep på produktet Ved reparasjoner må man kun bruke originaldeler fra PEG PEREGO PEG PEREGO vil ikke påta seg noe ansvar dersom det gjøres inngrep på det elektriske anlegget Man må ikke la batteriene eller kjøretøyet stå nær varmekilder som varmeovner peiser osv Beskytt kjøretøyet fra vann regn snø osv Bruk på sand eller leire kan føre til skader på tatser motorer...

Page 32: ...ut av emballasjen Skru av luken på batterirommet Sett inn to stilobatterier AA på 1 5 V Følger ikke med på det bestemte plassen ved å passe på rett polaritet Når operasjonen er slutt steng lokket på batterirommet og skru det fast igjen 24 Sett inn ledningen på antennen og radioen på den spesielle plassen på instrumentbordet ved å passe på riktig retning som vist på figuren 25 Trykk de fire hjulkap...

Page 33: ...STÄLLANDET Italien 30 03 2018 Peg Perego S p A via A De Gasperi 50 20862 Arcore MB ITALIA FÖRSÄKRAN OM ÖVERENSSTÄMMELSE Våra leksaker överensstämmer med de Europeiska säkerhetsföreskrifterna för leksaker säkerhetskrav som förutses av EEC rådet och av U S Consumer Toy Safety Specification De är vidare certifierade av anmälda organ i enlighet med direktiv 2009 48 EG gällande leksakers säkerhet Produ...

Page 34: ...ordonet på korrekt sätt så att körningen blir säker och rolig Leksaken ska användas med försiktighet och därför krävs en förmåga att undvika att ramla eller kollidera med föremål vilket kan skada användaren och andra personer Innan start ska man försäkra sig om att färdsträckan inte hindras av personer eller föremål Kör med händerna på styrstången ratten och håll alltid ögonen på vägen Bromsa i ti...

Page 35: ...utan den är endast en lek nyckel D ELEKTRISK GAS BROMSPEDAL genom att släppa gaspedalen med foten sätts bromsen automatiskt i funktion 31 För att lossa säkerhetsbältena 1 tryck mot mitten och tryck samtidigt på tryckknappen 2 lossa dem 32 VÄXELSPAK 1 hastigheten med körning på första växeln 2 hastigheten med körning på andra växeln R backväxel 33 ANDRA HASTIGHETEN När den röda plattan är inställd ...

Page 36: ...rden afgevoerd als afval De doorgekruiste afvalbak geeft aan dat het product als gescheiden afval moet worden ingezameld DE ACCU AFVOEREN ALS AFVAL Draag uw steentje bij aan de milieubescherming De gebruikte accu mag niet worden weggegooid met het huisvuil U kunt hem afgeven bij een inzamelcentrum van gebruikte accu s of van speciaal afval vraag bij uw gemeente om informatie WAARSCHUWINGEN BATTERI...

Page 37: ...rkende assistentiecentra voor eventuele reparaties of vervangingen en de verkoop van originele vervangingsonderdelen Om contact op te nemen met een assistentiecentrum ga naar onze site http www pegperego com Bij ieder contact heeft u het serienummer van het artikel nodig Raadpleeg de pagina over de vervangingsonderdelen om het serienummer te kunnen vinden ASSISTENTIEDIENST LET OP ALLEEN VOLWASSENE...

Page 38: ...maal in de stekker A Denk er aan het einde altijd aan om de namaakmotor te sluiten met de schroef Bu kullanım kılavuzunu modelin kullanımına alışmak ve de çocuğunuza doğru güvenli ve eğlenceli sürüşü öğretmek için dikkatlice okuyunuz Daha sonraki herhangi bir gereksinim için kılavuzu saklayınız Ürünün üçüncü şahıslara devredilmesi halinde talimat kitapçığının da ürünle birlikte verildiğinden emin ...

Page 39: ...ıtının kablosunun üzerini örtmeyiniz Kabloyu ve veya bataryayı sıcak yüzeylerin üzerine koymayınız Kablonun yıpranmaması veya işlerliliğinin olumsuz yönde etkilenmemesi için nereye ve nasıl sarıldığına dikkat ediniz DİKKAT BATARYA AŞINDIRICI ZEHİRLİ MADDELER İÇERİR ELLE MÜDAHALE ETMEYİNİZ Batarya asit bazlı elektrolit içermektedir Bataryanın kutup başları arasında direk kontak oluşturmayınız sert ...

Page 40: ...lu tuşu kullanınız Kapatmak için ise 4 no lu tuşu kullanınız Radyo istasyonlarını seçmek için üçgen ve kare düğmelere basınız bkz şekil Radyo kapandığında istasyon hafızada kalmaz Ses ayarı için 2 no lu düğmeyi kullanınız Saati ayarlamak için SET tuşunu basılı tutarken aynı zamanda HR ve MIN tuşlarını kullanınız Radyo MP3 cihazlarının bağlanabilmesi için AUX girişi ile donatılmıştır C OYUNCAK KONT...

Page 41: ...ЛАЗ С ЭЛЕКТРОЛИТОМ Промыть большим количеством проточной воды поврежденный участок Немедленно обратитесь к врачу В СЛУЧАЕ ПРОГЛАТЫВАНИЯ ЭЛЕКТРОЛИТА Прополоскайте рот и выплюньте Немедленно обратитесь к врачу ПРЕДУПРЕЖДЕНИЯ ПО БАТАРЕЕ Наши игрушки соответствуют Европейским нормам по безопасности игрушек требованиям по безопасности предусмотренным Советом ЕЭС и спецификации U S Consumer Toy Safety S...

Page 42: ...ЛИ НАХОДЯТСЯ В ПАКЕТЕ ВНУТРИ УПАКОВКИ БАТАРЕЯ МОЖЕТ БЫТЬ УЖЕ УСТАНОВЛЕНА НА ИГРУШКУ Если в процессе вскрытия упаковки произошло повреждение игрушки не используйте её а обратитесь в точку продажи или сервисный центр Не подпускайте к месту сборки игрушки маленьких детей Мелкие предметы и пластиковые мешки могут представлять для них серьёзную опасность Для сборки игрушки требуется шлицевая и крестова...

Page 43: ... 38 Отвинтите и снимите стопор батареи 39 Замените батарею Установите на место и снова завинтите стопор батареи 40 Соедините две вилки 41 Закройте капот установив 2 боковые крепления на место и снова затяните винт ЗАРЯДКА БАТАРЕИ ВНИМАНИЕ ЗАРЯДКА БАТАРЕЙ И ЛЮБЫЕ РАБОТЫ С ЭЛЕКТРИЧЕСКОЙ СИСТЕМОЙ ДОЛЖНЫ ВЫПОЛНЯТЬСЯ ВЗРОСЛЫМИ ТАКЖЕ БАТАРЕЮ МОЖНО ЗАРЯЖАТЬ НЕ СНИМАЯ ЕЕ С ИГРУШКИ 42 Отсоедините вилку А э...

Page 44: ...PEG PEREGO B C A A PEG PEREGO 4 3 3 3 3 A 24 PEG PEREGO B 1 3 3 H AI AJ 4 H 4 J 4 J C B H 4 A L CMAJ4 A4 C ACJ 4 A4 C ACJ I 1 3 313 1 A U S Consumer Toy Safety Specification 2009 48 1 3 3 3 1 3 3 36 1 3 3 4 A A A a 1 3 3 B 3 A M 1 3 313 1 9 LR44 1 5V A 4 3 4 2 ...

Page 45: ...4A4 A 4 C A A A 4 M H C A A A J J AC A H H A4 4 AJC A A J J A 4 4 A AM 4 A ASA4 323 1 p p p p 2 p p p 3 H p 4 5 6 7 p H p p p p 8 H p p p 9 H 10 11 12 13 14 A B Roll Bar 15 H p Roll Bar C p 16 2 Roll Bar Roll Bar 2 A 17 Peq rse so seqlasij l qoy sxm fxm m aruake ay rsgm erov pot bq rjesai rso j sx jemsqij l qoy sot jah rlasoy pxy ua mesai rsgm eij ma 18 p p 19 p Roll Bar 20 p p p p 21 2 22 23 H I ...

Page 46: ... p 1 A A 4 4 4 A4A 4 A 4 A A A4 CA AJ A4 Q J A 4 CC Q 4 A AJ A4 QA4 37 Amo nse so jap ctq fomsay sa 2 pketqij cjirsqa jai auaiq rse sg b da pot bq rjesai ep mx rsg l rja 38 I p 39 p p p p 40 41 Jke rse so jap rsq uomsay sa 2 cjirsqa jai namabid rse sg b da 43 1 A A A 4 4 A A A H A C A J 4 CAJ4 A 4 C A 4 A 4 4 A A 4 42 p A p B p p p 43 H p p H C p 44 p p p p p p C p H 45 H p B A p B ...

Page 47: ...m H s j f H G H g f h V m j k f i V s l h J H g f h V h J î V a h m t O E r j O j g T f h V j U K H g k l ƒ o e H g l q p ƒ H B C e V U g n j s g s G U l g m H B s j f H G H g a P K H g l q P m 7 3 H t j p Y h x H g l P V f ï H V M U h l j d H g j e f J H g h k f j K O V œ H g l s l h V H g l U g n H g y h x 8 3 t H k c r G H g f h V m 9 3 r L f j y V H g f h V m U q v j e f J r G H g f h V m 0 4 ...

Page 48: ...L H s j O H L H g u V f m f j P l G l V l e G H g Œ h M t R H g V l h G H g k h U l m H P h G H V H q d H g l m H t ï K r h v H g j h V H g O h W f h g j P l G H g l V s T Œ v H g Œ V M t V H s T j j v H g Œ V M f u f q u m e H K H s j l j h c l s j l V H P j f l l U m f h V h J l a P k m h M g b s j O H L H g u V f m B j u l G j l K U L h f b J l w g m j P J a V P m H s V H c j l K U l G V H s V ...

Page 49: ... H g h V Y m H g Œ d H g f h V h J H g h V Y m t d H g P h h J H g O h w m f ï U h M j V H g f h V h J H g l s j u l g m j a V L a V m O G E R E P G E P g j q g L ƒ H H g l k j µ j Œ L a V m O G E R E P G E P f h g u k h m f O V œ H h G g g j k I l k ƒ e V l K 0 6 U h L t f l V B j L j Œ L g L U V f h J H h G H g w y V M e L j Œ L g L U V f h J H g j k I q h f u ƒ g j Œ L H g u h F H g j d j u l G...

Page 50: ......

Page 51: ......
Page 52: ...all us toll free 1 800 728 2108 llame USA gratis 1 800 225 1558 PEG PEREGO CANADA Inc 585 GRANITE COURT PICKERING ONT CANADA L1W3K1 phone 905 8393371 fax 905 8399542 call us toll free 1 800 661 5050 Tutti i diritti di proprietà intellettuale relativi ai contenuti di questo manuale d istruzione appartengono a PEG PEREGO S p A e sono tutelati dalle leggi vigenti All of the intellectual property righ...

Reviews: