background image

represents a potential source of danger to human
health and for the environment if the products are
not disposed of correctly.

• The barred dustbin symbol indicates that the

product must undergo sorted waste collection.

DISPOSAL OF THE BATTERY
• Help protect the environment.
• Used batteries must not be disposed of with

domestic waste.

• They can be left at a used battery or special waste

collection centre. Contact your local authorities for
more information.

Battery charging must be carried out and supervised
by adults only.
Do not allow children to play with the battery. 

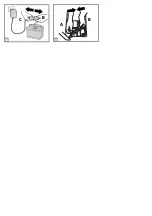
CHARGING THE  BATTERY
• Charge the battery according to the instructions

enclosed with the battery charger and never for
more than 24 hours.

• To avoid damage, the battery should be charged as

soon as the vehicle starts to lose speed.

• If the vehicle is left unused for a long time,

remember to charge the battery and to keep it
disconnected from the electrical system. Repeat the
recharge procedure at least once every three
months.

• The battery must not be charged upside-down.
• Do not forget about the battery which is being

charged! Check it from time to time.

• Only use the battery charger provided and the

original PEG PEREGO battery.

• The battery is sealed and does not require

maintenance. 

• Do not remove the battery charger from the

socket by pulling the cable.

• Do not move the toy by pulling the battery charger

cable.

• Do not cover the battery charger cable, as this

would cause it to overheat.

• Do not place the cable and/or battery on hot

surfaces.

• Take care on how and where you wrap the cable to

so as not to damage it or compromise its
operation.

WARNING

• THE BATTERY CONTAINS CORROSIVE TOXIC

SUBSTANCES.

  DO NOT TAMPER WITH IT.

• The battery contains acid-based electrolytes.
• Do not create direct contact between the battery

terminals, avoid strong impacts: risk of explosion
and/or fire.

• While charging, the battery produces gas. Charge

the battery in a well-ventilated environment, away
from sources of heat and flammable materials.

• The flat battery must be removed from the vehicle.
• It is not advisable to bring the battery into contact

with clothes, as it could damage them.

• Only use batteries or accumulators of the

recommended kind.

IF THERE IS A BATTERY LEAK
Protect your eyes. Avoid direct contact with the
electrolyte. Protect your hands.
Put the battery in a plastic bag and follow the
instructions for battery disposal.

IF SKIN OR EYES COME INTO CONTACT WITH
THE ELECTROLYTE
Thoroughly rinse the area concerned with running
water.
Consult a doctor immediately.

IF THE ELECTROLYTE IS SWALLOWED
Rinse the mouth and spit out the water.
Consult a doctor immediately.

BATTERY WARNINGS

THE VEHICLE DOES NOT WORK?

• Check that there are no disconnected cables under

the accelerator plate.

• Check the operation of the accelerator button and

replace it if necessary.

• Check that the battery is connected to the

electrical system.

THE VEHICLE LACKS POWER?
• Charge the batteries. If after charging the problem

persists, have the battery and charger checked by
an assistance centre.

PROBLEMS?

ASSEMBLY INSTRUCTIONS

WARNING

ASSEMBLY MUST ONLY BE CARRIED OUT BY
ADULTS. TAKE  CARE WHEN  REMOVING THE
VEHICLE FROM ITS PACKAGING. ALL THE
SCREWS AND SMALL PARTS ARE CONTAINED IN
A BAG INSIDE THE PACKAGING. THE BATTERY
MAY ALREADY BE FITTED INSIDE THE ITEM.
Do not use the toy if you find it damaged after
opening the packaging. Contact the shop where you
bought it or the customer support centre.
Take care in the presence of children while
assembling the toy, given the risks caused by small
parts (ingestion hazard) and the plastic bags that
contain them (choking hazard).
To assemble the toy, you will need a flat-head
screwdriver, a Phillips screwdriver, a hammer, and a
pair of pliers.

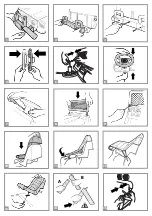
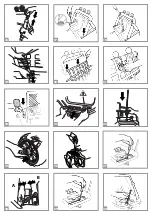
ASSEMBLY

 1 • Place from bumper on body and tighten four

screws as shown in the drawing.

 2 • Place rear bumper on body.
 3 • Tighten three screws as shown in the drawing.
 4 • Assemble the two parts of the steering wheel.
 5 • Connect the steering wheel cable to the

dashboard cable. WARNING: place the cables in
their housing taking care they don't get crushed.

 6 • Insert the steering wheel on the steering wheel

column.

 7 • Align steering wheel column holes with steering

wheel: nut fits into haxagon hole, bolt into round
hole.

 8 • Insert the windscreen.
 9 • Secure it by means of the two screws.

10 • Fit the removable seat cover as shown in the

figure.

11 • Hook the front elastic bands.
12 • Position the other two elastic bands.
13 • Place seat on body. Adjust seat position. Secure it

with washer and thumb nut.

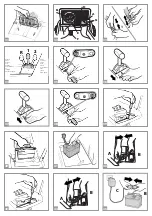
14 • Join A with B and insert the part of the electrical

system in the rear of the vehicle’s bodywork
inside this unit you have just created.

15 • Connect the 2 roll bar light cables.
16 • Insert the roll bar into the vertical supports.

Rotate the cables to make sure they fit correctly
in place.

17 • Insert the 2 plates in the slots at the base of the

roll-bar and hold them in place. Secure the plates
and the roll-bar with the 2 screws provided.

18 • Secure the 2 seat belts to the roll bar, using the 2

screws provided.

19 • Insert the end of the seat belts into the slot

located in the lower central part of the
bodywork, as shown in the figure.

20 • Tighten the net to the bodywork, using the 3

screws provided.

21 • Secure the net to the roll bar.
22 • Insert the rearview mirrors in the direction

shown by the arrow.

23 • Apply the corresponding stickers to the 2 sides

of the body (see sticker sheet), then press the
two plastic writings into position.

24 • Insert the antenna, pressing down as you do so,

into its appropriate housing, situated on the right
rear mudguard.

25 • Snap fit the 4 wheel hubcaps.
26 • Open the bonnet by turning the 2 side fasteners

and remove the screw on the grill.

27 • Remove the 2 screws of the toy engine. Lift the

toy engine.

28 • Plug battery terminal A into vehicle wiring

terminal B. 

29 • Lower the imitation motor and screw it down

again. Close the hood, securing it in place with
the 2 hooks. The vehicle is now ready for use.

• Do not disassemble or try to repair the vehicle on

your own. Contact an authorised Peg Perego
customer support centre.

• The toy should not be left anywhere with a

temperature below 0°C. If it were to be used
without being warmed up to a temperature above
0°C, irreversible damage could be caused to the
motors and batteries.

• Check the condition of the vehicle regularly, paying

particular attention to the electrical system, the
plug connections, the terminal protectors and the
battery charger. If defects are identified, the
electrical vehicle and the battery charger must not
be used.

• Always disconnect the battery charger from the toy

before carrying out cleaning, maintenance, or any
type of intervention.

• For repairs use only original PEG PEREGO spare

parts.

• PEG PEREGO do not accept any responsibility for

cases of tampering with the electrical system.

• Do not leave the batteries or the vehicle close to

sources of heat like radiators, fireplaces, etc.

• Protect the vehicle from water, rain, snow, etc.

Using the vehicle on sand or mud may damage the
buttons, motors and gears.

• Lubricate moving parts like bearings, steering, etc.

periodically with light oil.

• The vehicle surfaces can be cleaned with a damp

cloth and, if necessary, with non-abrasive domestic
cleaning products.

• Cleaning must only be carried out by adults.
• Never dismantle the vehicle mechanisms or

motors, unless authorized by PEG PEREGO.

MAINTENANCE AND VEHICLE

CARE

For the safety of the child, before starting up the
vehicle read and carefully follow the following
instructions.
• Teach the child how to use the vehicle properly for

safe and enjoyable driving.

• The toy must be used with caution, as it requires

substantial dexterity in order to avoid falls or
collisions which could cause injuries to the user or
third parties.

• Before starting, check that there are no people or

objects obstructing the vehicle’s path.

• Drive with hands on the handlebars/steering wheel

and always watch the road ahead.

• Brake in good time to avoid collisions.

ATTENTION! 

The item is equipped with a brake

system which needs to be appropriately illustrated to
the child by an adult.

2nd GEAR (if present)

Initially, use in 1st gear is recommended. Before
enabling 2nd gear, check that the child has learned to
use the handlebars/steering wheel, 1st gear and the
brake correctly, and has become familiar with the
vehicle.

WARNING!

• Check that all the wheel fixing studs/nuts are

fastened properly.

• If the vehicle is overloaded, as can happen on soft

sand, mud, or very uneven ground, the overload
switch will immediately disconnect the power. The
power supply will be restored after a few seconds.

UNINTERRUPTED FUN: Keep a spare set of charged
batteries ready for use.

RULES FOR SAFE DRIVING

PEG PEREGO offers an after-sales assistance
service, directly or through a network of
authorized assistance centres, for any repairs or
replacements and the sale of original spare parts.

To contact a service center, visit our website:

http://www.pegperego.com

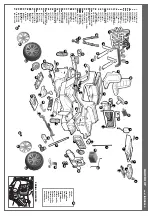
The item’s serial number must always be quoted.
See the page on spare parts to find out how to
identify the serial number.

CUSTOMER SERVICE

Summary of Contents for GAUCHO XP IGOD0555

Page 1: ...ENTRETIEN EN FR DE ES PT TR RU EL GEBRAUCH UND WARTUNG BRUGSANVISNING KÄYTTÖOHJE BRUKSANVISNING DA FI NO SV BRUKSANVISNING EMPLEO Y MANUTENCION USO E MANUTENÇÃO KULLANIM VE BAKIM ЭКСПЛУАТАЦИЯ И УХОД MSGQG G SL UPORABA IN VZDRŽEVANJE H B s j O H L H g w h k m AR NL GEBRUIK EN ONDERHOUD FI002001G228 ...

Page 2: ...A B 1 2 3 4 6 7 8 9 14 10 11 12 13 5 15 ...

Page 3: ...17 19 20 21 22 23 24 25 26 A B 28 29 30 16 18 27 ...

Page 4: ...A D C F E G 2 1 32 33 1 2 R davanti front devant vorn delante parte dianteira ön сперсди dietro posterior arriére heck trasera parte traseira arka сзади 34 35 36 37 38 B C B 39 40 41 42 43 44 45 A 31 B A ...

Page 5: ...C B B A 46 47 ...

Page 6: ...PST3509DGP 16sx SPST3509SGP 17 SPST3867N 18 SPST3555GP 19 SPST3055JA SPST3055JRF 20 MUCI1012GRN 21 MUCI1009GR 22dx SAGI8405KDNGR 22sx SAGI8405KSNGR 23 SPST8931N 24 CSGAXP00 DX36BL13 25 SAGI0318KGP 26Adx SPST3824JDN 26Asx SPST3824JSN 26Bdx SPST3823JDN 26Bsx SPST3823JSN 27 SPST3508JN 28 SAGI0183GR 29 SAGI9955XJ 30 SPST3546JN 31 SAGI3977JKGPN 32 SOFF0300C30 33 MEVA0081 34 ASGI0325NGP 35dx SPST3522DGP...

Page 7: ...PRODOTTO IGOD0555 NORMATIVE di RIFERIMENTO origine Directive on the safety of toys 2009 48 EC Standard EN 71 1 2 3 Standard EN 62115 Directive regulates the electromagnetic compatibility of equipment 2014 30 UE Standard EN 55014 1 EN55014 2 Standard EN 55022 Standard EN 61000 Information Directive on WEEE RAEE 2003 108 EC Directive on batteries and accumulator 2008 103 EC Directive on RoHS 2011 65...

Page 8: ... figura 2 Posizionare il paraurti posteriore 3 Avvitare le tre viti come in figura 4 Unire le due parti del volante 5 Connettere l impianto del volante all impianto del cruscotto ATTENZIONE riporre i cavi all interno della sede evitando che si schiaccino 6 Inserire il volante sull asta volante 7 Allineare i fori dell asta volante e del volante Avvitare vite e dado il dado si fissa nel foro esagona...

Page 9: ...rical systems buttons etc Do not use petrol or other flammable substances close to the vehicle The vehicle must be only be used by a single child unless it is classed as a two seater vehicle WEEE DIRECTIVE EU only At the end of its useful life this product is classed as Waste Electrical and Electronic Equipment WEEE and must therefore not be disposed of as urban waste but instead taken to a design...

Page 10: ...nds 13 Place seat on body Adjust seat position Secure it with washer and thumb nut 14 Join A with B and insert the part of the electrical system in the rear of the vehicle s bodywork inside this unit you have just created 15 Connect the 2 roll bar light cables 16 Insert the roll bar into the vertical supports Rotate the cables to make sure they fit correctly in place 17 Insert the 2 plates in the ...

Page 11: ... de 70 ans PEG PEREGO accompagne les promenades des enfants Dès leur naissance avec les landaus puis avec les poussettes et plus tard avec les jouets à pédales et à batterie Découvrez sur notre site la gamme complète des produits les nouveautés et d autres renseignements sur le monde Peg Perego www pegperego com Peg Perego S p A est une entreprise disposant d un système de management de la qualité...

Page 12: ... est scellée et ne nécessite aucun entretien Ne pas retirer le chargeur de batterie de la prise de courant en tirant sur le câble Ne pas déplacer le jouet en tirant sur le câble du chargeur de batterie Ne pas couvrir le câble du chargeur de batterie car il pourrait surchauffer Ne pas poser le câble et ou la batterie sur des surfaces chaudes Faire attention à la façon et le lieu où le câble est enr...

Page 13: ...e roll bar avec les 2 vis fournies de série 18 Fixer les 2 ceintures à l arceau à l aide des 2 vis fournies 19 Insérer l extrémité des ceintures de sécurité dans l encoche située dans la partie basse centrale de la coque comme indiqué sur la figure 20 Appliquer le filet en le vissant à la coque à l aide des 3 vis fournies 21 Fixer le filet à l arceau 22 Insérer les rétroviseur dans le sens indiqué...

Page 14: ...twendig Die Kinder müssen während der Benutzung des Fahrzeugs immer Schuhe tragen Beim Betrieb des Fahrzeuges darauf achten dass die Kinder weder Hände Füße und andere Körperteile noch Kleidungsstücke oder andere Gegenstände in die Nähe der sich bewegendenTeile bringen Fahrzeugteile wie den Motor die elektrische Anlage die Tasten usw nie mitWasser in Berührung bringen Benzin oder andere entflammba...

Page 15: ...hrauben der Räder richtig festgezogen sind Beim Einsatz des Fahrzeuges unter Überlastbedingungen z B auf weichem Sand Schlamm oder in holprigem Gelände schaltet der Überlastschalter sofort die Leistung ab Die Stromzuführung wird nach einigen Sekunden wieder aufgenommen VERGNÜGEN OHNE UNTERBRECHUNG Halten Sie immer einen Satz einsatzbereiter Batterien bereit DAS FAHRZEUG FUNKTIONIERT NICHT Die korr...

Page 16: ...nd das Plättchen in die vorgesehene Öffnung schieben 38 Wieder festschrauben Durch Zurückstellen des Schalthebels fährt das Fahrzeug mit der zweiten Geschwindigkeit AUSWECHSELN DER BATTERIE ACHTUNG DIE ZEICHNUNGEN DER BATTERIEN SIND NUR BEISPIELE IHRE BATTERIE KANN SICH VON DEM DARGESTELLTEN MODELL UNTERSCHEIDEN DAS HAT JEDOCH KEINEN EINFLUSS AUF DIE DARGESTELLTEN AUSTAUSCH UND LADESEQUENZEN 39 Di...

Page 17: ...andard EN 71 1 2 3 Standard EN 62115 Directive regulates the electromagnetic compatibility of equipment 2014 30 UE Standard EN 55014 1 EN55014 2 Standard EN 55022 Standard EN 61000 Information Directive on WEEE RAEE 2003 108 EC Directive on batteries and accumulator 2008 103 EC Directive on RoHS 2011 65 UE EN 50581 2012 Reg CE n 1907 2006 Reach allegato XVII 51 52 phthalates in toys No cumple con ...

Page 18: ... del volante 5 Conectar los cables del volante y el salpicadero ATENCIÓN volver a colocar los cables dentro del alojamiento para evitar que queden aplastados 6 Insertar el volante en la barra del volante 7 Alinear los orificios de la barra del volante y del volante Atornillar el tornillo y la tuerca la turca se fija en el orificio hexagonal el tornillo en el orificio circular 8 Insertar el perabri...

Page 19: ...rías 46 Una vez acabada la carga sacar el cargador de batería de la toma doméstica después desconectar el enchufe C del enchufe B 47 Introducir a fondo hasta que salte el mecanismo el enchufe B en el enchufe A Una vez completadas las operaciones no olvide cerrar con los tornillos el falso motor de juguete y el capó ATENCIÓN 1 Cargue exclusivamente baterías con plomo proporcionadas por PEG PEREGO 2...

Page 20: ... de veículos com dois lugares DIRETRIZ RAEE somente UE Este produto constitui ao fim de sua vida útil como resíduo classificado RAEE e portanto não deve ser eliminado como simples resíduo urbano mas deve ser sujeito à coleta seletiva Entregue este resíduo nas apropriadas e relativas ilhas ecológicas A presença de substâncias perigosas contidas nos componentes elétricos deste produto constitui NORM...

Page 21: ...mo na figura 4 Unir as duas partes do volante 5 Conecte o sistema do volante com o sistema do painel ATENÇÃO colocar os cabos dentro do alojamento evitando que se esmaguem 6 Inserir o volante sobre a haste do volante 7 Alinhar o furo da haste do volante com o do volante Atarraxar o parafuso e a porca a porca se fixa no furo hexagonal o parafuso naquele circular 8 Inserir o pára brisa como na figur...

Page 22: ...014 2 Standard EN 55022 Standard EN 61000 Information Directive on WEEE RAEE 2003 108 EC Directive on batteries and accumulator 2008 103 EC Directive on RoHS 2011 65 UE EN 50581 2012 Reg CE n 1907 2006 Reach allegato XVII 51 52 phthalates in toys Ne ustreza predpisom za vožnjo po cestah zato se z njim otroci ne smejo voziti po javnih cestah IZJAVA O SKLADNOSTI Peg Perego S p A na lastno odgovornos...

Page 23: ...dno je treba pravočasno zavreti da se ne bi vozilo zaletelo OPOZORILO Izdelek je opremljen z zavornim sistemom o katerem mora otroka skrbno poučiti odrasla oseba 2 PRESTAVA če je nameščena Za začetek vam svetujemo uporabo 1 prestave Preden omogočite 2 prestavo se prepričajte da zna otrok pravilno uporabljati volan krmilo 1 prestavo zavoro in da se je vozila privadil POZOR Preverite da so vse pritr...

Page 24: ...AČE 44 Izvlecite vtikač A električnega sistema iz vtikača B ki pripada bateriji s stranskim pritiskom 45 Vtaknite vtikač polnilca na električni priključek sledeč priloženim navodilom Povežite vtikač B z vtikačem C ki pripada polnilcu 46 Ko končate polnjenje odklopite polnilnik akumulatorja iz domačega omrežja in odklopite vtič C z vtiča B 47 Do konca tako da klikne vstavite vtič B v vtič A Ko konč...

Page 25: ...acér ikke kablet og eller batteriet på varme overflader Vær opmærksom på hvor og hvordan kablet oprulles for at undgå beskadigelse eller påvirkning af dets funktion PAS PÅ BATTERIET INDEHOLDER GIFTIGE OG ÆTSENDE STOFFER FORETAG INGEN INDGREB PÅ DET Batteriet indeholder syrebaserede elektrolytter Foretag ikke nogen direkte sammenkobling af batteriets terminalpunkter og undgå at det udsættes for hår...

Page 26: ...det med den medfølgende spændskive og det runde håndtag 14 Sæt A sammen med B delen og sæt anlægget der findes i karrosseriets bagerste del indeni den netop monterede gruppe 15 Tilslut de 2 ledninger på styrtbøjlen lysanlæg 16 Sæt styrtbøjlens tværstang i de lodrette holdere ved at dreje dem således at de kommer til at passe korrekt 17 Indsæt de 2 plader i de tilhørende lejer nederst på styrtbøjle...

Page 27: ...022 Standard EN 61000 Information Directive on WEEE RAEE 2003 108 EC Directive on batteries and accumulator 2008 103 EC Directive on RoHS 2011 65 UE EN 50581 2012 Reg CE n 1907 2006 Reach allegato XVII 51 52 phthalates in toys Ei vastaa tieliikennesääntöjä eikä siis voi ajaa yleisillä teillä VAATIMUSTENMUKAISUUSVAKUUTUS Peg Perego S p A vakuuttaa omalla vastuullaan että kyseinen tuote on käynyt lä...

Page 28: ...npiteet Älä koskaan pura ajoneuvon tai moottorin mekanismeja ilman PEG PEREGOn valtuutusta AJONEUVON HUOLTO JA KUNNOSSAPITO Lapsen turvallisuuden takaamiseksi lue seuraavat ohjeet ja noudata niitä tarkkaan ennen ajoneuvon käynnistämistä Opeta lapsi käyttämään ajoneuvoa oikein jotta hän osaa ajaa turvallisesti ja pitää hauskaa Lelua täytyy käyttää varoen sen käyttäminen vaatii taitoa Vältä putoamis...

Page 29: ...laatan ruuvi 36 irroita punainen laatta 37 kierrä sitä 180 kunnes jäniksen kuva on oikeassa kohdassa Kiinnitä laatta sille kuuluvaan aukkoon 38 Ruuvaa takaisin kiinni Vaihdetangon ollessa takana ajoneuvo kulkee kakkosnopeudella AKUN VAIHTO HUOMIO AKKUJEN KUVAT OVAT VAIN VIITTEELLISIÄ AKKU VOI OLLA ERILAINEN KUIN KUVASSA SE EI VAIKUTA KUVATTUIHIN VAIHTO JA LATAUSOHJEISIIN 39 Avaa etupelti Irrota le...

Page 30: ...eller på trange områder kan påføre skader for brukeren og på andre personer i området Det er alltid nødvendig at voksne har overoppsyn med bruken Barn må alltid ha på sko når de bruker kjøretøyet Når kjøretøyet er i bruk må man følge med så barna ikke setter hendene føttene eller andre kroppsdeler klær eller andre ting inn nær der det er deler i bevegelse Man må aldri ha vann på eller fukte kompon...

Page 31: ...endes inn uten at dette er avtalt på forhånd vil bli avvist Skjema til bruk ved reklamasjon Navn Adresse Postnr sted Kontaktperson Tlf nr Opplysninger om kjøretøyet Produksjonskode strekkodenr Produksjonsdato Kontrollnr Controllo Kjøpsdato Reklamasjonens art Med vennlig hilsen Peg Pérego S p A Maki A S REKLAMASJONSRETT PEG PEREGO tilbyr en kundeservicetjeneste etter kjøp enten direkte eller gjenno...

Page 32: ... er plugget inn i strømuttaket og er klar for lading Peg Perego batteriet er koblet til FAST LYS batteriet er ladet BLINKENDE LYS batteri lades SLIK LADER DU BATTERIENE ADVARSEL Før du bruker leken må du lade batteriet i minst 18 timer A Plugg inn batteriladeren i et strømuttak som samsvarer med spesifikasjonen på merkeskiltet B Koble terminalen på batteriladeren til den på batteriet ved hjelp av ...

Page 33: ... I början rekommenderar vi att man använder den 1 a växeln Innan man lägger i 2 a hastigheten ska man försäkra sig om att barnet har lärt sig korrekt användning av styrstång ratt av 1 a hastigheten bromsen och att barnet är bekant med fordonet OBS Kontrollera att alla beslag muttrar för fästning av hjulen sitter fast ordentligt Om fordonet är verksamt i överbelastningstillstånd som t ex på fin san...

Page 34: ...m medföljer 18 Fäst de två säkerhetsbältena vid störtbågen med de två medföljande skruvarna 19 För in säkerhetsbältenas ändstycke i hålet i den understa mellandelen av karosseriet som på bilden 20 Skruva fast nätet vid karosseriet med de tre medföljande skruvarna 21 Fäst nätet vid störtbågen 22 Sätt i backspeglarna i pilens riktning 23 Sätt fast motsvarande klistermärke på vardera sida på karosser...

Page 35: ...e användas med icke uppladdningsbara batterier Risk för explosion 3 Apparaten får endast användas av vuxna Det är inte en leksak Den är inte avsedd för personer med psykisk funktionsnedsättning om det inte finns någon ansvarig person i närheten som kan övervaka att apparten används korrekt 4 Får inte användas om höljet sladden eller anslutningen har skadats 5 Under uppladdningen ska du se till att...

Page 36: ...loffings en of brandgevaar Tijdens het opladen geeft de accu gassen af Laad de accu op een goed geventileerde plek op ver weg van warmtebronnen en ontvlambare materialen De lege accu moet uit het voertuig worden gehaald Het wordt ontraden de accu tegen kledingstukken te houden deze zouden beschadigd kunnen worden Gebruik uitsluitend accu s of batterijen van het aanbevolen type ALS ER EEN LEK IS Be...

Page 37: ...rkap met de schroeven dicht te maken 18 Bevestig de 2 gordels aan de roll bar met behulp van de 2 meegeleverde schroeven 19 Steek het uiteinde van de veiligheidsgordel in de uitsparing onderaan in het midden van het frame zoals getoond op de afbeelding 20 Breng het net aan door het vast te schroeven met de 3 meegeleverde schroeven 21 Bevestig het net aan de roll bar 22 Plaats de achteruitkijkspieg...

Page 38: ...antwoordelijk persoon die een correct gebruik garandeert 4 Gebruik geen klittenband kabel of connector die beschadigd is 5 Zorg tijdens het laden dat er voldoende ventilatie is rondom de accu 6 Verwijder de stekker niet door aan de kabel te trekken 7 Sleep het voertuig op wielen niet door aan de laadkabel te trekken 8 Bedek de kabel niet om oververhitting te voorkomen en plaats hem niet op warme o...

Page 39: ...yuncağı şarj aygıtının kablosundan tutarak taşımayınız Aşırı ısınmaması için şarj aygıtının kablosunun üzerini örtmeyiniz Kabloyu ve veya bataryayı sıcak yüzeylerin üzerine koymayınız Kablonun yıpranmaması veya işlerliliğinin olumsuz yönde etkilenmemesi için nereye ve nasıl sarıldığına dikkat ediniz BATARYA İLE İLGİLİ UYARILAR Çocuğunuzun güvenliği için aracı çalıştırmadan önce aşağıdaki talimatla...

Page 40: ...e vidalayınız 21 Ağı viraj denge çubuğuna geçiriniz 22 Dikiz aynalarını ok işareti yönünde yerlerine yerleştirin 23 Gövdenin iki yanına karşılık gelen çıkartmaları yapıştırınız bkz çıkartma kağıdı 2 plastik yazıyı bastırmak suretiyle iliştiriniz 24 Anteni sağ ön çamurluğun üstünde bulunan yuvasına basarak geçirin 25 Tekerlerdeki 4 Jant kapağını tık sesi gelecek şekilde takın 26 Yan tarata yer alan...

Page 41: ...вилам дорожного движения поэтому они не могут передвигаться по общественным дорогам ВНИМАНИЕ Эта игрушка из за своей высокой максимальной скорости не подходит для детей в возрасте до 3 лет ВНИМАНИЕ Не предназначено для детей в возрасте до 36 месяцев Мелкие детали могут попасть в рот или дыхательные пути что чревато удушьем ВНИМАНИЕ КАТЕГОРИЧЕСКИ ЗАПРЕЩАЕТСЯ использовать игрушку на автомобильных до...

Page 42: ...и пластиковые мешки могут представлять для них серьёзную опасность Для сборки игрушки требуется шлицевая и крестовая отвёртки а также молоток и пассатижи СБОРКА 1 Установите передний бампер и затяните четыре винты как показано на рисунке 2 Установите задний бампер 3 Затяните три винта как показано на рисунке 4 Соедините две части руля 5 Подключите разъем рулевого колеса к разъему приборной панели ...

Page 43: ...но выбрасывать так как считается что они вредят окружающей среде Сдача в утиль данных элементов или изделия целиком в конце их срока службы должна выполняться в соответствии с законом действующим в стране где они использовались 12 Перед использованием зарядного устройства убедитесь что оно оборудовано специальной вилкой для страны в которой оно должно использоваться 13 Убедитесь что дети не играют...

Page 44: ...the safety of toys 2009 48 EC Standard EN 71 1 2 3 Standard EN 62115 Directive regulates the electromagnetic compatibility of equipment 2014 30 UE Standard EN 55014 1 EN55014 2 Standard EN 55022 Standard EN 61000 Information Directive on WEEE RAEE 2003 108 EC Directive on batteries and accumulator 2008 103 EC Directive on RoHS 2011 65 UE EN 50581 2012 Reg CE n 1907 2006 Reach allegato XVII 51 52 p...

Page 45: ...E 3 3 3 3 3 3 3 E 3 1 3D2 PEG PEREGO http www pegperego com 1 13 1 3 3 3 3 E 6 3 3 3C 36 E 3 6 C3 K A 63 3 E C3E 63 A 3 C C 3 A C 3 3 C E6 C 3 B 3 C E C3E 3 3 K3 3 R 323 1 p p p p 2 p p p 3 A p 4 3 5 6 7 3 p A p p p p 8 A p p p 9 A 10 11 12 13 14 3 A B 15 2 roll bar 16 roll bar 17 2 roll bar roll bar 2 18 2 roll bar 2 19 20 3 3 21 roll bar 22 p p p p 23 2 2 24 25 4 26 Amo nse so jap ctq fomsay sa ...

Page 46: ... 5 L H H A C 3 3 3 30 31 C 32 A B C LED LED 20 LED 10 D FM MP3 USB MICRO SD E START F G K 3 3 START 33 p 1 p p p 2 p 34 6 E B 1 p 2 R p 35 3E 3 E p p p p p 3p p p p p p p p 36 37 5 180 A p 38 D p p p 1 3 B B 3 3 3 C C 3 3 3 36 E 3 C P3 E 3 66 P3 3 C C E 3 C P 39 2 5 5 40 D 41 3 42 43 D 5 43 1 B B C 3 3 3 A 63C C E 3 3 3C 36 E 3 6 C3 3 3 C B 3 3 3 44 A B 45 3 A C 46 C B 47 A B A 5 ...

Page 47: ...B j V H g l V f m U g n H g u b J U f V s P F h f G a h P K H g f h V m 8 B j y d H g h f G g d B j H P V H V j i B j q u i U g n H s p H g s h O k m 9 j O n H g P ƒ V f a K m H g j h T h f G H g l O V œ l K G U L î j b t i 0 1 t d P h G h K a h P K H g f h V m j h g h B k f y d H s j O H l i î g n K j L j w g P i 1 1 P j D H g l k j µ U g n f u Q H g u k h w V H g j d j u j f V q h V M f h g f z ...

Page 48: ...s h l V w H l G j e f J H g u b J l P l m H î ƒ H j L H s j O H L H g u V f m f j P l G l V l e G H g Œ h M t R H g V l h G H g k h U l m H P h G H V H q d H g l m H t ï K r h v H g j h V H g O h W f h g j P l G H g l V s T Œ v H g Œ V M t V H s T j j v H g Œ V M f u f q u m e H K H s j l j h c l s j l V H P j f l l U m f h V h J l a P k m h M g b s j O H L H g u V f m B j u l G j l K U L h f b J ...

Page 49: ...ƒ g j Œ L H g u h F H g j d j u l G f h g H s h J H g f h V m H j a T H g l l U m H g h l g m g g l k j h J H g l k j h J H g M H g l u g l h J H O V N g u h g L O G E R E P G E P l K O b G l r u k h H g j V k d m o c o g e r e p g e p w w w f œ f V a V m l s h l m A p S o g e r e P g e P d a V m g h k h L î H V M M l u j l l K j T î h g h A ƒ L L l r S a i l a t I V U T t O E h g b z P m H 1 0 0 ...

Page 50: ......

Page 51: ......
Page 52: ...A gratis 1 800 225 1558 PEG PEREGO CANADA Inc 585 GRANITE COURT PICKERING ONT CANADA L1W3K1 phone 905 8393371 fax 905 8399542 call us toll free 1 800 661 5050 www pegperego com Tutti i diritti di proprietà intellettuale relativi ai contenuti di questo manuale d istruzione appartengono a PEG PEREGO S p A e sono tutelati dalle leggi vigenti All of the intellectual property rights for the contents of...

Reviews: