background image

• PEG PEREGO® thanks you for choosing this
product. For over 50 years, PEG PEREGO has been
taking children for an outing: first with its famous
baby carriages and strollers, later with its pedal and
battery operated toy vehicles.

• Read this instruction manual carefully to learn the
use of this vehicle and to teach your child safe and
enjoyable driving. Please keep this manual for use
as a reference in the future.

• Our toys conform with the safety requirements
provided by the Council of the EEC, of the T.Ü.V.; of
the I.I.S.G. Istituto Italiano Sicurezza Giocattoli, and
the U.S. Consumer Toy Safety Specification F963.

Peg Perego S.p.A. is an ISO 9001
certified company.
The fact that we are certified provides
a guarantee of our honesty for our
customers, and fosters trust in the
company’s way of working.

• Peg Perego reserves the right to modify or change
their product. Price, literature, manufacturing
processes or locations or any combination of these
above mentioned entities may change at any time
for any reason without notice with impunity.

Years 1-4

PEG PEREGO offers after-sales services, directly or
with a network of authorized service centers for
repairs or replacement parts. See the back cover of
this instruction manual for a list of service centers.

Peg Perego is at the consumer's service, meeting
every need in the best way possible. This is why our
customers' opinions are so important and valuable
to us. We would be very grateful if you would kindly
fill in the CUSTOMER SATISFACTION
QUESTIONNAIRE after using one of our products.
You will find the questionnaire on the Internet at 
"www.pegperego.com".
Please note any observations or suggestions you
may have on the questionnaire.

ADULT ASSEMBLY REQUIRED.
USE CARE WHEN UNPACKING AS COMPONENTS TO
BE ASSEMBLED MAY POSE A SMALL PARTS/SHARP
EDGE HAZARD.
BATTERY ALREADY INSTALLED IN VEHICLE.

ASSEMBLY

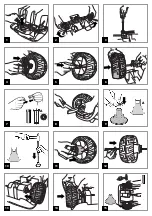
1 • Turn the vehicle upside down. In the front

section, insert the hole of the steering rod onto
the pin of the gear motor, as shown in the
figure.

2 • Slightly lift the 2 steering levers, rotating them

until they engage with the ends of the steering
rod.

3 • Attach the 2 steering levers to the steering rod

with the respective screws and washers.

4 • Press to snap fit the hub caps onto the four

wheels.

5 • Insert the respective small bushes into the

housing inside the two wheels, as shown in the
figure.

6 • Insert a washer and a wheel onto each of the

two steering levers.

7 • Insert a self-locking washer into the special

tool, as shown in the figure. Important, the tabs
on the self-locking washer must be facing the
inside of the tool (see detail A).
NOTE: spare self locking washers are included
in the bag and these should be carefully
conserved in case one breaks and requires
replacement.

8 • Holding the vehicle still, fix the wheel as shown

in the figure. Repeat for the other front wheel.

9 • Insert a self-locking washer into the special

tool, as shown in the figure. Important: the tabs
of the self locking washer must be facing the
inside of the tool (see detail A).

10 • Remove the grey protector caps from the ends

of the rear axle. Insert the axle into the tool, as
shown in the figure.

11 • Fully insert the 2 large bushes inside the

wheels.

12 • Insert the axle into one of the two wheels, as

shown in the figure.

ENGLISH

CUSTOMER SERVICE

ASSEMBLY INSTRUCTIONS

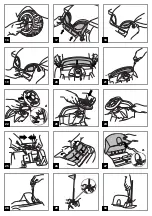
13 • Insert the unit into the rear of the vehicle (gear

motor side), engaging the gear motor into the
bush as shown in the figure.

14 • Insert a washer and the remaining wheel onto

the other end of the axle.

15 • Position the conical tool, which was used

previously, on the axle (gear motor side).
Making sure that the tool does not move, turn
the vehicle onto the gear motor side. Insert a
self locking washer into the remaining tool
provided and attach the wheel (see figure).

16 • Turn the vehicle back onto its wheels and fit

the four boss cover caps, making sure that the
teeth engage into the respective cavities.

17 • Fit the front mask, applying pressure to engage

it into its housing in the bodywork.

18 • Apply the transfers A and B.
19 • Press the front lights to snap them into place.
20 • Insert the windscreen into its three slots.
21 • Fasten the windscreen at the sides with the two

screws.

22 • Remove the protection cap from the steering

shaft and position the hole in the steering shaft
parallel to the windscreen. Connect the
steering wheel to the dashboard, as shown in
the figure. Insert the connected unit under the
steering wheel (see detail A).

23 • Insert the steering wheel onto the steering

shaft, taking care to insert the dashboard
spring into its cavity in the steering wheel.

24 • Fasten the steering wheel with the screw and

nut provided. IMPORTANT: the nut must be
inserted in the hexagonal hole and the screw in
the round hole.

25 • Connect the electrical system plug to the

vehicle battery.

26 • Position the seat support, engaging first the

two rear tabs (1) and then the two front tabs
(2).

27 • Put the seat in the required position by

inserting the two front tabs and then engaging
the rear tab (detail A). Important: the seat can
be set in three different positions according to
the height of the child.

28 • Fasten the seat down with the screw.
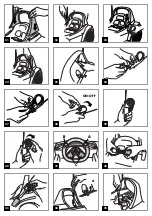
29 • Insert the aerial unit with its spring in the hole

in the bodywork, as shown in the figure.
IMPORTANT: check that the plate located in the
hole in the bodywork is visible and therefore
correctly inserted.

30 • Fasten it with the screw provided.
31 • Insert the roll-bar into its slots.
32 • Fasten the roll bar with 3 of the 4 screws

provided (2 rear and 1 front right), as shown in
the figure.

33 • Attach the radio control holder, inserting the

front tab into the slot in the bodywork.

34 • Fasten the radio control holder and roll bar

with the fourth screw provided.

35 • When the START/RESET button below the roll

bar to the right is pressed, the vehicle is ready
for use.

36 • Take the radio control out of its packaging. Fit

and screw on the aerial. With a screwdriver
remove the screw on the back of the radio
control and open the battery compartment.

37 • Insert 2 type AA 1.5 V batteries (not included)

into the compartment, ensuring that the
polarity is correct. When the batteries are in
place, close the battery compartment cover and
tighten the screw.

38 • Switch on the radio control with the ON/OFF

button on the back.

WARNING! THE RADIO CONTROL IS NOT A TOY. KEEP
IT OUT OF THE REACH OF CHILDREN!

OPERATION OF THE RADIO CONTROL
39 • Extend the radio control aerial. When the lever

is pushed downwards, the vehicle goes
forwards. When the lever is pushed upwards,
the vehicle goes backwards.

40 • When the central dial is turned right or left, the

vehicle turns in that direction.

IMPORTANT: WITH THE RADIO CONTROL SWITCHED
ON, MAKE SURE THAT IT OPERATES WITHIN THE
MINIMUM FIELD OF RECEPTION IN ORDER TO AVOID
THE VEHICLE STOPPING.

WARNING! INDEPENDENT DRIVE MODE MUST ONLY
BE ACTIVATED BY ADULTS.

RADIO CONTROL DRIVE MODE

INDEPENDENT DRIVE MODE

• Switch off the radio control with the ON/OFF

button (see fig. 38). IMPORTANT! THE VEHICLE
WILL NEVER ENTER INDEPENDENT DRIVE MODE IF
IT IS NOT SWITCHED OFF.
To activate the steering wheel controls, press the
START/RESET button located under the roll bar on
the right (see fig. 35).
Now the vehicle will operate in INDEPENDENT
DRIVE mode, with the option of immediate
stopping with the radio control.

PLEASE NOTE
IMPORTANT! WITH THE RADIO CONTROL
DISABLED, ANY CONTROL ACTIVATED ON IT
IMMEDIATELY STOPS ALL VEHICLE MOVEMENT.
In order to restart movement in INDEPENDENT
DRIVE mode, with the radio control disabled (OFF)
and the vehicle stopped, press the START/RESET
button.

• To return to the RADIO CONTROL DRIVE mode,

enable it with the ON-OFF button. First the vehicle
stops and it can then be controlled with the radio
control.

• If the radio control is enabled (ON) and the child

pushes the START/RESET button, the vehicle stops
moving WITHOUT ENTERING INDEPENDENT DRIVE
MODE, due to the priority of the enabled radio
control.

• To avoid any problems of reception from the radio

control, it is advisable to check that the aerial is
positioned correctly in its housing as described
above (see fig. 29).

• In both drive modes, if the vehicle is not used it

switches off after about 8 minutes in stand-by. To
reactivate it, press the START/RESET button.

NORMAL OPERATION OF THE PRODUCT CAN BE
AFFECTED BY STRONG ELECTROMAGNETIC
INTERFERENCE. IF THIS HAPPENS, FOLLOW THE
INSTRUCTIONS IN THIS MANUAL TO RESET THE ITEM
SO THAT IT RETURNS TO NORMAL OPERATING
CONDITIONS. IF THE VEHICLE DOES NOT RETURN TO
NORMAL OPERATION, USE IT IN A DIFFERENT
LOCATION.

IMPORTANT! THE RADIO CONTROL MUST NOT IN
ANY WAY BE CONSIDERED AS A SAFETY DEVICE
AND CANNOT IN ANY WAY REPLACE THE
SUPERVISION OF AN ADULT AND THE NEED TO BE
CLOSE TO THE TOY IN CASE OF DANGER.

VEHICLE CHARACTERISTICS AND USE

• To move the seat to the required position,

proceed as described in point 27.

41 • ELECTRONIC STEERING WHEEL: the steering

wheel has 2 drive buttons (A forward, B
reverse). The 2 orange buttons (C) with LEDs
start 8 melodies and if pushed together
produce 3 sounds (engine roar, horn and
braking).

• STOPPING: when the drive buttons on the

steering wheel are released, the vehicle stops
automatically.

42 • SAFETY BELTS: adjust the safety belts according

to the size of the child.

43 • RADIO CONTROL HOLDER: only replace the

radio control in its holder when the vehicle is
no longer in use.

REPLACING THE BATTERY
44 • Remove the screw behind the seat. Push the

seat locking tab to release it and allow access
to the battery compartment.

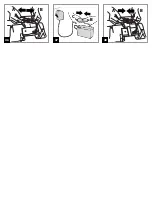
45 • Unscrew the battery holder and remove it.
46 • Disconnect the plugs by pressing them on the

sides. Remove and replace the battery.
Reconnect the plugs and screw the battery
holder back on. Close the seat and tighten the
screw.

CHARGING THE BATTERY
IMPORTANT: BATTERY CHARGING AND ANY WORK
ON THE ELECTRIC SYSTEM MUST BE CARRIED OUT
BY ADULTS.
THE BATTERY CAN BE CHARGED WITHOUT
REMOVING IT FROM THE VEHICLE.
47 • Disconnect plug A of the electrical system from

the battery plug B by pressing the sides.
Connect the battery charger plug to a domestic
socket, following the attached instructions.
Connect plug B with the battery charger plug
C. When the battery is charged, remove the
battery charger from the domestic socket, then
disconnect plug C from plug B.

48 • Fully insert plug B into plug A until it engages

with a click. On completion always remember
to refit the battery holder (if the battery has
been removed), close the battery
compartment, and fasten the seat down with

Summary of Contents for GO BUGGY GO !

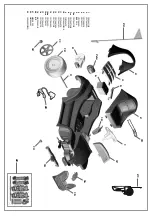
Page 1: ...RU EL GEBRAUCH UND WARTUNG BRUGSANVISNING KÄYTTÖOHJE BRUKSANVISNING DA FI NO SV BRUKSANVISNING EMPLEO Y MANUTENCION USO E MANUTENÇÃO KULLANIM VE BAKIM ЭКСПЛУАТАЦИЯ И УХОД MSGQG G SL UPORABA IN VZDRžEVANJE H B s j O H L H g w h k m AR FI000801G119 1 2 VOLT GO BUGGY GO cod IGOR0035 ...

Page 2: ...A A 1 2 3 5 6 7 8 9 10 13 12 11 15 14 4 ...

Page 3: ...A 1 2 20 19 17 22 21 26 25 24 27 16 A 23 18 28 29 30 ...

Page 4: ...A B C 41 36 37 38 39 40 ON OFF 42 43 44 45 A 33 34 35 32 31 ...

Page 5: ...46 47 B C 48 A B A B ...

Page 6: ...57JGR 8 SAGI9962KXK 9 SOFF0245Z 10 SAGI8843GRGR 11 SPST8840YK 12 SPST8841VD 13 SPST0467KGL 14 SPST8837GR 15 SPST8836VD 16 dx SPST8859D 16 sx SPST8859S 17 SPST8848YK 18 SPST8861YK 19 MUCI1006GR 20 IKCB 21 MEVA0045 22 MMEV0463 23 SAGI8993GRVD 22 1 19 3 2 18 16 15 17 4 5 6 8 7 dx 9 10 20 11 12 13 14 21 23 ...

Page 7: ...eicolo 26 Posizionare il supporto sedile agganciando prima i due denti posteriori 1 poi i due anteriori 2 27 Sistemare il sedile nella posizione desiderata infilando le 2 linguette anteriori e agganciando il dente posteriore particolare A Attenzione il sedile e predisposto per essere fissato in 3 posizioni diverse a seconda dall altezza del bambino 28 Fissare il sedile con la vite 29 Inserire il g...

Page 8: ...i collegamenti delle spine i cappucci di protezione ed il caricabatterie In caso di difetti accertati il veicolo elettrico ed il caricabatterie non devono essere utilizzati Per riparazioni usare solo pezzi di ricambio originali PEG PEREGO PEG PEREGO non si assume nessuna responsabilità in caso di manomissione dell impianto elettrico Non lasciare le batterie o il veicolo vicino a fonti di calore co...

Page 9: ...d 28 Fasten the seat down with the screw 29 Insert the aerial unit with its spring in the hole in the bodywork as shown in the figure IMPORTANT check that the plate located in the hole in the bodywork is visible and therefore correctly inserted 30 Fasten it with the screw provided 31 Insert the roll bar into its slots 32 Fasten the roll bar with 3 of the 4 screws provided 2 rear and 1 front right ...
Page 10: ...verload conditions such as soft deep sand mud or rough uneven terrain the overload circuit breaker will automatically disconnect the power After 10 or more seconds the circuit breaker will automatically reset howevere you must eliminate overload conditions to resume normal driving Periodically lubricate with a light weight oil moving parts such as wheel bearings steering linkages where they rotate...

Page 11: ...anuel d instructions Peg Perego est à la disposition de ses consommateurs pour satisfaire au mieux toutes leurs exigences À cette fin connaître l avis de nos clients est pour nous extrêmement important et précieux Nous vous saurions donc gré après avoir utilisé l un de nos produits de bien vouloir remplir le QUESTIONNAIRE SATISFACTION DU CONSOMMATEUR que vous trouverez sur Internet à l adresse sui...

Page 12: ...ur comme des radiateurs des cheminées etc Protéger le véhicule de l eau de la pluie de la neige etc si on l utilise sur le sable ou dans la boue cela risque d endommager les touches les moteurs et les réducteurs Si le véhicule fonctionne en conditions de surcharge comme sur la sabble mou la boue on les terrains très accidentés l interrupteur de surcharge coupe immédiatement le courant La distribut...

Page 13: ...en Unterlegscheiben die für den DEUTSCH KUNDENDIENST MONTAGEANWEISUNGEN Fall dass eine Unterlegscheibe beschädigt wird aufbewahrt werden müssen 8 Das Gerät festhalten und die Räder wie in der Abbildung dargestellt befestigen Den Vorgang beim zweiten Vorderrad wiederholen 9 Eine selbstsichernde Unterlegscheibe in das dafür vorgesehene und in der Abbildung dargestellte Endteil einfügen Achtung die F...

Page 14: ...ließen und festschrauben AUFLADEN DER BATTERIE ACHTUNG DAS AUFLADEN DER BATTERIEN SOWIE JEGLICHER VORGANG DER AN DER ELEKTROANLAGE DES FAHRZEUGS AUSGEFÜHRT WERDEN MUSS DARF AUSSCHLIESSLICH VON ERWACHSENEN DURCHGEFÜHRT WERDEN DIE BATTERIE KANN AUCH AUFGELADEN WERDEN OHNE SIE AUS DEM SPIELZEUG HERAUSNEHMEN ZU MÜSSEN 47 Den Stecker A der Elektroanlage von Stecker B der Batterie durch seitliches Drück...

Page 15: ...en und Gegenständen ist Während der Fahrt die Hände auf dem Lenker lassen und immer auf den Fahrweg schauen Rechtzeitig bremsen um Auffahren zu vermeiden WARTUNG Beim Einsatz des Faharzeuges unter Überlastbedingungn z B auf weichem Sand Schlamm oder unter schwierigen Geländebedingungen schaltet der Überlastschalter sofort die Leistung ab Die Stromzuführung wird nach einigen Sekunden wieder aufgeno...

Page 16: ...or de la batería Una vez la recarga realizada desconectar el cargador de la toma doméstica y posteriormente desconectar la clavija C de la clavija B 48 Introducir completamente hasta encajarse la clavija B en la clavija A Una vez hecho recordar siempre de quitar el dispositivo de bloqueo de la batería en caso de que la batería esté desmontada de cerrar el compartimento de la batería y de fijar el ...

Page 17: ...tes de accionar el vehículo lea y siga atentamente las siguientes instrucciones ATENCIÓN Controlar que los bullones de fijación estén bien sujetos MARCHA HACIA ADELANTE Presionar el botón redondo derecho del volante el vehículo se pone en marcha con una velocidad de 3 1 Km h aproximadamente MARCHA HACIA ATRÁS Presionar el botón redondo izquierdo del volante el vehículo funciona en marcha atrás con...

Page 18: ...o sob o volante vide detalhe A 23 Introduza o volante na haste do volante prestando atenção para que a mola entre no carroçaria na abertura específica do volante 24 Fixe o volante com seus parafusos e porcas apropriadas ATENÇÃO A porca deve ser colocada no furo hexagonal o parafuso no furo circular 25 Ligue o plug do sistema da bateria do veículo 26 Posicione o suporte do assento prendendo primeir...

Page 19: ...rema a tecla redonda esquerda no volante O veículo movimenta se em marcha atrás a uma velocidade de cerca de 3 1Km h DISPOSITIVO DE PARAGEM Soltando as teclas de movimentação situadas no volante o veículo pára automaticamente Ensinar a seu filho de manter um uso correcto do veículo com uma guia segura e divertente Antes de partir assegurar se que o percurso seja livre de pessoas ou coisas Guiar co...

Page 20: ...ETE UPORABLJATI KOT VARNOSTNO NAPRAVO IN NE SME ZAMENJATI NADZORA ODRASLE OSEBE IN TEGA DA MORATE OBVEZNO BITI V BLIŽINI OTROKA DA NE BI PRIŠLO DO NESREČE LASTNOSTI IN UPORABA VOZILA Da bi nastavili sedež v želeni položaj nadaljujte kot je opisano na risbi 27 41 ELEKTRONSKO KRMILO krmilo je opremljeno z 2 gumboma za vožnjo A vožnja naprej B vožnja vzvratno 2 oranžna gumba C s svetlečimi diodami pr...

Page 21: ...vključite vozilo preberite navodila in se jih natančno držite OPOZORILO Preverite da so vse pritrditvene zaponke na kolesih dobro pritrjene VOŽNJA NAPREJ Pritisnite okrogel gumb na desni strani volana vozilo bo speljalo s hitrostjo približno 3 1 Km h VZVRATNA PRESTAVA Pritisnite okrogel gumb na levi strani volana Vozilo bo vzvratno speljalo s hitrostjo približno 3 1 Km h ZAUSTAVLJALNI MEHANIZEM Ko...

Page 22: ...aktivere kørslen trykkes på knappen START RESET PRODUKTETS NORMALE FUNKTION KAN FORSTYRRES AF STÆRK ELEKTROMAGNETISK INTERFERENS HVIS DETTE SKER FØLGES VEJLEDNINGEN I DENNE BRUGSANVISNING FOR AT NULSTILLE VOGNEN SÅLEDES AT DEN VENDER TILBAGE TIL NORMALE FUNKTIONSBETINGELSER HVIS VOGNEN IKKE VENDER TILBAGE TIL NORMAL FUNKTION BØR PRODUKTET ANVENDES PÅ ET ANDET STED PAS PÅ RADIOSTYRINGSENHEDEN MÅ IK...

Page 23: ...køreknappen på rattet standser køretøjet automatisk Lær dit barn hvordan bilen køres på en sikker og sjov måde Inden bilen startes skal man sørge for at kørebanen er fri for personer eller ting Kør med hænderne på rattet og se altid på kørebanen Brems i tide for at undgå sammenstød PAS PÅ Hvis bilen udsættes for overbelastning såsom ved kørsel på blødt sand i mudder eller på meget usammenhængende ...

Page 24: ...aosassa olevan tapin yksityiskohta A Huomaa istuin voidaan kiinnittää kolmeen eri asentoon lapsen pituuden mukaan 28 Kiinnitä istuin paikalleen ruuvilla 29 Kiinnitä antenniryhmä jousineen ajoneuvon korissa olevaan reikään kuvassa esitetyllä tavalla HUOMAA tarkista että ajoneuvon korin reikään sijoitettu läppä on näkyvissä silloin se on oikein asennettu 30 Kiinnitä mukana toimitetut ruuvit 31 Aseta...

Page 25: ...en kaminoiden jne läheisyyteen Suojaa ajoneuvo kastumiselta sateelta lumelta jne ajoneuvon käyttäminen hiekalla tai mudassa saattaa vahingoittaa painikkeita moottoria ja välityksiä Jos ajoneuvo ylikuormittuu esimerkiksi ajaessa pehmeällä hiekalla mudassa tai erittäin epätasaisessa maastossa ylikuormitussuoja katkaisee välittömästi tehon syötön Tehon syöttö alkaa uudelleen muutaman sekunnin kuluttu...

Page 26: ...BALLASJEN BATTERIET ER ALLEREDE SATT INN I KJØRETØYET MONTERING 1 Sett kjøretøyet opp ned Ta tak i bakre del og plasser åpningen på styrestangen på leddet til giret som vist i figuren 2 Løft litt opp de to 2 styrespakene med å la dem rotere helt til de faller på plass i enden av styrestangen 3 Fest de to styrespakene till styrestangen ved hjelp av de riktige distanseskivene og skruene 4 Trykk på p...

Page 27: ...n med rett polaritet Batteriene er forseglet og behøver ikke noe vedlikehold ADVARSEL BATTERIENE INNEHOLDER GIFTIGE ETSENDE SUBSTANSER IKKE KLUSS MED DEM Batteriene inneholder elektrolytt med syrebasis Ikke vold direkte kontakt mellom polklemmene på batteriet unngå sterke støter risiko for eksplosjon og eller brann Under lading utvikler batteriet gass Lad batteriet på et godt ventilert sted langt ...

Page 28: ...örvara sedan handboken för varje framtida bruk Våra leksaker uppfyller de säkerhetskrav som förutses av EEC Rådet och av U S Consumer Toy Safety Specification och de är godkända av T Ü V I I S G Istituto Italiano Sicurezza Giocattoli Peg Perego S p A är certificerad enligt ISO 9001 Certifieringen erbjuder kunderna och konsumenterna en klar och tillförlitlig garanti beträffande företagets sätt att ...

Page 29: ... STÖRAS AV STARKA ELEKTROMAGNETISKA STÖRNINGAR OM DETTA SKULLE INTRÄFFA SKA MAN FÖLJA INSTRUKTIONERNA I DENNA MANUAL FÖR ATT ÅTERSTÄLLA PRODUKTEN SÅ ATT DEN ÅTERGÅR TILL NORMALA FUNKTIONSFÖRHÅLLANDEN OM FORDONET INTE ÅTERGÅR TILL NORMALA FUNKTIONER SKA PRODUKTEN ANVÄNDAS PÅ ANNAN PLATS OBS FJÄRRKONTROLLEN FÅR INTE PÅ NÅGOT SÄTT FÖRSTÅS SOM EN SÄKERHETSANORDNING OCH KAN ALLTSÅ INTE PÅ NÅGOT SÄTT ER...

Page 30: ...tner i Sverige og Norge hvis der konstateres fejl eller mangler på køretøjet Såfremt reparationen ikke kan klares pr telefon skal køretøjet fremsendes til Sverige FurusätersElektronik Furusäter6671 S 47172 Hjälteby Tlf 0304668329 Fax 0304668329 Kontaktperson ClaesAxelsson Køretøjet tages kun til reparation efter forudgående aftale Køretøjer der fremsendes uden forudgående aftale vil blive afvist S...

Page 31: ... Deliğin içerisindeki plaketin görünür olduğunu yani düzgün yerleştirildiğini kontrol edin 30 Araçla birlikte verilen vida ile sıkıştırın 31 Devrilme koruyucusunu yuvalara takınız 32 Devrilme koruyucusunu araçla birlikte verilen dört vidanın 3 ü ile 2 arka ve 1 sağ ön şekilde gösterildiği gibi sabitleyin 33 Uzaktan kumanda taşıyıcısını ön dili deliğe geçirerek takın 34 Uzaktan kumandayı ve devrilm...

Page 32: ... kulanılmamalıdır Tamirat için sadece asıl Peg Perego yedek parçalarını kullanın Peg Perego elektrik tesisatına yapılan elle müdahelelerde hiçbir sorumluluk almaz Aküleri veya aracı kalorifer şömine vb ısı kaynakları yanında bırkmayın Aracı su yağmur kar vb den koruyunuz kum veya çamur üzerinde kullanım düğme motor ve redüktöre zarar verebilir Aracın yumuşak kum çamur ya da çok gevşek toprak gibi ...

Page 33: ...и действуйте так чтобы отверстие оси руля было параллельно лобовому стеклу Установите руль на панель приборов как показано на рисунке Пропустите собранный узел под руль смотри деталь А 23 Наденьте руль на ось руля обращая внимание на то чтобы пружина панели приборов вошла в соответствующий паз руля 24 Закрепите руль при помощи специального винта и гайки ВНИМАНИЕ вставьте гайку в шестигранное отвер...

Page 34: ...детям играть с батареями Батареи должны заменять взрослые Используйте только тип батарейки указанный изготовителем Соблюдайте полярность Не замыкайте клеммы питания есть опасность воспламенения или взрыва Всегда снимаете батареи если вы долго не будете пользоваться игрушкой Не бросайте батареи в огонь Ни в коем случае не пытайтесь перезаряжать батарейки не подлежащие перезарядке Удалите разряженны...

Page 35: ...a mesai rsgm eij ma 14 Peq rse 1 qod ka jai som sqov pot leime ap so kko l qoy sot noma 15 Sopohes rse rsom noma pketq jimgs qa le le xrg rsqou m so jxmij en qsgla pot vqgrilopoi rase pqogcotl mxy Pqor vomsay ma lgm lesajim rese so en qsgla ctq rse so vgla rsgm pketq sot jimgs qa le le xrg rsqou m Peqm msay 1 qod ka atsorseq xrgy rso paqev lemo en qsgla pot vei le mei pqovxq rse rsg rseq xrg sot s...

Page 36: ...EPAMEKHEI RSIR JAMOMIJER KEISOTQCIER VQGRILOPOIGRSE SO PQO OM RE EMAM AKKO VXQO PQOROVG SO SGKEVEIQIRSGQIO DEM PQEPEI RE JALIA PEQIPSXRG MA KGUHEI XR ENAQSGLA ARUAKEIAR JAI DEM LPOQEI JASA RTMEPEIA MA AMSIJASARSGREI LE JAMEMAM SQOPO SGM EPIBKEWG EMOR EMGKIJA OTSE SGM AMACJG MA BQIRJERSE JOMSA RSO PAIVMIDI RE PEQIPSXRG JIMDTMOT VAQAJSGQIRSIJA JAI VQGRG SOT OVGLASOR Cia ma qthl rese so j hirla rsgm ...

Page 37: ... 9 PEG PEREGO SpA Via De Gasperi 50 20043 Arcore MI Italy www pegperego com E R PEG PEREGO i i i i i i i i i i i E i i i i i o i i i i i i i i i i i i i i i i 4 i i i i i i 4 i i i i i i i i i i i i i i i i i 6 i i0 0 30 i i i E R SEP RS ___________________________________________ ___________________________________________ ___________________________________________ ______________________________...

Page 38: ...h P K H g f h V h J t d P h g m U F M B F H s j O H L H g u V f m H g V f h z m a h P K H g f h V h J g g Œ h L f h w b P h J H s j O L t Œ r v H g y h V H w g m l K a V m O O G G E E R R E E P P G G E E P P a V m O O G G E E R R E E P P G G E E P P B j j P l G m l s z g m t d P h g m H g u f E t d H g h H g V f h z d B j j V H g f h V h J H g u V f m f h g Œ V F l K l w h V H g P V H V M l e G M ...

Page 39: ...f V H g O h W f i t d H g e Œ F H g l f G H g u V f m l h l q p f h g a G j k f i j K H g g P m H g l V f m t d e Œ F G H g u V f m l V z m ƒ H j K l V f m f V Œ m w P P m 0 3 e L e f J f h s j O H L H g l s h l V H g l V t Œ m 1 3 V F H g Œ q F H g l k g R t d l h k i 2 3 e f J H g Œ q F H g l k g R f e b e m l K H g l s h l V H V f u m H g l V t Œ m f i 2 O g K H P l h l d U g n H g l K l h l q ...

Page 40: ...p A via A De Gasperi 50 20043 Arcore MI ITALIA KONFORMITÄTSERKLÄRUNG DEUTSCH DENOMINACIÓN DEL PRODUCTO GO BUGGY GO CÓDIGO DE IDENTIFICACIÓN DEL PRODUCTO IGOR0035 NORMATIVA DE REFERENCIA origen Directiva 88 378 CE sobre la Seguridad en los Juguetes norma EN 71 1 2 3 9 norma EN 62115 Directiva 2004 108 CE sobre Compatibilidad Electromagnética normas EN55022 EN55014 EN301489 1 3 Directiva R TTE 99 05...

Page 41: ...ETSERKLÆRING NORSK PRODUKTBENÄMNING GO BUGGY GO PRODUKTENS IDENTIFIERINGSKOD IGOR0035 REFERENSBESTÄMMELSER original aAllmänt säkerhetsdirektiv för leksaker 88 378 EU Standard EN 71 1 2 3 9 Standard EN62115 Direktiv för elektromagnetisk kompatibilitet 2004 108 EU Standard EN55022 EN55014 EN301489 1 3 Direktiv R TTE 99 05 EG Standard EN 300220 Europeiskt direktiv för avfall från elektriska och elekt...

Page 42: ...и R TTE 99 05 CE Стандарт EN 300220 Европейская директива по утилизации электронных и электрических приборов 2003 108 CE Европейская директива RoHS 2002 95 CE Директива по фталатам 2005 84 CE Стандарт EN60825 1 Изделие не соответствует правилам дорожного движения поэтому оно не может передвигаться по общественным дорогам ДЕКЛАРАЦИЯ СООТВЕТСТВИЯ Компания PegPerego S p A с полной ответственностью за...

Page 43: ......

Page 44: ...hone 260 4828191 fax 260 4842940 call us toll free 1 800 728 2108 llame USA gratis 1 800 225 1558 llame Mexico gratis 1 800 710 1369 PEG PEREGO CANADA Inc 585 GRANITE COURT PICKERING ONT CANADA L1W3K1 phone 905 8393371 fax 905 8399542 call us toll free 1 800 661 5050 BURIGOTTO S A INDUSTRIA E COMERCIO RUA MARTINO DRAGONE 280 JD SANTA BARBARA 13480 308 LIMEIRA SP BRASIL TEL 19 3404 2000 FAX 19 3451...

Reviews: