background image

For the safety of the child, before starting up the
vehicle read and carefully follow the following
instructions.
• Teach the child how to use the vehicle properly for

safe and enjoyable driving.

• Before starting, check that there are no people or

objects obstructing the vehicle’s path.

• Drive with hands on the handlebars/steering wheel

and always watch the road ahead.

• Brake in good time to avoid collisions.

2nd GEAR (if present)

Initially, use in 1st gear is recommended. Before
enabling 2nd gear, check that the child has learned to
use the handlebars/steering wheel, 1st gear and the
brake correctly, and has become familiar with the
vehicle.

WARNING!

• Check that all the wheel fixing studs/nuts are

fastened properly.

• If the vehicle is overloaded, as can happen on soft

sand, mud, or very uneven ground, the overload
switch will immediately disconnect the power. The
power supply will be restored after a few seconds..

• Only for 12 and 24 Volt vehicles: in first gear the

vehicle has a differential effect like a real motor
vehicle; on smooth terrain and with just one child
on board, the two wheels can turn at different
speeds and they can slip and slow down.

UNINTERRUPTED FUN: Keep a spare set of charged
batteries ready for use.

THE VEHICLE DOES NOT WORK?

• Check that there are no disconnected cables under

the accelerator plate.

• Check the operation of the accelerator button and

replace it if necessary.

• Check that the battery is connected to the

electrical system.

THE VEHICLE LACKS POWER?
• Charge the batteries. If after charging the problem

persists, have the battery and charger checked by
an assistance centre.

PROBLEMS?

RULES FOR SAFE DRIVING

PEG PEREGO

offers an after-sales assistance service,

directly or through a network of authorized
assistance centres, for any repairs or replacements
and the sale of original spare parts. To contact the
assistance centres refer to the “Assistance Centres”
booklet included in the packaging.

Peg Perego always strive to best satisfy their
customers' needs. Knowing the opinions of our
customers is therefore very important and valuable
to us. We would be very grateful if, once you have
used the product, you would fill out the 

CONSUMER

SATISFACTION QUESTIONNAIRE 

which you can find on

the internet at: 

www.pegperego.com

, making

any observations or suggestions you might have.

ASSISTANCE SERVICE

WARNING

ASSEMBLY MUST ONLY BE CARRIED OUT BY
ADULTS. TAKE  CARE WHEN  REMOVING THE
VEHICLE FROM ITS PACKAGING. ALL THE
SCREWS AND SMALL PARTS ARE CONTAINED IN
A BAG INSIDE THE PACKAGING. THE BATTERY
MAY ALREADY BE FITTED INSIDE THE ITEM.

ASSEMBLY

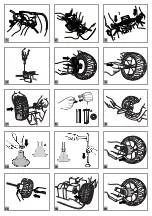
1 • Insert the steering shaft from below the vehicle,

positioning the bend in the tube as shown in the
figure.

2 • Turn the vehicle upside down. In the front

section, position the steering rod as shown in the
figure.

3 • Slightly raise the two steering levers, rotating

them until they engage with the ends of the
steering rod.

4 • Attach the two steering levers to the steering

rod with the screws and washers provided.

5 • Press to snap fit the hub caps onto the four

wheels.

6 • Insert the small bushes into the housing on the

inside of two of the four wheels, as shown in the
figure.

7 • Slide a washer and a wheel onto each of the two

steering levers.

8 • Insert a self-locking washer into the special tool,

as shown in the figure. Important: the wings of
the self locking washer must be facing the inside
of the tool (see detail A).
NOTE: spare self locking washers are included in
the bag. These should be kept in case one breaks
and needs replacing.

9 • Holding the vehicle still, fix the wheel as shown

in the figure. Repeat for the other front wheel.

10 • Insert a self-locking washer into the special tool,

as shown in the figure. Important: the wings of
the self locking washer must be facing the inside
of the tool (see detail A).

11 • Remove the grey protector caps from the ends

of the rear axle. Insert the axle into the tool as
shown in the figure.

12 • Fully insert the large pentagonal-shaped bush

inside one of the two remaining wheels.

13 • Insert the axle into the wheel as shown in the

figure.

14 • Insert the whole unit into the rear of the vehicle

(gear motor side), engaging the gear motor
pentagon into the bush as shown in the figure.

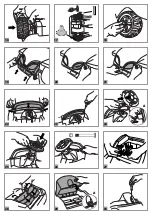
15 • Fully insert the large rounded bush inside the

remaining wheel.

16 • Insert a washer and the remaining wheel onto

the other end of the axle.

17 • Position the conical tool, which was used

previously, on the axle (gear motor side). Taking
care that the tool does not move, turn the
vehicle onto the gear motor side. Insert a self
locking washer into the remaining tool provided
and attach the wheel (see figure).

18 • Turn the vehicle back onto its wheels and fit the

four boss cover caps, making sure the teeth
engage into the respective cavities.

19 • Fit the front plate, applying pressure to snap it

into its slots in the bodywork.

20 • Apply transfers A and B to the front plate.
21 • Press the front lights to snap them into place.
22 • Insert the windscreen into its three slots.
23 • Fasten the windscreen at the sides with the two

screws.

24 • Connect the steering wheel and dashboard plugs

as shown in the figure. Insert the connected
plugs under the steering wheel (see detail A).

25 • Insert the steering wheel onto the steering shaft,

aligning the holes in the two elements.

26 • Fasten the steering wheel with the screw and nut

provided. IMPORTANT: the nut must be inserted
into the hexagonal hole and the screw into the
round hole.

27 • Connect the plug of the electrical system to the

battery plug.

28 • Position the seat support, engaging first the two

rear tabs (1) and then the two front tabs (2).

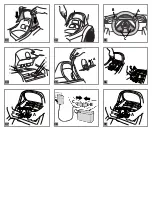
29 • Put the seat in the required position by inserting

the two front tabs and then engaging the rear tab
(detail A). Important: the seat can be set in three
different positions according to the height of the
child.

30 • Fasten the seat with the screw.
31 • Insert the roll-bar into its slots.
32 • Fasten the roll-bar with the four screws

provided.

FEATURES AND USE OF THE VEHICLE

33 • ELECTRONIC STEERING WHEEL: the steering

ASSEMBLY INSTRUCTIONS

wheel has two drive buttons (A forward, B
reverse). The two orange buttons (C) with LEDs
start eight melodies and if pushed together
produce three sounds (engine roar, horn, and
braking).

• STOPPING SYSTEM: when the drive buttons on

the steering wheel are released, the vehicle
stops automatically.

34 • The seat can be set in three different positions

depending on the height of the child.

REPLACING THE  BATTERY

35 • Remove the screw behind the seat. Push the

seat locking tab to release it and allow access to
the battery compartment.

36 • Unscrew the battery holder and remove it.
37 • Disconnect the plugs by pressing them on the

sides.

• Remove and replace the battery. Reconnect the

plugs and screw the battery holder back on.
Close the seat and replace the retention screw.

CHARGING THE  BATTERY

WARNING: BATTERY CHARGING AND EVERY
OTHER OPERATION ON THE ELECTRICAL
SYSTEM MUST BE CARRIED OUT BY ADULTS
ONLY.
THE BATTERY CAN ALSO BE CHARGED
WITHOUT REMOVING IT FROM THE TOY.

• Disconnect plug A of the electrical system from

the battery plug B by pressing the sides.

38 • Connect the battery charger plug into a

domestic power supply as per the attached
instructions. Connect plug B with plug C of the
battery charger.

• When charging is complete, detach the battery

charger from the domestic supply and then
disconnect plug C from plug B.

39 • Fully insert plug B into plug A until it engages

with a click. On completion always remember to
refit the battery holder (if the battery has been
removed), close the battery compartment, and
refit the seat with the retention screw.

Summary of Contents for IGED1100

Page 1: ...E IT USE AND CARE UTILISATION ET ENTRETIEN EN FR DE ES PT TR RU EL GEBRAUCH UND WARTUNG BRUGSANVISNING KÄYTTÖOHJE BRUKSANVISNING DA FI NO SV BRUKSANVISNING EMPLEOY MANUTENCION USO E MANUTENÇÃO KULLANIM VE BAKIM ЭКСПЛУАТАЦИЯ И УХОД MSGQG G SL UPORABA IN VZDRŽEVANJE H B s j O H L H g w h k m AR ...

Page 2: ...1 2 3 4 5 6 7 8 9 12 11 10 15 14 13 A A 1 2 ...

Page 3: ...16 17 18 19 21 20 22 23 24 27 26 25 30 29 28 A A 1 2 ...

Page 4: ...31 32 33 34 35 36 37 38 39 A B A A B B C A B C 1 2 3 1 2 3 ...

Page 5: ...seissa eri väreissä tilauksesta Reservedeler disponible i mange farger som må spesifiseres ved etterspørsel Reservdelar finns att få i flera färger som ska anges i begäran Siparişte belirtilen değişik renklerdeki yedek parçalari mevcuttur Запчасти имеются различных цветов необходимый указать в запросе sa ajsij diah rila re di woq vq lasa qordioq rse sam paqacce kese ricambi da richiedere insieme 1...

Page 6: ...55022 EN55014 Direttiva Europea RAEE 2003 108 CE Direttiva Europea RoHS 2002 95 CE Direttiva Ftalati 2005 84 CE Standard EN60825 1 Non è conforme alle disposizioni delle norme di circolazione su strada e pertanto non può circolare su strade pubbliche DICHIARAZIONE di CONFORMITA PegPerego S p A dichiara sotto la propria responsabilità che l articolo in oggetto è stato sottoposto a test di collaudo ...

Page 7: ...petere l operazione per l altra ruota anteriore 10 Inserire 1 rondella autobloccante sull apposito attrezzo mostrato in figura Attenzione le linguette della rondella autobloccante devono essere rivolte verso l interno dell attrezzo vedi particolare A 11 Togliere i tappi grigi di protezione posti sulle estremità dall assale posteriore Infilare l assale nell attrezzo come in figura 12 Infilare fino ...

Page 8: ...cle from water rain snow etc Using the vehicle on sand or mud may damage the buttons motors and gears Lubricate moving parts like bearings steering etc periodically with light oil The vehicle surfaces can be cleaned with a damp cloth and if necessary with non abrasive domestic cleaning products Cleaning must only be carried out by adults Never dismantle the vehicle mechanisms or motors unless auth...

Page 9: ...he figure Important the wings of the self locking washer must be facing the inside of the tool see detail A 11 Remove the grey protector caps from the ends of the rear axle Insert the axle into the tool as shown in the figure 12 Fully insert the large pentagonal shaped bush inside one of the two remaining wheels 13 Insert the axle into the wheel as shown in the figure 14 Insert the whole unit into...

Page 10: ...Directive européenne RAEE 2003 108 CE Directive européenne RoHS 2002 95 CE Directive Ftalati 2005 84 CE Standard EN60825 1 Ce produit n est pas conforme aux normes de circulation routière et par conséquent ne doit pas circuler sur les voies publiques DECLARATION DE CONFORMITE Peg Perego S p A déclare sous son entière responsabilité que l article ci dessus référencé a été soumis à des essais intern...

Page 11: ...ège pour la décrocher et avoir accès au compartiment de la batterie 36 Dévisser la barrette de blocage de la batterie et l enlever 37 Débrancher les fiches en appuyant sur les côtés Retirer et remplacer la batterie Rebrancher les fiches et revisser la barrette de blocage de la batterie Refermer le siège en revissant CHARGE DE LA BATTERIE ATTENTION L OPERATION DE CHARGE DES BATTERIES ET TOUTES AUTR...

Page 12: ...tt klassifiziert und muss demnach gemäß der vorgesehenen Mülltrennungsbestimmungen entsorgt werden Das zu entsorgende Produkt bei den dafür vorgesehenen Sammelstellen abliefern Die in den elektrischen Komponenten dieses Produktes enthaltenen gefährlichen Substanzen stellen eine potenzielle Gefahr für die Gesundheit des Menschen und die Umwelt dar sofern diese Produkte nicht vorschriftsmäßig entsor...

Page 13: ...Richtung Innenseite zeigen müssen siehe Detail A 11 Die grauen Schutzkappen die sich an den Enden befinden von der Hinterachse abnehmen Die Achse wie in der Abbildung dargestellt in das Endteil einfügen 12 Die große Buchse mit dem Fünfeck zur Gänze in das Innere eines der verbliebenen zwei Räder einstecken 13 Die Achse wie in der Abbildung dargestellt auf die Räder stecken 14 Das Ganze in das Hint...

Page 14: ...se aconseja o análogos SI HAY UNA PÉRDIDA Protegerse los ojos Evitar el contacto directo con el electrolito Proteger las manos Poner la batería en una bolsa de plástico y seguir las instrucciones para la eliminación de baterías SI PIEL Y OJOS ENTRAN EN CONTACTO CON EL ELECTROLITO Lavar abundantemente la parte afectada con agua Consultar un médico inmediatamente SI SE INGIERE ELECTROLITO Enjuagar l...

Page 15: ... Atención las lengüetas de la arandela autoblocante deben estar orientadas hacia el interior de la herramienta ver punto A 11 Quitar los tapones de protección grises colocados en el extremo del eje posterior Introducir el eje en la herramienta tal y como muestra la imagen 12 Introducir completamente el bulón grande con el pentágono en el interior de una de las ruedas que queda 13 Introducir el eje...

Page 16: ...ard EN71 1 2 3 Standard EN62115 Diretriz Compatibilidade Electromagnética 2004 108 CE Standard EN55022 EN55014 Diretriz Européia RAEE 2003 108 CE Diretriz Européia RoHS 2002 95 CE Diretriz Ftalati 2005 84 CE Standard EN60825 1 Não está de acordo com as leis de circulação viária e portanto não pode circular em vias públicas DECLARAÇÃO DE CONFORMIDADE Peg Perego S p A declara sob a própria responsab...

Page 17: ...a 10 Insira 1 anilha de bloqueio na respectiva ferramenta ilustrada na figura Atenção as linguetas da anilha de bloqueio têm de ficar viradas para o interior da ferramenta ver pormenor A 11 Remova as tampas cinzentas de protecção situadas nas extremidades do eixo traseiro Enfie o eixo na ferramenta como na figura 12 Enfie até ao fundo a bucha grande com o pentágono no interior de uma das outras ro...

Page 18: ... odložite na ustreznem vnaprej pripravljenem ekološkem otoku Prisotnost nevarnih snovi v električnih delih tega izdelka predstavljajo vir morebitne nevarnosti za človeško življenje in za okolje če izdelka ne zavržete na pravilen način Prekrižan smetnjak je oznaka ki sporoča da je treba izdelek zavreči kot predmet ločenega zbiranja odpadkov VARNO ODLAGANJE AKUMULATORJA Prizadevajte si za varovanje ...

Page 19: ...nataknite na ustrezno orodje prikazano na risbi Pozor jezički samoblokirne podložke morajo biti obrnjeni proti orodju glej podrobnost A 11 Odstranite zaščitna pokrovčka s koncev zadnje osi Vstavite os v orodje kot prikazuje risba 12 Do konca vstavite večji zatič s petkotnikom v notranjost enega od preostalih koles 13 Vstavite os v kolo kot prikazuje risba 14 Vstavite sklop v zadnji del vozila na s...

Page 20: ...r 2 Køretøj med 1 plads 1 genopladeligt batteri på 6V 3 3Ah med blyforsegling 1 drivende hjul 1 motor på 60 W Hastighed i 1 gear 4 Km h Hastighed i bakgear 4 Km h Peg Perego forbeholder sig ret til når som helst at foretage ændringer på modeller og data angivet i denne brochure på grund af tekniske eller erhvervsmæssige årsager PEG PEREGO takker dig for dit valg af dette produkt I mere end 50 år h...

Page 21: ...m går i stykker 9 Hold værktøjet godt fast og anbring hjulet som vist på tegningen Gentag samme fremgangsmåde med det andet forhjul 10 Indsæt 1 selvblokerende spændeskive i det medfølgende værktøj som vist på tegningen Pas på at vingerne på den selvblokerende spændeskive vender ind mod værktøjets inderside se deltegning A 11 Fjern de grå beskyttelsespropper på bagakslens yderpunkter Sæt værktøjet ...

Page 22: ...äylien ja uima altaiden läheisyydessä Lasten on aina pidettävä jalkineita ajoneuvon käyttämisen aikana Ajoneuvon käytön aikana on varottava etteivät lapset laita käsiä jalkoja tai muita kehon osia vaatteita tai muita esineitä lähelle liikkuvia osia Älä koskaan kastele ajoneuvon osia kuten moottoria järjestelmiä painikkeita jne Älä käytä ajoneuvon läheisyydessä bensiiniä tai muita tulenarkoja ainei...

Page 23: ...Jarruta aina ajoissa törmäysten välttämiseksi TOINEN NOPEUS mallikohtainen Aluksi on suositeltavaa käyttää ensimmäistä vaihdetta Ennen toisen vaihteen kytkemistä on varmistettava että lapsi on oppinut käyttämään oikein ohjaustankoa pyörää ensimmäistä vaihdetta jarrua ja että hän on tottunut käyttämään ajoneuvoa HUOMIO Tarkista että kaikki pyörien suojalevyt ja kiinnitysmutterit ovat kunnolla paiko...

Page 24: ... jonka päässä on viisikulmio pohjaan saakka yhteen jäljellä olevista pyöristä 13 Työnnä akseli pyörän läpi kuvassa esitetyllä tavalla 14 Aseta kokonaisuus paikalleen ajoneuvon takaosaan alennusvaihteen puolelle Sovita alennusvaihteen viisikulmio holkin sisään kuvassa esitetyllä tavalla 15 Työnnä suuri holkki jonka päässä on ympyrä pohjaan saakka jäljellä olevaan pyörään 16 Pujota yksi aluslaatta j...

Page 25: ...OM HUDEN ELLER ØYNENE KOMMER I KONTAKT MED ELEKTROLYTTEN Skyll nøye med rikelig vann det berørte området Kontakt lege med en gang DERSOM NOEN SKULLE KOMME TIL Å DRIKKE ELEKTROLYTTEN Skyll munnen og spytt Kontakt lege med en gang ADVARSLER FOR BATTERIET Det anbefales ikke å oppbevare leken på steder der det temperaturen synker til under null grader Dersom den skulle bli brukt uten at man først har ...

Page 26: ...terikontakten 28 Plasser setestøtten ved først å hekte fast de bakre to festetaggene 1 og deretter de to fremre 2 29 Plasser setet i ønsket posisjon ved å sette inn de to bakre snippene og feste dem til bakre tagg se detalj A Vær oppmerksom Setet er beregnet til å kunne festes i 3 posisjoner avhengig av barnets høyde 30 Fest setet ved hjelp av en skrue 31 Sett rullestangen i sporene 32 Fest rulles...

Page 27: ...der Lägg batteriet i en plastpåse och följ instruktioner för bortskaffande av batterier OM HUDEN ELLER ÖGONEN SKULLE KOMMA I KONTAKT MED ELEKTROLYTEN Skölj den utsatta kroppsdelen i rikligt med rinnande vatten Rådfråga omedelbart läkare OM ELEKTROLYTEN SVÄLJS Skölj munnen och spotta Rådfråga omedelbart läkare VARNINGAR BATTERI Leksaken bör inte lämnas på platser vars temperatur understiger noll gr...

Page 28: ...tts igång ska man noggrant läsa och följa instruktionerna härunder Lär barnet att använda fordonet på korrekt sätt så att körningen blir säker och rolig Innan start ska man försäkra sig om att färdsträckan inte hindras av personer eller föremål Kör med händerna på styrstången ratten och håll alltid ögonen på vägen Bromsa i tid för att undvika krockar 2 a HASTIGHET om sådan finns I början rekommend...

Page 29: ...nmayınız Aracın kullanımı esnasında çocuklar daima ayakkabı giymiş olmalıdır Araç çalışırken çocukların ellerini ayaklarını veya vücutlarının diğer uzuvlarını giysilerini veya başka eşyalarını aracın hareketli aksamlarına koymadıklarına dikkat ediniz Aracın motorlar tesisatlar düğmeler vs gibi bileşenlerini asla ıslatmayınız Aracın yakınında benzin veya başka yanıcı maddeler kullanmayınız Bu araç ...

Page 30: ...nuz redüktörlü motor tarafı 15 Geniş yuvarlak burcu diğer tekerleğin içine tam olarak oturtunuz 16 Diğer tekerleği ve bir rondelayı aksın diğer ucuna takınız 17 Daha önceden kullandığınız konik aleti aks üzerine hizalayın redüktörlü motor tarafı Aletin yerinden hareket etmediğinden emin olarak aracı redüktörlü motor alta gelecek şekilde çevirin Verilen diğer alete kendinden kilitlemeli bir rondela...

Page 31: ...о характера Компания PEG PEREGO благодарит вас за то что вы выбрали это изделие Вот уже 50 лет как компания PEG PEREGO гуляет с детьми Сразу после рождения на своих детских колясках затем на прогулочных а позже на педальных и электрических игрушках Ознакомьтесь с полной гаммой продукции новиками и другой информацией о мире компании Peg Perego на нашем сайте www pegperego com НАИМЕНОВАНИЕ ИЗДЕЛИЯ M...

Page 32: ...одним лишь ребенком на борту два колеса могут крутиться с разной скоростью с возможным их проскальзыванием или замедлением РАЗВЛЕЧЕНИЕ БЕЗ ПЕРЕРЫВОВ держите запасной комплект заряженных батарей готовым к применению ИГРУШКА НЕ РАБОТАЕТ Проверьте не отсоединились ли кабели под пластиной акселератора Проверьте исправность кнопки акселератора и при необходимости замените ее Убедитесь что батарея подкл...

Page 33: ...нжевые кнопки С со светодиодами включают 8 мелодий и в случае одновременного нажатия издают 3 звука шум двигателя звуковой сигнал и торможение УСТРОЙСТВО ОСТАНОВКИ отпуская кнопки хода расположенные на руле игрушка автоматически остановится 34 Сиденье можно регулировать по длине в трех разных положениях в зависимости от роста ребенка ЗАМЕНА БАТАРЕИ 35 Отвинтите винт за сиденьем и отцепите зуб сиде...

Page 34: ..._ ___________________________________________ 8 E C 1R ___________________________________________ ___________________________________________ ___________________________________________ ___________________________________________ S E971 ___________________________________________ ___________________________________________ ___________________________________________ ______________________________...

Page 35: ... B 1 1 2 3 2 4 2 5 6 7 1 8 D 2H 9 0 10 1 11 12 13 14 15 16 1 17 1 18 4 19 20 21 22 23 2 24 8 1 25 26 27 28 1 2 29 2 3 N 30 31 rollbar 32 rollbar 3 3 3 3 1 3 33 B2 B 2 2 8 3 2 M D D 34 N 13 3 3 3 4 3 35 M 36 M 37 M 9 3 3 4 3 2 HB D 2HB 2 2 D 2 C D 2 B CB 2 B 2 D 2 D 2 B 2 E 2 2 H 2 B 2 B2 2 38 C C 39 ...

Page 36: ... g l k g R f h g l s h l V H V f u m H g l V t Œ m 3 3 U g m H g Œ h M H g j V k m U g m H g Œ h M l M f V K A g g s V î g n H l h L B î g n H g V H x H g l j h P h K ƒ H H g g K H g f V j Œ h g d C H g l H K f l C a V l q d x Œ l h K f j a y G H g k y l h J U k l h K H g G r f G j a y G H g u V f m H r V H j f v H g j u g l h J H g j h g m f u k h m r L f j u g L g H B s j O H L H g w P p g g u V...

Page 37: ...h z d H Y s G H g x H g l w h F f h g l h x H g h V D H g y V r L f h s j a h V M H g f F t V H t d P h g m H f j b c H g l h M H g Œ h f g m g g j P g G H g V f h z d H a T t l H f w R r L f h s j a h V M H g f F t V H B k w p f j V H g g u f m t d f z h J j Œ G V m P V H V j h U K H g w V H g l z D t d P h g m H s j O H L H g g u f m t d f z m j Œ j V F V m P V H V j h l K w V l z h t l K H g l ...

Page 38: ......

Page 39: ......

Page 40: ...lo da telefono fisso PEG PEREGO U S A Inc 3625 INDEPENDENCE Dr FORT WAYNE IN 46808 phone 260 4828191 fax 260 4842940 call us toll free 1 800 728 2108 llame USA gratis 1 800 225 1558 llame Mexico gratis 1 800 710 1369 PEG PEREGO CANADA Inc 585 GRANITE COURT PICKERING ONT CANADA L1W3K1 phone 905 8393371 fax 905 8399542 call us toll free 1 800 661 5050 cod IGED1100 PINK cod IGED1103 ...

Reviews: