background image

20

25

13

17

16

15

19

7

8

9

10

A

1

8

Apply decals before
installing

12

14

A

21

22

23

24

26

A

Summary of Contents for IGOD0074

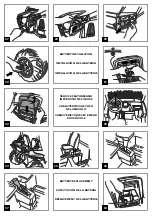
Page 1: ...NOTA este manual contiene 3 idiomas por lo tanto las ilustraci nes para ensamblaje estan aparte de las instrucci nes de ensamblaje escritas Las instrucci nes de ensamblaje escritas estan varias pagina...

Page 2: ...VERBAL INSTRUCTIONS AFTER THE PICTURES VER LAS INSTRUCCIONES DESPU S DE LOS DISE OS VOIR LES INSTRUCTIONS APR S LES DESSINS INITIAL BATTERY CHARGE PRIMERA CARGA DE LA BATER A PREMI RE CHARGE DE BATTER...

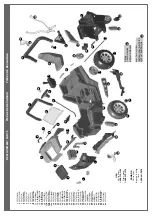
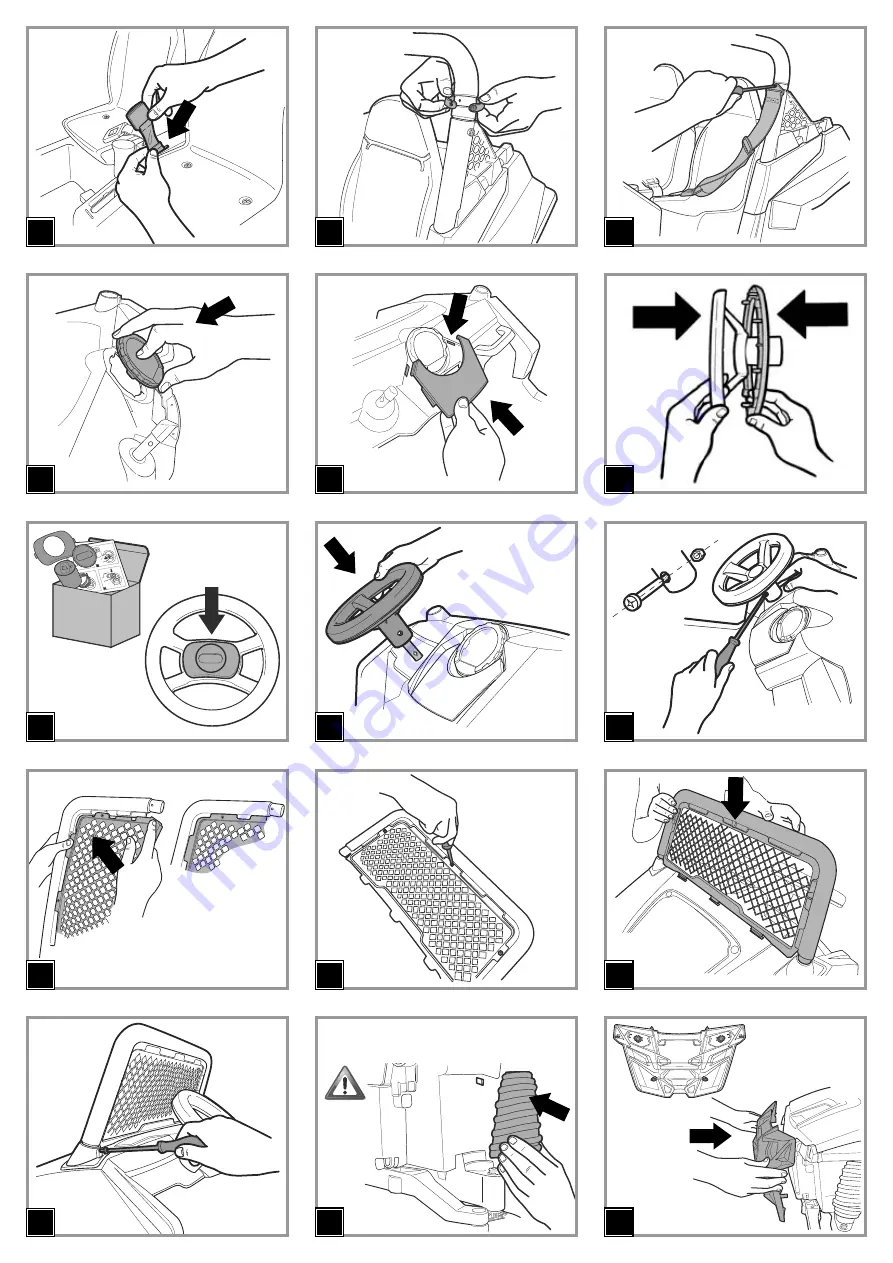
Page 3: ...20 25 13 17 16 15 19 7 8 9 10 A 18 Apply decals before installing 12 14 A 21 22 23 24 26 A...

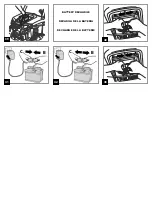
Page 4: ...ATER A INSTALLATION DE LA BATTERIE 31 32 VEHICLE FEATURES AND INSTRUCTIONS FOR USE CARACTER STICASY USO DEL VEH CULO CARACTERISTIQUES ET EMPLOI DU VEHICULE 34 35 36 37 1 2 R BATTERY REPLACEMENT SUSTIT...

Page 5: ...43 B A B A 39 40 B C 41 BATTERY RECHARGE RECARGA DE LA BATER A RECHARGE DE LA BATTERIE B C 42...

Page 6: ...b blue bk black r red w white b azul bk negro r rojo w blanco b bleu bk noir r rouge w blanc...

Page 7: ...4VO 6 SPST8211N 7 SPST8995 8 SPST8933N 9 SPST9323N 10 SAGI8862NGL 11 SPMV9458N 12 ASGI0217NVO 13 SOTF0291L30 14 ASGI0235N 15 SPRP9304MF 16 SPMV9459N 17R SPST9317DN 17L SPST9317SN 18R SPST9318DVO 18L S...

Page 8: ...45 minutes for assembly Before the vehicle is used for the first time charge the battery for 18 hours to initiate it Failure to do this can result in permanent battery damage Use only with the include...

Page 9: ...WITH THEM Batteries contain an acid based electrolyte Do not make direct contact between battery terminals as this can cause an explosion or fire Charging produces explosive gases Charge batteries in...

Page 10: ...orrect right and left are indicated on the back of the items DX right side 26 Fit the front grill engaging it to the chassis at the 6 points highlighted in detail A 27 Screw on the grill with the 2 sc...

Page 11: ...trical system the plug connections the covering caps and the charger In case of fault do not try to use the vehicle and the charger For repair use only original PEG PEREGO s spare parts PEG PEREGO ass...

Page 12: ...or mud or over rough or uneven terrain the overload circuit breaker will automatically disconnect the power After 10 or more seconds the circuit breaker will automatically reset however you must elim...

Page 13: ...z cargar la bater a durante 18 horas No respectar este procedimiento podr a causar da os irreversibles a la bater a anulando su garant a Utilice solamente con la clavija incluida Peg Perego 12 voltio...

Page 14: ...AS BATER AS CONTIENEN SUBSTANCIAS T XICAS CORROSIVAS NO SE DEBEN MANIPULAR ABUSIVAMENTE Las bater as contiene electrolita de base cida No provoque el contacto directo entre los terminales de la bater...

Page 15: ...iezas DX lado derecho 26 Insertar la persiana del radiador en la parte anterior enganch ndola al chasis en los 6 puntos que se muestran en el gr fico A 27 Atornillar la persiana del radiador mediante...

Page 16: ...ATR S Bajar con una mano la palanca del cambio Colocar la otra mano sobre el volante y pisar el acelerador El veh culo retrocede a una velocidad de aproximadamente 21 4 mph FRENO El sistema el ctrico...

Page 17: ...vehiculo esta construido para dos ninos Se puede usar sobra superficies lisas hierba sin suciedad o superficies duras con pendientes que superan el 10 No apto para ni os menores de 36 meses por sus ca...

Page 18: ...ge Avant d utiliser le v hicule pour la premi re fois recharger le batterie pendant 18 heures La non observation des instructions dans cette brochure peut entra ner le risque des dommages irr versible...

Page 19: ...OUVRIR Les batteries contiennent des lectrolytes base d acide Ne pas provoquer de contact direct entre les plots de la batterie risque d explosion et d incendie Pendant le rechargement la batterie pro...

Page 20: ...R glez la calandre avant en l enclenchant au ch ssis sur les 6 points mis en vidence dans le d tail A 27 Vissez la calandre l aide des 2 vis fournies 28 Appliquez les adh sifs en mylar argent dans le...

Page 21: ...RE Abaisser d une main lelevier du chargement de vitesse Mettre l autre main sur le volant et appuyer avec le pied sur l acc l rateur Le v hicule part en arri re une vitesse d environ 21 4 mph FREIN L...

Page 22: ...toute responsabilit en cas de mauvaise utilisation de l installation lectrique Ne pas laisser les batteries ou le jouet proximit de sources de chaleur comme des radiateurs des chemin es etc Prot ger l...

Page 23: ......

Page 24: ...pas votre v hicule la m moire Nous sommes un appel t l phonique en service libre appel loin et nous pouvons aider Si vous tes les pi ces manquantes ou avez besoin d aide voir s il vous pla t l inform...

Reviews: