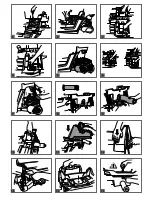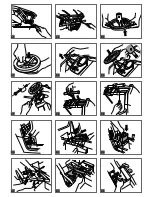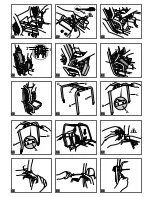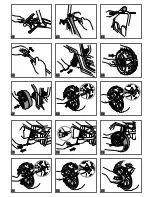
background image

• B - selettore stazioni radio
• C - tasti on/off
• D - spia di radio accesa
• E - manopola regolazione volume
• F - tasti regolazione orologio digitale

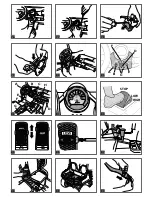
82 • COMPONENTI ABITACOLO:

• A - volante
• B - radio funzionante  (vedi fig 81)
• C - quadro di controllo velocita' e stato di carica

della batteria  (vedi fig 83)

• D - maniglia passeggero
• E - pedale acceleratore/freno elettrico (vedi fig

84-85-86)

• F - leva cambio  (vedi fig 87)
• G - portabibite  (vedi fig 88)
• H - vano porta lettore MP3

83 • QUADRO di CONTROLLO - Nella parte

inferiore del quadro di controllo viene visualizzato
lo stato di carica della batteria. Spia verde, la
batteria e' carica; spia arancione, la batteria si sta
scaricando, spia rossa, la batteria deve essere
ricaricata. Nella parte superiore i led verdi si
accendono pregressivamente all'aumentare della
velocita' del veicolo (sono solo a scopo di gioco
e non visualizzano la reale velocita' del veicolo).

84 • PEDALE ACCELERATORE/FRENO ELETTRICO

- Premendo con il piede il pedale dell’acceleratore
il veicolo si mette in moto. Rilasciando il pedale
entrerà in funzione il freno elettrico arrestando il
veicolo automaticamente.

85 • Sul pedale è posizionato il blocco seconda velocità.

Quando viene tolto il veicolo dall’imballo, il
blocco seconda velocità è posizionato come in
figura A (LOW) e permette al veicolo di viaggiare
alla velocità più bassa. Quando il blocco seconda
velocità è posizionato come in figura B (HIGH), il
veicolo viaggia alla velocità più alta.

86 • Per posizionare il blocco seconda velocità nella

posizione B (HIGH), svitare la vite di fissaggio del
blocco seconda velocità e spostarlo verso l’alto.
Attenzione, riavvitare sempre la vite.

87 • LEVA CAMBIO - Quando la leva cambio e'

posizionata in posizione verticale, il veicolo
viaggia in avanti alla velocita' LOW o HIGH.
Tirando indietro la leva cambio e premendo
contemporaneamente il pedale dell’acceleratore
il veicolo procede in retromarcia.

88 • PORTABIBITE - E’ dotato di due vani portabibite

per lattine o bottigliette.

89 • CASSONE e MOLLEGGI - Il retro del veicolo è

dotato di un ampio cassone portaoggetti e di
veri molleggi funzionanti sulle ruote. 

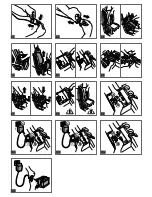
90 • CINTURE di SICUREZZA - Per agganciare la

cintura di sicurezza inserire la parte terminale
della cintura più lunga nella fibia della cintura più
corta premendo le due estremita' tra di loro.

91 • Per sganciare la cintura di sicurezza premere il

pulsante della fibia e contemporaneamente
sganciare i due elementi.

92 • Per regolare la lunghezza della cintura di sicurezza,

spostare il cursore come mostrato in figura.

SOSTITUZIONE DELLA BATTERIA

93 • Svitare la vite di sicurezza della seduta del sedile

passeggero e sollevare la seduta;

94 • Svitare i pomoli e togliere il sedile;
95 • Svitare le due viti della base del sedile. Scollegare

le spine della batteria e dell'impianto elettrico;

96 • Estrarre la base del sedile e sfilare le spine;
97 • Sostituire la batteria.

• Riposizionare la base del sedile dopo aver inserito

le spine nei fori. Ricollegare le spine e riposizionare
il sedile.

98 • ATTENZIONE: riavvitare sempre tutti i pomoli e

le viti.

CARICA DELLA BATTERIA

ATTENZIONE: LA CARICA DELLA BATTERIA E
QUALSIASI INTERVENTO ALL'IMPIANTO ELETTRICO
DEVONO ESSERE EFFETTUATI DA ADULTI.
LA BATTERIA PUÓ ESSERE CARICATA ANCHE
SENZA RIMUOVERLA DAL GIOCO.
99   • Scollegare la spina A dell' impianto elettrico

dalla spina B della batteria premendo le spine
lateralmente.

100 • Inserire la spina del caricabatterie ad una presa

domestica seguendo le sue istruzioni allegate.
Collegare la spina B con la spina C del
caricabatterie.

101 • A carica ultimata staccare il caricabatteria dalla

presa domestica, poi scollegare la spina C dalla
spina B.

102 • Inserire a fondo, fino allo scatto, la spina B nella

spina A.

• ATTENZIONE: terminate le operazioni di

ricarica riavvitare sempre tutti i pomoli e le viti.

103 • La batteria può essere caricata anche fuori dal

veicolo in questo modo se avete una batteria di
scorta, il bambino può continuare a giocare.

Read this instruction manual carefully to learn how
to use the vehicle and teach your child to drive it
properly and safely while enjoying it at the same
time. Keep the manual safe for future reference. 
Before using the vehicle for the first time, charge the
battery for 18 hours. Failure to do this could result in
irreparable damage to the battery.

Ages 3 to 10

• Two-seater vehicle
• One 24V 15Ah sealed lead acid rechargeable battery
• Two drive wheels
• Two 280 W motors
• Speed in 1st gear 5 km/h
• Speed in 2nd gear 10.5 km/h
• Speed in reverse gear 5 km/h

Peg Perego reserve the right to make changes to the
models and information in the present publication at
any time, for technical or company reasons.

Thank you for choosing a PEG PEREGO® product.
For over 50 years PEG PEREGO have been with you
as you take your children out - in carriages just after
they are born, then in strollers, and later on in pedal
and battery-powered toys

Discover our complete range of products, news and
other information about the Peg Perego world on
our web site.

www.pegperego.com

PRODUCT NAME

Polaris Ranger RZR

PRODUCT IDENTIFICATION CODE

IGOD0513

REFERENCE STANDARD (origin)

General Toy Safety Directive 88/378/EEC

Standard EN 71 / 1 -2 -3

Standard EN62115

Electromagnetic Compatibility Directive

2004/108/EC

Standard EN55022 – EN55014

European Directive WEEE 03/108/EC

European Directive RoHS 2002/95/EC

Phthalates Directive 2005/84/EC

Standard EN 60825-1

The vehicle is not compliant with the requirements

of road transport standards and consequently

cannot travel on public roads.

DECLARATION of CONFORMITY

Peg Perego S.p.A. declares under its own

responsibility that the item in question has been

subjected to internal operational tests and

approved according to the standards in force at

external, independent laboratories.

PLACE AND DATE OF ISSUE

Italy - 06.05.2008 

Peg Perego S.p.A.

via A. De Gasperi 50

20043 Arcore (MI) – ITALIA

ENGLISH

DECLARATION OF CONFORMITY

IMPORTANT INFORMATION

Our toys are compliant with European Safety
Standards for toys (safety requirements stipulated by
the EEC Council) and with the “U.S. Consumer Toy
Safety Specification”. They are approved by the
I.I.S.G. (Italian Toy Safety Institute). They are not
compliant with the requirements of road transport
standards and consequently cannot travel on public
roads.

Peg Perego S.p.A. is ISO 9001
certified.

This certification provides customers
and consumers with a guarantee of
transparency and assurance about the
company’s working procedures.

WARNING! THE SUPERVISION OF AN ADULT IS
ALWAYS NECESSARY.
• Not suitable for children of under 36 months of

age due to the presence of small parts that could
be swallowed or inhaled.

• Do not use the vehicle on public roads, in places

where there is traffic or parked cars, on steep
slopes, near to steps and stairs, watercourses or
swimming pools.

• Children must always wear shoes when using the

vehicle.

• When the vehicle is in operation make sure that

children do not put their hands, feet, other body
parts, clothing, or other objects close to the
moving parts.

• Never wet sensitive vehicle components like the

motors, electrical systems, buttons, etc.

• Do not use petrol or other flammable substances

close to the vehicle.

• The vehicle must be only be used by a single child

unless it is classed as a two-seater vehicle.

WEEE DIRECTIVE (EU only)

• At the end of its useful life, this product is classed

as Waste Electrical and Electronic Equipment
(WEEE) and must therefore not be disposed of as
urban waste but instead taken to a designated
separated waste collection facility.

• Take it to an appropriate collection centre.
• The presence of dangerous substances contained in

the electrical components of this product
represents a potential source of danger to human
health and for the environment if the products are
not disposed of correctly.

• The barred dustbin symbol indicates that the

product must undergo sorted waste collection.

DISPOSAL OF THE BATTERY
• Help protect the environment.
• Used batteries must not be disposed of with

domestic waste.

• They can be left at a used battery or special waste

collection centre. Contact your local authorities
for more information.

AA 1.5 VOLT BATTERY WARNINGS

The insertion of the batteries must be carried out
and supervised by adults only. Do not allow children
to play with the batteries.
• The batteries must be replaced by an adult.
• Only use the battery type specified by the

manufacturer.

• Respect the +/- polarity.
• Do not short circuit the power supply terminals:

risk of fire or explosion.

• Always remove the batteries when the toy is not

used for a long time.

• Do not throw the batteries into a fire.
• Never try to recharge batteries if they are not

rechargeable.

• Do not mix old and new batteries.
• Remove flat batteries.
• Dispose of flat batteries in the appropriate

recycling containers.  

SAFETY STANDARDS

Summary of Contents for IGOD0513

Page 1: ...T USE AND CARE UTILISATION ET ENTRETIEN EN FR DE ES PT TR RU EL GEBRAUCH UND WARTUNG BRUGSANVISNING KÄYTTÖOHJE BRUKSANVISNING DA FI NO SV BRUKSANVISNING EMPLEOY MANUTENCION USO E MANUTENÇÃO KULLANIM VE BAKIM ЭКСПЛУАТАЦИЯ И УХОД MSGQG G SL UPORABA IN VZDRŽEVANJE H B s j O H L H g w h k m AR ...

Page 2: ...1 2 1 2 3 4 5 6 7 8 9 12 11 10 15 14 13 ...

Page 3: ...1 2 1 2 D A A B B C A B C D D A B A A B B D E C D C E 16 17 18 19 21 20 22 23 24 27 26 25 30 29 28 ...

Page 4: ...31 32 33 34 35 36 37 38 39 42 41 40 45 44 43 ...

Page 5: ...A 2 1 A B E D C C B A D E A 46 47 48 49 51 50 52 53 54 57 56 55 60 59 58 ...

Page 6: ...61 62 63 64 65 66 67 68 69 72 71 70 75 74 73 ...

Page 7: ...A B C D F E A B C H D F G E STOP HIGH LOW A B R 76 77 78 79 81 80 82 83 84 87 86 85 90 89 88 ...

Page 8: ...1 2 B A 1 2 C C B A 1 2 C C B B A A 91 92 93 94 95 96 97 98 99 102 101 103 100 ...

Page 9: ...F800 POLYSWITCH POLYSWITCH RUEF800 b r b V R k b s r P l V w f Q b blu bk nero r rosso w bianco b blue bk black r red w white b bleu bk noir r rouge w blanc b blau bk schwarz r rot w weiß b azul bk negro r rojo w blanco b azul bk preto r vermelho w branco b moder bk črn r rdeč w bel b blå bk sort r rød w hvid b sininen bk musta r punainen w valkoinen b blå bk svart r rød w hvit b blå bk svart r rö...

Page 10: ...SPST8934N 38 dx SPST8884DN 38 sx SPST8884SN 39 SPST8922N 40 SPST8921N 41 SOFF0248Z 42 SARP8997NGR 43 SPST9056R 44 SPMV8893N 45 dx SPST8924DGR 45 sx SPST8924SGR 46 SAGI8928N 47 dx SPST8919D 47 sx SPST8919S 48 ASGI0206N 49 SAGI8901N 50 SPST8902N 51 SPST8903 52 SOTF0253L30 53 dx SPST8882DN 53 sx SPST8882SN 54 SPST8879N 55 SPST8904N 56 SPST8925N 57 ASGI0207N 58 SPST8766KGL 59 SAGI8960JNGL 60 SPMV8916N...

Page 11: ...rrozzine poi con i passeggini e ancora dopo con i giocattoli a pedali e a batteria Scopri la gamma completa dei prodotti le novità e altre informazioni sul mondo Peg Perego sul nostro sito www pegperego com DENOMINAZIONE DEL PRODOTTO Polaris Ranger RZR CODICE IDENTIFICATIVO DEL PRODOTTO IGOD0513 NORMATIVE di RIFERIMENTO origine Direttiva generale Sicurezza dei Giocattoli 88 378 CE Standard EN 71 1...

Page 12: ...all assale posteriore 65 Infilare l assale nella parte posteriore del veicolo come mostrato in figura 66 Posizionare il driver nella parte interna di una delle due ruote piu larghe 67 Infilare la ruota sull assale con il driver rivolto verso il vicolo 68 Inserire sull assale una rondella 69 Fissare la ruota avvitando con la chiave in dotazione uno dei quatto dadi forniti Ripetere le operazioni del...

Page 13: ... 10 Two seater vehicle One 24V 15Ah sealed lead acid rechargeable battery Two drive wheels Two 280 W motors Speed in 1st gear 5 km h Speed in 2nd gear 10 5 km h Speed in reverse gear 5 km h Peg Perego reserve the right to make changes to the models and information in the present publication at any time for technical or company reasons Thank you for choosing a PEG PEREGO product For over 50 years P...

Page 14: ...ton and replace it if necessary Check that the battery is connected to the electrical system THE VEHICLE LACKS POWER Charge the batteries If after charging the problem persists have the battery and charger checked by an assistance centre PROBLEMS RULES FOR SAFE DRIVING PEG PEREGO offers an after sales assistance service directly or through a network of authorized assistance centres for any repairs...

Page 15: ...leased the electrical brake is activated automatically stopping the vehicle 85 The second gear lock is located on the pedal When the vehicle is removed from its packaging the second gear lock is positioned as shown in figure A LOW limiting the vehicle to the lower speed When the second gear lock is positioned as shown in figure B HIGH the vehicle can travel at the faster speed 86 To adjust the sec...

Page 16: ...onseillé de poser la batterie sur des vêtements cela risquerait de les abîmer Utilisez uniquement des batteries ou des accumulateurs du type recommandé ou de type analogue EN CAS DE FUITE Protégez vos yeux éviter tout contact direct avec l électrolyte protégez vos mains Mettre la batterie dans un sac en plastique et suivre les instructions concernant l élimination de la batterie EN CAS DE CONTACT ...

Page 17: ...partie de ceinture tel qu illustré sur le détail A Remarque les boutons des boucles des ceintures doivent être tournés vers le levier de vitesse tel qu illustré sur le dessin 48 Dévisser les boutons de la base du siège 49 Positionner le siège Remarque le siège peut être réglé en longueur sur deux positions différentes selon la taille de l enfant 50 Revisser les boutons 51 Baisser l assise du siège...

Page 18: ... sich bewegenden Teile bringen Fahrzeugteile wie den Motor die elektrische Anlage die Tasten usw nie mit Wasser in Berührung bringen Benzin oder andere entflammbare Stoffe nicht in der Nähe des Fahrzeuges benutzen Das Kinderfahrzeug ist nur für die Benutzung durch ein Kind ausgelegt sofern es nicht unter die Kategorie der zweisitzigen Fahrzeuge fällt BESTIMMUNGEN RAEE nur EU Dieses Produkt wird am...

Page 19: ... geraten bremsen VERGNÜGEN OHNE UNTERBRECHUNG Halten Sie immer einen Satz einsatzbereiter Batterien bereit DAS FAHRZEUG FUNKTIONIERT NICHT Die korrekte Verbindung der Kabel unter dem Gaspedal überprüfen Die Funktionstüchtigkeit der Drucktaste des Gaspedals kontrollieren und diese bei Bedarf ersetzen Prüfen ob die Batterie mit der elektrischen Anlage verbunden ist DAS FAHRZEUG LÄUFT LANGSAM Die Bat...

Page 20: ...altegriff mittels der beigefügten Schraube befestigen 40 Den Tankdeckel aufdrücken 41 Die Sitzträger die anfänglich herausgenommen wurden an der Fahrerseite wieder einsetzen 42 Die schon aufgeladene Batterie in das Fach unter dem Beifahrersitz einsetzen 43 Den Batteriestecker und den der elektrischen Anlage in die noch freien Öffnungen des Sitzträgers einstecken 44 Den Sitzträger an der Beifahrers...

Page 21: ...n una fuente de peligro potencial para la salud humana y para el ambiente si los productos no se eliminan correctamente El contenedor tachado indica que el producto está sujeto a la recogida diferenciada ELIMINACIÓN DE LA BATERÍA Contribuya a la protección del medio ambiente La batería usada no se elimina con los residuos domésticos Pueden depositarla en un centro de recogida de baterías usadas o ...

Page 22: ...tos que se indican con las letras A B y C 22 Levantar la parte superior de la persiana posterior para facilitar el enganche de las lengüetas de fijación D 23 Fijar la persiana posterior atornillando los dos tornillos tal y como se muestra en la figura 24 Completar la fijación de la persiana posterior atornillando el tornillo debajo del tubo de escape 25 Persiana delantera A lengüetas para el engan...

Page 23: ...inturones de seguridad mover el cursor tal y como se muestra en la figura SUSTITUCIÓN DE LA BATERÍA 93 Destornillar los tornillos de seguridad de la silla del asiento del pasajero y levantar la silla 94 Destornillar los pomos y quitar el asiento 95 Destornillar los dos tornillos de la base del asiento Desconectar las clavijas de la batería y de la instalación eléctrica 96 Extraer la base del asien...

Page 24: ...o veículo É desaconselhável apoiar a bateria sobre roupas poderiam danificar se Utilize somente baterias ou acumuladores do tipo recomendado ou similar CASO OCORRA VAZAMENTO Proteja seus olhos evite contato direto com o eletrólito Proteja suas mãos Coloque a bateria numa bolsa de plástico e siga as instruções sobre eliminação de baterias CASO A PELE OU ROUPAS ENTREM EM CONTATO COM O ELETRÓLITO Lav...

Page 25: ... parte final inferior 56 Monte o teto fazendo pressão no veículo 57 Introduza as abraçadeiras nas peças D e E do teto Preste atenção no lado correto da abraçadeira 58 Introduza a parte final das proteções laterais nas abraçadeiras 59 Atarraxe os parafusos de fixação 60 Fixe o teto na parte traseira com 2 parafusos 61 Fixe o teto na parte dianteira com 2 parafusos 62 Fixe as partes longas dos cinto...

Page 26: ...ikacijo o uporabi igrač ki so jo izdale ZDA U S Consumer Toy Safety Specification Potrdil jih je organ IISG Italijanski inštitut za varnost igrač Ne ustrezajo predpisom za vožnjo po cestah zato se z njimi otroci ne smejo voziti po javnih cestah Peg Perego S p A ima certifikat ISO 9001 Certifikat za stranke in uporabnike pomeni garancijo transparentnosti in zaupanja v delo podjetja POZOR OTROKE NAJ...

Page 27: ...n na električno napeljavo vozila VOZILO NIMA MOČI Napolnite akumulatorje Če po polnjenju akumulatorja težava še vedno obstaja odnesite akumulatorje in polnilnike v center za pomoč uporabnikom TEŽAVE PRAVILA ZA VARNO VOŽNJO PEG PEREGO ponuja pomoč uporabnikom ki so kupili izdelek neposredno ali prek svoje mreže pooblaščenih centrov za pomoč uporabnikom za morebitna popravila zamenjave ali nakup ori...

Page 28: ...peljalo Ko pedal spusti se bo samodejno sprožila električna zavora in vozilo zaustavila 85 Na pedalu je nameščena blokada druge prestave Ko vozilo vzamete iz embalaže je blokada druge prestave postavljena kot prikazuje risba A LOW NIZKO in dovoljuje vozilu le počasno vožnjo Ko je blokada druge prestave postavljena kot prikazuje risba B HIGH VISOKO vozilo vozi tudi hitreje 86 Da bi prestavili bloka...

Page 29: ...torer af den anbefalede type eller en tilsvarende type HVIS DER FOREKOMMER EN LÆKAGE Beskyt øjnene undgå direkte kontakt med elektrolytten beskyt hænderne Anbring batteriet i en plastikpose og følg anvisningerne vedrørende bortskaffelse af batterier HVIS HUD ELLER ØJNE KOMMER I KONTAKT MED ELEKTROLYTTEN Vask det ramte område med rigelige mængder rindende vand Henvend dig straks til en læge HVIS EL...

Page 30: ...tes ind i hullet E på forskærmen som vist på tegningen 31 Spænd styrtbøjlen fast med den medfølgende skrue 32 Færdiggør fastspænding af styrtbøjlen ved at spænde de 2 skruer fast på den forreste del 33 Tryk sammen på rattets to dele for at presse dem fast mod hinanden 34 Tryk rattets midterprop på plads 35 Fjern plastikbeskyttelsen fra ratstammen 36 Anbring rattet og sørg for at linjestille huller...

Page 31: ...ava suljettu lyijyakku 24 V 15 Ah 2 vetävää pyörää 2 moottoria 280 W Ykkösvaihteen nopeus 5 Km h Kakkosvaihteen nopeus 10 5 Km h Peruutusvaihteen nopeus 5 Km h Peg Perego pidättää oikeuden tehdä teknisistä tai tuotannollisista syistä malleihin ja tämän julkaisun tietoihin muutoksia milloin tahansa Kiitos että valitsit PEG PEREGO tuotteen PEG PEREGO on vienyt lapsia ulos jo 50 vuoden ajan Vastasynt...

Page 32: ...in ohjaustankoa pyörää ensimmäistä vaihdetta jarrua ja että hän on tottunut käyttämään ajoneuvoa HUOMIO Tarkista että kaikki pyörien suojalevyt ja kiinnitysmutterit ovat kunnolla paikoillaan Jos ajoneuvo joutuu ylikuormitustilanteeseen kuten pehmeässä hiekassa mudassa tai hyvin epätasaisella maaperällä ylikuormituskytkin katkaisee tehon välittömästi Tehon syöttö jatkuu muutaman sekunnin kuluttua J...

Page 33: ...sosiin 59 Ruuvaa kiinni kiinnitysruuvit 60 Kiinnitä katon takaosa kahdella ruuvilla 61 Kiinnitä katon etuosa kahdella ruuvilla 62 Kiinnitä kattoon turvavöiden pitkät osat 63 Kiinnitä kattoon kolme sumuvaloa toimitetuilla ruuveilla yksi valoa kohti 64 Poista taka akselin suojukset 65 Työnnä taka akseli ajoneuvon takaosaan kuten kuvassa 66 Sijoita vetopyörä toisen leveämmän pyörän sisään 67 Työnnä p...

Page 34: ...tt på en riktig måte Symbolet med en utkrysset søppelkasse angir at produktet må sendes til spesialinnsamling AVSETTING AV BATTERIET Vær med å ta bevare miljøet Det brukte batteriet må ikke kastes sammen med vanlig husholdningsavfall Dere kan ta dtm med til en oppsamlingsstasjon for brukte batterier eller avsettingssted for spesialavfall Skaff informasjon hos kommunen eller avfallsselskapet ADVARS...

Page 35: ... helt inn som vist på figuren 14 Fest bagasjerommet ved å skru til de tre medfølgende skruene Vær oppmerksom på at den midterste skruen må skrus til som vist på neste figur 15 Trykk inn tappen som hjelp til å sette passasjehullene i samsvar med skruen 16 Fullfør festet av bagasjerommet ved å skru de to skruene til inne i førerhuset 17 Sett inn de to beskyttende grillene på siden som vist på figure...

Page 36: ...ed produktet 70 Fjern beskyttelsene fra framakselen 71 Sett en spennskive inn på aksen 72 Sett ett av de to gjenværende hjulene smalere enn bakhjulene på akselen 73 Sett en spennskive inn på aksen 74 Fest hjulet ved å skru til en av de medfølgende mutrene med nøkkelen du finner i pakken Gjenta monteringsoperasjonene for forhjulet på den andre siden 75 Trykk de fire hjulkapslene på plass på hjulene...

Page 37: ...dda era ögon och undvik direkt kontakt med elektrolyten skydda era händer Lägg batteriet i en plastpåse och följ instruktioner för bortskaffande av batterier OM HUDEN ELLER ÖGONEN SKULLE KOMMA I KONTAKT MED ELEKTROLYTEN Skölj den utsatta kroppsdelen i rikligt med rinnande vatten Rådfråga omedelbart läkare OM ELEKTROLYTEN SVÄLJS Skölj munnen och spotta Rådfråga omedelbart läkare VARNINGAR BATTERI K...

Page 38: ...plattan igen 7 Lyft de båda stötdämparna 1 För in dem i hålen i karossen 2 8 Fäst stötdämparna till karossen med de två stiften ett per del Observera att det i förpackningen finns två reservstift 9 För in avgasröret så som visas på bilden 10 Fäst avgasröret med den medföljande skruven 11 Placera boxen 12 För in de två kilarna i karossen två per del från boxens främre del 13 För in de två järnslang...

Page 39: ... Km s hız Peg Perego istediği zaman bu yayında tanıtılmış modellere teknik veya şirket içi sebeplerden dolayı değişiklik yapma hakkını saklı tutar PEG PEREGO bu ürünü tercih ettiğiniz için size teşekkür ediyor 50 yılı aşkın bir süredir PEG PEREGO çocukları gezmeye götürüyor doğar doğmaz o meşhur bebek arabaları ve pusetleri ile daha sonra ise pedallı veya bataryalı eşsiz oyuncak arabaları ile Peg ...

Page 40: ...imlerini geçiriniz 19 Gövdenin yan kısımlarını şekilde gösterilen iki noktadan bastırarak takılmalarını sağlayınız 20 Arka kafes A gövdeyi takma yeri B demir boruyu geçirme yeri C egzoz borusunu geçirme yeri D gövdeye sabitleme dilleri 21 Arka kafesi A B C harfleriyle işaretli noktaları birleştirmek suretiyle yerleştiriniz 22 Sabitleme dillerinin D takılmasını kolaylaştırmak için arka kafesin üst ...

Page 41: ...uracaktır 85 Pedalın üzerine ikinci hız bloğu yerleştirilmiştir Araç ambalajından çıkartıldığında ikinci hız bloğu şekil A daki gibi LOW konumlandırılmıştır ve aracın düşük hızda seyretmesini sağlar İkinci hız bloğu şekil B deki gibi konumlandırıldığında HIGH araç daha yüksek hızda seyreder 86 İkinci hız bloğunu B HIGH konumuna getirmek için ikinci hız bloğunun sabitleme vidalarını sökünüz ve yuka...

Page 42: ...ала как и настоящие автомобили на ровном грунте и с одним лишь ребенком на борту два колеса могут крутиться с разной скоростью с возможным их проскальзыванием или замедлением РАЗВЛЕЧЕНИЕ БЕЗ ПЕРЕРЫВОВ держите запасной комплект заряженных батарей готовым к применению ИГРУШКА НЕ РАБОТАЕТ Проверьте не отсоединились ли кабели под пластиной акселератора Проверьте исправность кнопки акселератора и при н...

Page 43: ...имание на направленность деталей В С для этого смотрите их нижнюю конечную часть 55 Соедините детали A D E задней части крыши так как показано на рисунке затягивая крепежные винты в нижних отверстиях Обратите внимание на направленность деталей D E для этого смотрите их нижнюю конечную часть 56 Установите с нажимом крышу на игрушку 57 Установите хомуты на детали D и E крыши Обратите внимание на нап...

Page 44: ...iy joms re rjak jia jai rj key sqevo lemo meq jai pir mey Sa paidi pq pei p msa ma uoqo m papo sria jas sg di qjeia sgy vq rgy sot ov lasoy sam so vgla keisotqce pqor nse ma lgm b fotm sa paidi v qia p dia kka l qg sot r las y soty qo va kka pq clasa joms rsa l qg pot jimo msai Lgm bq vese pos sa enaqs lasa sot ov lasoy pxy jimgs qey lom dey pk jsqa jkp Joms rso vgla lgm vqgrilopoie se bemf mey kk...

Page 45: ...oi ap sgm PEG PEREGO RTMSGQGRG JAI UQOMSIDA SOT OVGLASOR Cia sgm aru keia sot paidio pqim ma emeqcopoi rese so vgla diab rse jai ajokoth rse pqorejsij siy aj kothey odgc ey L hese rso paidi ray sg rxrs vq rg sot ov lasoy cia l a aruak jai diarjedarsij od cgrg Pqim ma nejim rese bebaixhe se si g diadqol e mai eke heqg ap amhq poty pq clasa Ma odgce se le sa v qia rso sil mi bok m jai ma bk pese p m...

Page 46: ...da sgy h jgy sxm lpasaqi m Pqorov ma namabid mese p msa sg b da 80 Sopohes rse sgm jeqa a jai so q dio rsgm dqa sot salpk 81 Keisotqc ey sot q dio A r mderg cia so jack sgy rtrjet y amapaqacxc y MP3 PQOROVG Rtmd rse sg rtrjet amapaqacxc y MP3 dem paq vesai rso q dio sot atsojim sot vqgrilopoi msay ma jak dio le l joy OVI am seqo ap 150cm B epikoc ay qadiouxmij m rsahl m C jotlpi on off D ktvm a q ...

Page 47: ... w k R H g j y g T K r G H g s V U m H g e h k m l q f h l h l q p t d H g a G A W O L H g f z m s l p g g u V f m f h g s V f h g s V U m H r G U k l h K r G H g s V U m H g e h k m l q f h l h l q p t d H g a G B H G I H H g s V u m j s V H g u V f m f h g s V U m H U g n 6 8 g q f r G H g s V U m H g e h k m U k H g q v B H G I H H g s V u m t l s l h V j e f J r G H g s V U m H g e h k m r L f...

Page 48: ...d G H P t Œ l K K K g g u g j K s V U h J l O j g m l v î l h k m H k B r h î f h z h H s j l j h c l s j l V H P j f l l U m f h V h J l a P k m h M g b s j O H L H g u V f m B j u l G j l K U L h f b J l w g m j P J a V P m H s V H c j l K U l G V H s V H c r L f j y V I U k H g g L j K H g f h V m l e f j m t d H g h H g V f h z d t Œ J H g u V f m r V j h H a P K H g f h V h J î ƒ H H s j l V ...

Page 49: ...O V N r h f g m g b a j u h G f h g Œ V F l K H g u V f m F H s j O H L H g u V f m l K r ˆ f G G H P t Œ t d P h g m U L î V H h q l K t z m H g u V f h J H g l M f l h k K H g j h J H V f m E E A R t Œ g b j P h H V f d u ƒ H H g l k j µ U k H k j h x U l V I H B t j V H q d r l h l m l w k m j f u h g g j h J E E A R g ƒ g B F H g j O g W l k i l v H g Œ l h l m H g l k m f G F K O q v g u l g ...

Page 50: ......

Page 51: ......
Page 52: ...mero verde solo da telefono fisso PEG PEREGO U S A Inc 3625 INDEPENDENCE Dr FORT WAYNE IN 46808 phone 260 4828191 fax 260 4842940 call us toll free 1 800 728 2108 llame USA gratis 1 800 225 1558 llame Mexico gratis 1 800 710 1369 PEG PEREGO CANADA Inc 585 GRANITE COURT PICKERING ONT CANADA L1W3K1 phone 905 8393371 fax 905 8399542 call us toll free 1 800 661 5050 cod IGOD0513 ...

Reviews: