background image

For the safety of the child, before starting up the
vehicle read and carefully follow the following
instructions.
• Teach the child how to use the vehicle properly for

safe and enjoyable driving.

• The toy must be used with caution, as it requires

substantial dexterity in order to avoid falls or
collisions which could cause injuries to the user or
third parties.

• Before starting, check that there are no people or

objects obstructing the vehicle’s path.

• Drive with hands on the handlebars/steering wheel

and always watch the road ahead.

• Brake in good time to avoid collisions.

ATTENTION! 

The item is equipped with a brake

system which needs to be appropriately illustrated to
the child by an adult.

2nd GEAR (if present)

Initially, use in 1st gear is recommended. Before
enabling 2nd gear, check that the child has learned to
use the handlebars/steering wheel, 1st gear and the
brake correctly, and has become familiar with the
vehicle.

WARNING!

• Check that all the wheel fixing studs/nuts are

fastened properly.

• If the vehicle is overloaded, as can happen on soft

sand, mud, or very uneven ground, the overload
switch will immediately disconnect the power. The
power supply will be restored after a few seconds.

UNINTERRUPTED FUN: Keep a spare set of charged
batteries ready for use.

THE VEHICLE DOES NOT WORK?

• Check that there are no disconnected cables under

the accelerator plate.

• Check the operation of the accelerator button and

replace it if necessary.

• Check that the battery is connected to the

electrical system.

THE VEHICLE LACKS POWER?
• Charge the batteries. If after charging the problem

persists, have the battery and charger checked by
an assistance centre.

PROBLEMS?

RULES FOR SAFE DRIVING

ASSEMBLY INSTRUCTIONS

WARNING

ASSEMBLY MUST ONLY BE CARRIED OUT BY
ADULTS. TAKE  CARE WHEN  REMOVING THE
VEHICLE FROM ITS PACKAGING. ALL THE SCREWS
AND SMALL PARTS ARE CONTAINED IN A BAG
INSIDE THE PACKAGING. THE BATTERY MAY
ALREADY BE FITTED INSIDE THE ITEM.
Do not use the toy if you find it damaged after
opening the packaging. Contact the shop where you
bought it or the customer support centre.
Take care in the presence of children while assembling
the toy, given the risks caused by small parts (ingestion
hazard) and the plastic bags that contain them
(choking hazard).
To assemble the toy, you will need a flat-head
screwdriver, a Phillips screwdriver, a hammer, and a pair
of pliers.

ASSEMBLY

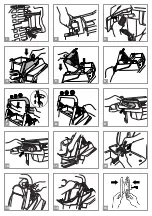
 1 • Remove the chassis from the packaging and

position it on its side. Snap fit the teeth of the 2
supports onto the chassis.

 2 • Position the chassis horizontally and screw up the

4 internal screws while holding the 2 supports in
position.

 3 • Push the 2 rear cylindrical shock absorbers into

the slots, ensuring that the sides are correct (right
and left are indicated on the back of the items).

 4 • Press the side panel into the 2 slots on the

chassis, paying attention to the lights system cable.
Insert the other side panel on the opposite side.

 5 • Insert the lights system cable into the roll bar

support. Position the roll bar support by engaging
the rear part first and then the front part. Do the
same with the other support.

 6 • Fix on the supports with the screws provided.
 7 • Connect the 2 roll bar light cables and insert the

roll bar into the vertical supports.

 8 • Fix the roll bar using pressure to engage the 2

self-threading screws, one on each side.

 9 • Apply the stickers in the 2 rear light seats.

10 • Push the rear lights into the respective seats.
11 • Position the seat as required (the seat can be

fitted in 2 positions) and fix it with the 2 screws
provided. Fit the other seat in the same way.

12 • Insert the 2 seatbelt buckles into the respective

central slots between the seats, as shown in the
figure.

13 • Fit the 2 ring clamps on the roll bar, one on each

side, opening them to position them correctly.

14 • Fix the 2 belts to the respective ring clamps with

the screws provided.

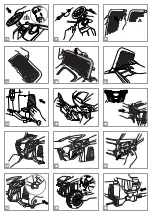
15 • Join the two sections of the steering wheel.
16 • Remove the plastic protection from the steering

column. Connect the steering wheel cable to the
dashboard cable. WARNING: place the cables in
their housing taking care they don't get crushed.
Fit the steering wheel on the steering column,
lining up the respective holes.

17 • On one side insert the screw and on one other

the nut, and fix the steering wheel as shown in the
figure.

18 • Install the two parts of the windshield as shown.

Picture A shows the grille fitted correctly

19 • Secure the grille with the three screws.
20 • Place the windshield on the hood hooking the

three central tabs.

21 • Fit the windscreen of the vehicle with screws.
22 • Snap fit the 2 remaining front shock absorbers,

ensuring that the sides are correct (right and left
are indicated on the back of the items).

23 • Connect the front lights as shown in the figure.
24 • Fit the front cover engaging it to the chassis at the

6 points highlighted in detail A.

25 • Screw on the cover with the 2 screws provided.
26 • Apply the silvered stickers in the 2 front light

seats.

27 • Push the front lights into the respective seats.
28 • Remove the protective caps from the steering

levers. On one side, slide on one of the large
washers provided.

29 • Fit one of the two front wheels (the narrower

ones) on this same side. Keep the wheel trim on
the outside (check that it is fitted onto the wheel
and attach it to its pin if necessary). Next, insert a
small washer and then the nut. Tighten the nut to
secure the wheel. Use the same procedure to fit
the other front wheel.

30 • Remove the protective caps from the rear axle

and insert the axle into the rear of the vehicle as
shown in the figure.

31 • On one of the rear wheels, on the opposite side

to the rim, push on a driver. Now slide the wheel
onto the axle, and keep it in position while fitting
the other rear wheel in the same way.

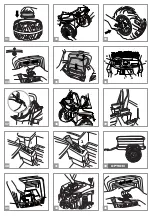
32 • Fit a small washer and nut on both wheels.

Tighten the nuts using the spanner provided on
one side and a pair of pliers on the other.

33 • Snap fit the 4 wheel hubcaps.
34 • Open the battery compartment by rotating the

red catch to the lock open position. Connect the
electrical system plug with the battery plug.

35 • Close the battery compartment by inserting the

cover at the front below the cover plate.
Complete the operation by inserting the red
catch and rotating it 180º using a coin. The vehicle
is now ready for use.

FEATURES AND INSTRUCTIONS FOR

USE

36 • A - passenger handrail

B - horn activating button
C - low battery indicator
• blinking LED: 20% battery level
• steady LED: 10% battery level
D - radio FM, MP3 input, USB port, MICRO SD
slot
E - START button
F - electric accelerator and brake pedal. Lift the
foot from the pedal to engage the brake
automatically.
WARNING: lights and sounds deactivate after 3
minutes if the vehicle remains inactive. Press
START or the accelerator to reactivate them.

37 • To release the seat belt: 1 pull towards the centre

while pushing the button; 2 disengage.

38 • Rear DRINKS HOLDER. There is a double drinks

holder in the rear box.

39 • ADJUSTABLE SEATS. The seats can be adjusted in

2 positions as the child grows, as shown in the
figure.

40 • GEAR LEVER: when supplied the vehicle speed is

limited to first gear (1 - see figure). It also has a
reverse (R), and a second gear (2) recommended
only for expert drivers. To enable the second gear,
unscrew the red stop on the gear lever.

41 • Rotate the stop 90°, as shown in the figure, and fix

in position with the screw. Now by pulling back
the gear lever the vehicle can run in second gear.

42 • ACCESSORY: trailer to attach to the vehicle (sold

separately).

REPLACING THE BATTERY

PLEASE NOTE: THE PICTURES OF THE BATTERIES
ARE FOR ILLUSTRATIVE PURPOSES ONLY. YOUR
BATTERY MAY BE DIFFERENT FROM THE MODEL
SHOWN. THIS DOES NOT AFFECT THE
REPLACEMENT AND CHARGING PROCEDURES
DESCRIBED.
43 • Use a coin to open the battery compartment.

Disconnect the battery from the system. Remove
the 2 screws from the battery holder in the
compartment.

44 • Replace the flat battery. Put the battery holder

back in place and secure it with the screws.
Connect the two plugs, close the battery
compartment and fasten it shut.

BATTERY CHARGING

WARNING: BATTERY CHARGING AND EVERY
OTHER OPERATION ON THE ELECTRICAL
SYSTEM MUST BE CARRIED OUT BY ADULTS
ONLY.
THE BATTERY CAN ALSO BE CHARGED
WITHOUT REMOVING IT FROM THE TOY.
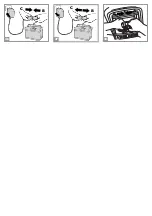
45 • Disconnect plug A of the electrical system from

plug B of the battery by pressing laterally.

46 • Connect the battery charger to a domestic power

outlet according to the instructions included with
the charger. Connect plug B with plug C of the
battery charger.

47 • When charging is complete, disconnect the

battery charger from the power outlet and then
disconnect plug C from plug B.

48 • Fully insert plug B into plug A, until it snaps into

position. At the end of charging operations always
remember to insert and fix the battery holder.
Close the battery compartment and secure it
with the catch.

• Do not disassemble or try to repair the vehicle on

your own. Contact an authorised Peg Perego
customer support centre.

• The toy should not be left anywhere with a

temperature below 0°C. If it were to be used
without being warmed up to a temperature above
0°C, irreversible damage could be caused to the
motors and batteries.

• Check the condition of the vehicle regularly, paying

particular attention to the electrical system, the
plug connections, the terminal protectors and the
battery charger. If defects are identified, the
electrical vehicle and the battery charger must not
be used.

• Always disconnect the battery charger from the

toy before carrying out cleaning, maintenance, or
any type of intervention.

• For repairs use only original PEG PEREGO spare

parts.

• PEG PEREGO do not accept any responsibility for

cases of tampering with the electrical system.

• Do not leave the batteries or the vehicle close to

sources of heat like radiators, fireplaces, etc.

• Protect the vehicle from water, rain, snow, etc.

Using the vehicle on sand or mud may damage the
buttons, motors and gears.

• Lubricate moving parts like bearings, steering, etc.

periodically with light oil.

• The vehicle surfaces can be cleaned with a damp

cloth and, if necessary, with non-abrasive domestic
cleaning products.

• Cleaning must only be carried out by adults.
• Never dismantle the vehicle mechanisms or

motors, unless authorized by PEG PEREGO.

MAINTENANCE AND VEHICLE

CARE

PEG PEREGO offers an after-sales assistance
service, directly or through a network of
authorized assistance centres, for any repairs or
replacements and the sale of original spare parts.

To contact a service center, visit our website:

http://www.pegperego.com

The item’s serial number must always be quoted.
See the page on spare parts to find out how to
identify the serial number.

CUSTOMER SERVICE

Summary of Contents for IGOD0554

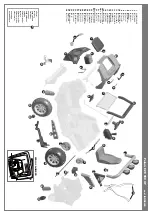
Page 1: ...N ET ENTRETIEN EN FR DE ES PT TR RU EL GEBRAUCH UND WARTUNG BRUGSANVISNING KÄYTTÖOHJE BRUKSANVISNING DA FI NO SV BRUKSANVISNING EMPLEO Y MANUTENCION USO E MANUTENÇÃO KULLANIM VE BAKIM ЭКСПЛУАТАЦИЯ И УХОД MSGQG G SL UPORABA IN VZDRŽEVANJE H B s j O H L H g w h k m AR NL GEBRUIK EN ONDERHOUD FI002101G223 ...

Page 2: ...1 2 3 4 5 6 7 8 9 10 11 12 13 14 15 ...

Page 3: ...A A 16 17 18 19 20 21 22 26 27 28 29 30 23 24 25 ...

Page 4: ...B C D E A F OPTION 32 33 34 35 36 37 38 39 40 41 42 43 44 45 31 A B 2 R 1 ...

Page 5: ...C 46 47 B C B A B 48 ...

Page 6: ...310 4 SAGI9309N 5 IAKB0039 6 SOPF0201L89 7 SPST8211N 8 SPST8995J 9 SPST8933JN 10 SAGI3977JKN 11 SPST9460GR 12 SPMV9458GR 13 SAGI3786NGR 14 ASGI0235N 15 SPRP9304GP 16 SAGI9822GRN 17 ASGI0209GRN 18 SPST8920RF 19 SPST9353N 20 dx SPST9317JDGR 20 sx SPST9317JSGR 21 SAGI9955XJ 22 SPST9457R 23 dx SPST9318DLL 23 sx SPST9318SLL 24 SOTF0292L89 25 SOFF0300C30 26 SPST9312R9 27 SPST9320N 28 SARP9306NR9 29 SPST...

Page 7: ...olo UE Questo prodotto costituisce alla fine della sua vita un rifiuto classificato RAEE e pertanto non deve essere smaltito come rifiuto urbano bensì deve essere soggetto a raccolta differenziata Consegnare il rifiuto nelle apposite preposte isole ecologiche La presenza di sostanze pericolose contenute nelle componenti elettriche di questo prodotto costituiscono fonte di potenziale pericolo per l...

Page 8: ...nessuna responsabilità in caso di manomissione dell impianto elettrico Non lasciare le batterie o il veicolo vicino a fonti di calore come caloriferi caminetti etc Proteggere il veicolo da acqua pioggia neve etc usarlo su sabbia o fango potrebbe causare danni a pulsanti motori e riduttori MANUTENZIONE E CURA VEICOLO Lubrificare periodicamente con olio leggero parti semovibili come cuscinetti sterz...

Page 9: ...a piccola e il dado Assicurare la ruota stringendo il dado Agire nello stesso modo per montare la restante ruota anteriore 30 Togliere i tappi di protezione dall assale posteriore e infilarlo nel retro del veicolo come mostrato in figura 31 Su una delle ruote posteriori nel lato opposto al coprimozzo montare a pressione il driver Procedere infilando questa ruota sull assale mantenendolo in posizio...

Page 10: ...ry into contact with clothes as it could damage them Only use batteries or accumulators of the recommended kind IF THERE IS A BATTERY LEAK Protect your eyes Avoid direct contact with the electrolyte Protect your hands Put the battery in a plastic bag and follow the instructions for battery disposal IF SKIN OR EYES COME INTO CONTACT WITH THE ELECTROLYTE Thoroughly rinse the area concerned with runn...

Page 11: ... the outside check that it is fitted onto the wheel and attach it to its pin if necessary Next insert a small washer and then the nut Tighten the nut to secure the wheel Use the same procedure to fit the other front wheel 30 Remove the protective caps from the rear axle and insert the axle into the rear of the vehicle as shown in the figure 31 On one of the rear wheels on the opposite side to the ...

Page 12: ... qu à l éventuel chargement Peg Perego se réserve le droit d apporter à tout moment des modifications aux modèles et aux données figurant dans ce livret pour des raisons de caractère technique ou de management PEG PEREGO vous remercie d avoir choisi ce produit Depuis plus de 70 ans PEG PEREGO accompagne les promenades des enfants Dès leur naissance avec les landaus puis avec les poussettes et plus...

Page 13: ...tenter de réparer le véhicule de votre propre initiative Contactez un centre d assistance agréé Peg Perego Il est déconseillé de laisser le jouet dans des lieux où la température est inférieure à 0 C S il est utilisé alors que sa température ne dépasse pas 0 C les moteurs et les batteries pourraient subir des dommages irréversibles Contrôler régulièrement l état du véhicule en particulier le circu...

Page 14: ...rations terminées toujours repositionner et fixer la barrette de fermeture de la batterie Refermer le compartiment batterie en le bloquant avec le crochet INSTRUCTIONS POUR LE MONTAGE ATTENTION LE MONTAGE DOIT ETRE EFFECTUE UNIQUEMENT PAR UN ADULTE DEBALLEZ LE VEHICULE AVEC PRECAUTION TOUTES LES VIS ET LES PETITES PIECES SONT DANS UN SACHET DANS L EMBALLAGE IL SE POURRAIT QUE LA BATTERIE SOIT DEJA...

Page 15: ...echargeables Risque d explosion 3 L appareil doit uniquement être utilisé par des adultes Ce n est pas un jouet Il n est pas prévu pour des personnes infirmes à moins qu elles ne soient supervisées par une personne responsable pour s assurer de l utilisation correcte 4 Ne pas utiliser enveloppé ou bien si le câble ou le connecteur sont abîmés 5 Lors de la charge s assurer qu il y a une bonne venti...

Page 16: ...n Richtlinien der Straßenverkehrsordnung überein und dürfen demnach nicht auf öffentlichen Straßen benutzt werden ACHTUNG Dieses Spielzeug ist aufgrund seiner Höchstgeschwindigkeit nicht für Kinder unter 3 Jahren geeignet ACHTUNG Nicht für Kinder unter 3 Jahren geeignet Kleinteile können verschluckt oder eingeatmet werden und so zu Erstickung führen ACHTUNG Dieses Spielzeug NIEMALS auf öffentliche...

Page 17: ...rischen Anlage vom Stecker B der Batterie durch seitliches Drücken lösen 46 Den Stecker des Batterieaufladegerätes an eine normale Steckdose anschließen Dabei den Anweisungen folgen Den Stecker B mit dem Stecker C des Batterieaufladegerätes verbinden 47 Nach dem Aufladen das Aufladegerät aus der Steckdose ziehen Anschließend den Stecker C vom Stecker B lösen 48 Den Stecker B in den Stecker A bis z...

Page 18: ...mweltschädlich gelten Nach Ablauf der Lebensdauer dieser Elemente oder des ganzen Produktes muss die Entsorgung gemäß den jeweiligen national gültigenVorschriften des Landes erfolgen in dem das Produkt verwendet wird 12 Vergewissern Sie sich vor dem Einsatz des Batterieladegeräts dass es mit dem für das jeweilige Land in dem Sie es zu verwenden beabsichtigen passenden Netzstecker ausgestattet ist ...

Page 19: ...atería contiene electrolitos de base ácida Evitar el contacto directo entre los terminales de la batería y golpes fuertes riesgo de explosión o incendio La batería produce gas cuando se está cargando Recargarla en un lugar bien ventilado lejos de fuentes de calor y materiales inflamables La batería agotada debe sacarse del vehículo No colocar la batería sobre prendas pues se podrían dañar Utilizar...

Page 20: ...ATERÍA TAMBIÉN SE PUEDE CARGAR SIN QUITARLA DEL JUGUETE SÓLO PARA EL BRASIL Tensión del cargador 127V 60 Hz Observación no utilizar el cargador de la batería con una tensión de 220V 45 Desconectar la clavija A del sistema eléctrico de la clavija B de la batería presionando en el lateral 46 Insertar la clavija del cargador de batería en una toma de corriente doméstica siguiendo las instrucciones ad...

Page 21: ...as ou outros objetos perto das peças em movimento Não molhe jamais os componentes do veículo como motores instalações botões etc Não use gasolina ou outras substâncias inflamáveis perto do veículo O veículo deve ser usado absolutamente por uma única criança já que não se enquadra na categoria de veículos com dois lugares DIRETRIZ RAEE somente UE Este produto constitui ao fim de sua vida útil como ...

Page 22: ...os use somente peças sobressalentes originais PEG PEREGO PEG PEREGO não assume qualquer responsabilidade em caso de adulteração do sistema elétrico Não deixe as baterias ou o veículo perto de fontes de calor como aquecedores lareiras etc Proteja o veículo da agua chuva neve etc usá la sobre a areia ou lama pode ocasionar danos nos botões motores e redutores Lubrifique regularmente com óleo leve pa...

Page 23: ... com o centro de assistência ao cliente para verificar a funcionalidade da bateria e do carregador D Quando a carga estiver completa e o LED aceso desligue primeiro o carregador de bateria da ficha e só depois desligue a bateria depois ligue a bateria ao sistema elétrico do brinquedo agora está pronto para ser utilizado O carregador de bate rias é munido de um dispositivo de segurança que no caso ...

Page 24: ...h ali podjetniških razlogov v kateremkoli trenutku SLOVENŠČINA POMEMBNE INFORMACIJE Izdelek z oznako ES načrtovan in homologiran glede na ustrezne direktive evropske skupnosti namenjen za tržišča v državah ki spoštujejo te predpise NAZIV IZDELKA Polaris RZR 900 XP IDENTIFIKACIJSKA KODA IZDELKA IGOD0554 ZAKONSKA PODLAGA izvor Directive on the safety of toys 2009 48 EC Standard EN 71 1 2 3 Standard ...

Page 25: ...nato priklopite spredaj Enak postopek ponovite za drugi nosilec 6 Oba nosilca privijte s priloženimi vijaki 7 Povežite 2 žici napeljave za luči varnostnega loka in vstavite prečni tram v vertikalne nosilce 8 Nadaljujte tako da varnostni lok močno privijete z 2 samoreznima vijakoma po enim na vsaki strani 9 V 2 ležišči zadnjih žarometov nalepite nalepke 10 V ustrezni odprtini s pritiskom vstavite z...

Page 26: ... ali priključek poškodovani 5 Med polnjenjem pazite da je prostor okoli akumulatorja dobro prezračen 6 Pri izklopu naprave iz električnega omrežja nikoli ne vlecite za kabel 7 Ne vlecite vozila na kolesih za kabel polnilca akumulatorjev 8 Ne pokrivajte kabla da se ne bi pregrel in ne polagajte ga na vroče površine 9 Pri navijanju izhodnega kabla bodite previdni da ga ne poškodujete 10 Če je polnil...

Page 27: ... direkte sammenkobling af batteriets terminalpunkter og undgå at det udsættes for hårde stød Der er fare for eksplosion og eller brand Batterier danner gas under opladningen Oplad batteriet på et godt ventileret sted og langt væk fra varmekilder og brændbare stoffer Når batteriet er opbrugt skal det fjernes fra køretøjet Det frarådes at holde batteriet op mod tøj der kunne opstå skader Benyt kun d...

Page 28: ...stykker fastholdes på deres plads 3 Indsæt de to bagerste cylinderformede støddæmpere ved at presse dem ind i sprækkerne Vær opmærksom på at der er forskel på højre og venstre Står skrevet bag på dem 4 Sæt det lille sidepanel i de 2 sprækker på stellet ved at trykke og vær samtidigt opmærksom på lysanlæggets ledninger Fortsæt ved at isætte det resterende lille sidepanel på modsatte side 5 Indsæt l...

Page 29: ...enarkoja aineita Ajoneuvoa saa käyttää vain yksi lapsi kerrallaan ellei ajoneuvo kuulu kaksipaikkaisten ajoneuvojen luokkaan SÄHKÖ JA ELEKTRONIIKKALALAITEROMUDIREKTIIVI WEEE vain EU Kun tuotteen käyttöikä on päättynyt se luokitellaan WEEE jätteeksi eikä sitä siis saa hävittää kotitalousjätteen tavoin vaan se on toimitettava erilliskeräykseen Toimita jäte asianmukaiseen keräykseen Tuotteen elektron...

Page 30: ...gperego com Asioimista varten on tunnettava tuotteen sarjanumero Sarjanumero löytyy varaosia koskevalta sivulta HUOLTO Aikuisen tulee ladata akku tai valvoa sen lataamista Älä anna lasten leikkiä akulla AKUN LATAAMINEN Ei sovellu alle 12 kuukauden ikäisten lasten käyttöön toiminnallisten ominaisuuksien vuoksi Lataa akku aina ajoissa heti kun ajoneuvon nopeus alkaa hidastua Näin vältät sen vahingoi...

Page 31: ...ki pystysuoraan tukeen 8 Ruuvaa turvakaari tukevasti kiinni 2 itsekierteittävällä ruuvilla yksi kullekin puolelle 9 Kiinnitä 2 tarraa takavalojen kohdille 10 Kiinnitä takavalot painamalla niille tarkoitettuihin syvennyksiin 11 Sijoita istuin haluttuun asentoon istuimella on 2 eri asentoa ja kiinnitä se 2 toimitetulla ruuvilla Sijoita sitten toinenkin istuin paikalleen ja kiinnitä se 12 Sijoita tur...

Page 32: ...frakoplet fra det elektriske anlegget Gjenta oppladingen minst hver 3 måned Batteriet må ikke lades opp når det står opp ned Ikke glem av batteriet mens de lades opp Kontroller med jevne mellomrom Bruk kun batteriladere som følger med produktet og PEG PEREGO originalbatterier Batteriet er forseglet og trenger ikke vedlikehold Ikke dra i ledningen for å trekke batteriladeren ut av stikkontakten Ikk...

Page 33: ...jon Navn Adresse Postnr sted Kontaktperson Tlf nr Opplysninger om kjøretøyet Produksjonskode strekkodenr Produksjonsdato Kontrollnr Controllo Kjøpsdato Reklamasjonens art Med vennlig hilsen Peg Pérego S p A Maki A S REKLAMASJONSRETT PEG PEREGO tilbyr en kundeservicetjeneste etter kjøp enten direkte eller gjennom sitt nettverk av autoriserte serviceverksteder som kan bistå ved eventuelle reparasjon...

Page 34: ...er 1 förseglat laddningsbart batteri 24V 8Ah med bly 2 drivhjul 2 motorer på 240 W Hastighet i 1 a växeln 4 km h Hastighet i 2 a växeln 8 km h Hastighet vid backväxel 4 km h Överstig ej den högsta tillåtna vikten på 60 kg Denna gräns inkluderar dels passagerare dels eventuell last Peg Perego kan när som helst tillföra ändringar på modeller eller fakta i denna publikation på grund av tekniska eller...

Page 35: ...risk för explosion och eller brand Under laddningen alstrar batteriet gas Ladda batteriet på en välventilerad plats långt ifrån värmekällor och brännbara material Uttjänt batteri ska tas ur fordonet Lägg inte batteriet på kläder eftersom de kan skadas Använd endast rekommenderade batterier eller ackumulatorer VID EN LÄCKA Skydda era ögon och undvik direkt kontakt med elektrolyten skydda era händer...

Page 36: ...na batterirummet Koppla den elektriska anordningens kontakt till batteriets kontakt 35 Stäng batterirummet genom att föra in locket på framsidan under höljet Fullfölj genom att vrida den röda haken 180 med hjälp av ett mynt Fordonet är nu redo att användas FORDONETS EGENSKAPER OCH HUR DET ANVÄNDS 36 A Handtag för passagerare B Knapp för aktivering av tuta C LED lampa för urladdat batteri Blinkande...

Page 37: ...ijd noodzakelijk De kinderen moeten altijd schoenen dragen wanneer ze het voertuig gebruiken Wanneer het voertuig in werking is moet erop gelet worden dat kinderen niet met hun handen voeten of andere lichaamsdelen kleding of andere voorwerpen bij de bewegende delen komen De componenten van het voertuig zoals motoren systemen drukknoppen enz mogen nooit nat worden Er mogen geen benzine of andere o...

Page 38: ...dien aanwezig Geadviseerd wordt om aanvankelijk de 1e versnelling te gebruiken Alvorens naar de 2e versnelling over te schakelen moet worden verzekerd dat het kind goed geleerd heeft hoe het stuur stuurwiel de 1e versnelling en de rem moeten worden gebruikt en voldoende vertrouwd geraakt is met het voertuig LET OP Controleer of alle bevestigingsschroeven moeren van de wielen stevig vastzitten Als ...

Page 39: ...DERING UW ACCU ZOU KUNNEN AFWIJKEN VAN HET AFGEBEELDE MODEL DIT IS NIET VAN INVLOED OP DE GEÏLLUSTREERDE WERKWIJZEN VOOR HET VERVANGEN EN OPLADEN 43 Open de accuruimte met behulp van een muntstuk Koppel de accu af van het systeem Draai de 2 schroeven van de accublokkering in de ruimte los 44 Vervang de lege accu Plaats de accublokkering terug en schroef hem weer vast Verbind de twee stekkers en sl...

Page 40: ...atarya araçtan çıkartılmalıdır Bataryanın giysilerin üstüne konulması tavsiye edilmez zarar görebilirler Sadece önerilen tipte piller ve akümülatörler kullanınız BİR AKINTI VARSA Gözlerinizi koruyun elektrolitle doğrudan temastan kaçının Ellerinizi koruyun Bataryayı bir plastik torbaya koyup batarya imha talimatlarını uygulayın EĞER DERİNİZ VEYA GÖZLERİNİZ ELEKTROLİTLE TEMAS ETTİYSE Bulaşmış bölge...

Page 41: ...ği ürünle birlikte verilen vidalarla sıkıştırın 7 Roll bar aydınlatma sisteminin 2 telini bağlayın ve traversi dikey desteklere geçirin 8 Devrilme çubuğunu her yana bir adet olmak üzere kendinden geçmeli 2 vida ile güçlüce sıkıştırarak devam edin 9 Renkli çıkartmaları arka farların 2 yuvasına yapıştırın 10 Bastırmak suretiyle arka farları ilgili yarıklara takın 11 Koltuğu istenilen konuma koltuk 2...

Page 42: ...nnektör hasar görmüş ise cihazı kullanmayınız 5 Şarj esnasında akü etrafında yeterli hava sirkülasyonu olduğundan emin olunuz 6 Fişi kabloyu çekerek çıkarmayınız 7 Aracı şarj cihazının kablosundan çekerek sürüklemeyiniz 8 Kablo aşırı ısınabileceğinden üzerini örtmeyiniz sıcak yüzeylerin üzerine koymayınız 9 Kablonun zarar görmesini önlemek amacıyla nasıl sarıldığına dikkat ediniz 10 Şarj cihazı za...

Page 43: ...аряжающейся батарее Периодически проверяйте ее Используйте только поставленное в комплекте зарядное устройство и фирменные батареи компании PEG PEREGO Батарея герметичная и необслуживаемая При отключении зарядного устройства от розетки не тяните за электрический шнур Не тяните игрушку за электрический шнур Во избежание перегрева не накрывайте шнур зарядного устройства Не кладите шнур и или батарею...

Page 44: ... такое колесо на ось удерживая в нужном положении Произвести те же действия со вторым задним колесом 32 Установить на обоих колесах соответственно по одной малой шайбе и гайке Затем затянуть гайки с помощью ключа из комплекта с одной стороны приставив плоскогубцы с другой стороны 33 Прижать до щелчка 4 колпака ступиц колес 34 Для открытия отсека аккумулятора повернуть красный фиксатор так чтобы он...

Page 45: ...ться 13 Убедитесь что дети не играют с зарядным устройством ЭТО НЕ ИГРУШКА СИГНАЛЫ СВЕТОДИОДА Батарея Peg Perego НЕ подсоединена НЕМИГАЮЩИЙ СИГНАЛ исправное зарядное устройство подключено к сетевой розетке готово к зарядке Батарея Peg Perego подсоединена НЕМИГАЮЩИЙ СИГНАЛ батарея заряжена МИГАЮЩИЙ СИГНАЛ батарея заряжается ЗАРЯДКА БАТАРЕИ ВНИМАНИЕ Перед использованием игрушки оставьте батарею заря...

Page 46: ...ity of equipment 2014 30 UE Standard EN 55014 1 EN55014 2 Standard EN 55022 Standard EN 61000 Information Directive on WEEE RAEE 2003 108 EC Directive on batteries and accumulator 2008 103 EC Directive on RoHS 2011 65 UE EN 50581 2012 Reg CE n 1907 2006 Reach allegato XVII 51 52 phthalates in toys 8 Peg Perego S p A 8 0 10 03 2020 Peg Perego S p A via A De Gasperi 50 20862 Arcore MB ITALIA 8 5 3 5...

Page 47: ...info peramax gr www peramax gr P 8 E 8 B E PS B R P 8 E R 5 Peg Perego 8 2 E R SEP RS 8 E F R S E E MAIL F 8 E R R 8 S RS S R Q 3 03 5 3 7 0 03 5 0 5 D3 05 3 C D 5 50 3 5 5C 30 3 5 C0 5 7 3 K3 D3C5 5 7 3 3 5 3 03 C5 0 0 5 30 3 0 3 5 3703 0 30 5 5 3 3 C3 0 5 5 0 5 3 03 3 3 03 50 3 50 30 K5 5 R D 1 3 2 2 4 2 3 2 4 2 5 rollbar roll bar 6 7 2 roll bar 8 roll bar 2 9 2 10 11 2 2 12 2 13 2 roll bar 14 2...

Page 48: ...3 C B 48 3 3 6 A 25 2 26 2 27 28 3 29 3 5 30 3 31 driver 32 33 4 34 D 35 180 36 A B C LED LED 20 LED 10 D FM MP3 USB MICRO SD E START F D 50 0 3 D START 37 D 1 2 38 7 3 3n 0 39 K 0Q 5 3 3K0 3 3 2 40 7C 37 3 1 R 2 D 41 D 90 42 3 5 3 7 3 75 03 3 3 0 50 30 6 8 1 PEG PEREGO 2 H 3 8 4 5 6 7 8 9 10 11 12 13 5 50 30 307 0 0 8 B LED Peg Perego 3K5 3 3 3 5 Peg Perego 3K5 3 3 3 5 3 3 50 6 18 A B C 5 LED 1 3...

Page 49: ...l h l K î O h G j e f J r G H g f h V m Y g R O h k m H g f h V m j l K Y g Œ h f ï P h L f P M j e f J j u g l h J H s j O H L a h P K H g f h V m j P ƒ V H J 1 H a P K t Œ f h V h J H g V w h W H g l V M l K f µ f V o g e r e P g e P 2 B s j O L l v f h V h J Y V r h f g m g g a P K O V H B k h V 3 F H s j O H L H g h l K r f G H a O h W H g f h g y K t Œ î K H g h g S g u f m î k i Y V l O w W ...

Page 50: ...y t d j d H g G l v H B k j f h I î g n s g P M H q H x H w G j V F H g g P m H g h k f m H g w y V M H O V N U g n H g h k F H g l Œ h f G 5 O G s g P M H q H x t d U l H g U L q v U l H g U L l K O b G î O h g i B t d H g x H g O g d j u a Œ i B P Œ h l K H g m H l h l m H t u G k S H g a d x l v H g U h l m H O V N 6 e f J g j h H g U h l j K f h g l s h l V H g g g f m H g l V t Œ m 7 w G s g ...

Page 51: ...L H g u h F H g j d j u l G f h g H s h J H g f h V m H j a T H g l l U m H g h l g m g g l k j h J H g l k j h J H g M H g l u g l h J H O V N g u h g L O G E R E P G E P l K O b G l r u k h H g j V k d m o c o g e r e p g e p w w w f œ f V a V m l s h l m A p S o g e r e P g e P d a V m g h k h L î H V M M l u j l l K j T î h g h A ƒ L L l r S a i l a t I V U T t O E h g b z P m H 1 0 0 9 O S I ...

Page 52: ...me USA gratis 1 800 225 1558 PEG PEREGO CANADA Inc 585 GRANITE COURT PICKERING ONT CANADA L1W3K1 phone 905 8393371 fax 905 8399542 call us toll free 1 800 661 5050 www pegperego com Tutti i diritti di proprietà intellettuale relativi ai contenuti di questo manuale d istruzione appartengono a PEG PEREGO S p A e sono tutelati dalle leggi vigenti All of the intellectual property rights for the conten...

Reviews: