background image

DON'T STOP THE FUN: Purchase a spare battery to have a freshly charged back-up available or purchase a Quick
Charge recharger to recharge your battery in 2 hours.

For your child’s safety: please read and follow all instructions below before operating.

HIGH SPEED

Initially we suggest using only the LOW speed setting and the reverse gear. Before moving into HIGH speed setting be
sure that the child has become familiar with operating the vehicle. 
• LOW SPEED setting (beginner drivers): 

 With both hands on the steering wheel, press down on the accelerator pedal; the vehicle goes forward at 

2

1/2

mph.

• HIGH SPEED setting (experienced drivers): 

With both hands on the steering wheel, press down on the accelerator pedal; the vehicle goes forward at 

5 mph.

• REVERSE: 

Place the left hand on the steering wheel. With the right hand holding the gearshift in reverse, press down on the
accelerator pedal; the vehicle reverses at 

2

1/2

mph. (Reverse is spring-loaded for safety).

• BRAKE: The electric braking system stops the vehicle automatically when your child lifts his foot off the pedal. 

ATTENTION!

• Check that all studs/nuts of the wheels are secure.
• When operating in overload conditions, such as soft deep sand, mud or rough uneven terrain, the overload circuit

breaker will automatically disconnect the power, and you will hear an INTERMITTENT BEEP for 30 sec. at the end of
which the toy will resume the power delivery and the vehicle will be operational again.

• If the circuit breaker opens, the toy becomes free-wheeling. You must remove foot from gas pedal to apply the breaks.

Teach your child the proper use of this vehicle for a safe and fun play time.
• Before starting be sure that the way is free from people and objects.
• Drive with both hands on the steering wheel and keep your eyes on the road at all times.
• Stop in time to avoid accidents and immediately release pedal when stuck.
•Use the 2nd speed only after your child has the maturity and the reflexes to operate the vehicle safely.

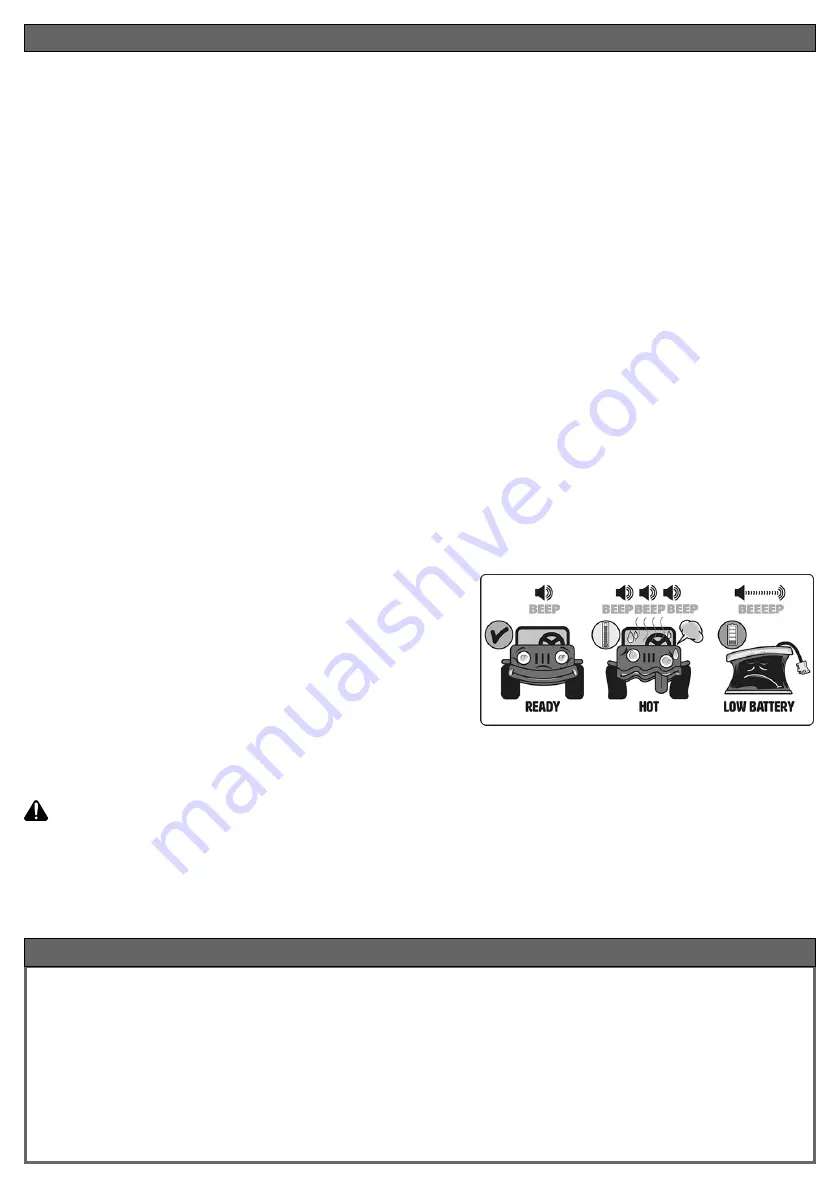
MEANING of BEEPING SOUNDS

• ONE SINGLE BEEP means that the toy is ready to operate
• CONTINUOUS BEEP for 6 sec. Means that the battery is fully

 discharged and the toy cannot operate anymore, recharge
 the battery or change it with a charged one.

• INTERMITTENT BEEP for 30 sec. means the motors are hot.

 The toy will be stopped for at least 30 sec. until the motors cool 
 down.

• Overheat condition can be reached playing longer on some

 of these condition:
 1 - Too much weight transported
 2 - Too steep of incline to climb
 3 - Too high grass driving into
 4 - Too soft terrain (mud or sand)
 5 - Irregular surface to drive on like rough uneven terrain, stones, roots
 6 - Some combination of these

CAUTION:

In low speed, the vehicle has a differential effect like real cars; on smooth terrain and with
one child, the two wheels may turn at different speeds, resulting in possible
sliding/deceleration.

If the vehicle is overloaded, as can happen on soft sand, mud, or very uneven ground, the
overload switch will immediately disconnect the power and an intermittent beep will be
heard. The power supply will be restored after a few seconds.

RULES FOR SAFE DRIVING

This product meets and/or exceeds all ASTM (American Society for Testing and Materials) TOY SAFETY
STANDARDS, including F 963, Consumer Toy Safety Specification.
This vehicle is not intended for use on streets, around traffic or parked cars.

MAINTENANCE AND CARE

• Do not try to repair the vehicle by yourself.
• Regularly check the conditions of the vehicle, particularly the electrical system, the plug connections, the

covering caps and the charger. In case of fault, do not try to use the vehicle and the charger. For repair use only
original PEG PEREGO’s spare parts.

• PEG PEREGO assumes no liability if the electrical system is tampered with.

VEHICLE MAINTENANCE AND SAFETY

Summary of Contents for John Deere GATOR XUV 6x4

Page 1: ...EMPLEO Y MANUTENCION model number IGOD0522 2 4 VOLT FIUS1501G201 See separate insert sheet for more information Voir la feuille séparée d insertion pour plus d information Vea la hoja separada del separador de millares para másinformación John Deere GATOR XUV 6x4 ...

Page 2: ...chrome decal chrome decal A OK B INITIAL BATTERY CHARGE PREMIÈRE CHARGE DE BATTERIE PRIMERA CARGA DE LA BATERÍA ASSEMBLY MONTAGE MONTAJE 1 2 3 4 5 6 7 8 9 10 11 12 ...

Page 3: ...e fixation 6 Insérer la vis dans le trou arrondi et le boulon dans le trou hexagonal Serrer la vis à l aide du tournevis 7 Installer la calandre sur le capot en l enclenchant dans les logements correspondants 8 Fixation du pare chocs avant cache batterie A veiller à bien positionner les trous inférieurs du pare chocs sur les pivots du châssis et B le basculer vers le haut jusqu au déclic de fermet...

Page 4: ...21 18 19 22 23 24 20 13 14 15 16 26 A 25 27 17 ...

Page 5: ...les 2 roues simultanément à l aide de l outil fourni et d une pince 20 Insérer les 6 petits chapeaux de roue 21 Assembler le ressort et le dispositif de blocage rouge comme indiqué sur la figure Soulever le piston et insérer dans la partie supérieure le crochet rouge comme indiqué sur la figure 22 Poser le support de caisson en faisant coïncider les trous de ce dernier et ceux du piston Insérer le...

Page 6: ...ION DE LA BATTERIE INSTALACION DE LA BATERÍA A B 1 R 1 2 R VEHICLE FEATURES AND INSTRUCTIONS FOR USE CARACTERÍSTIQUES ET UTILISATION DU VEHICULE CARACTERÍSTICAS Y USO DEL VEHÍCULO 36 37 31 32 33 34 35 38 39 29 30 1 2 2 1 2 1 R 40 28 ...

Page 7: ...nt lève son pied de l accélérateur 36 Le caisson est basculant et peut contenir des objets d un poids maximal de 30 kg Pour faire basculer le caisson décrocher le dispositif de blocage en tirant l anneau rouge et soulever 37 Le caisson dispose d un rebord arrière ouvrant qui se débloque en appuyant sur la poignée centrale 38 POSITIONS DU LEVIER DEVITESSE 3 positions au centre 4 km h vers l avant 2...

Page 8: ...B C B C BATTERY RECHARGE CHARGE DE LA BATTERIE CARGA DE LA BATERÍA 41 42 43 44 45 46 47 48 BATTERY REPLACEMENT REMPLACEMENT DE LA BATTERIE CAMBIO DE LA BATERÍA A B A B ...

Page 9: ...her le chargeur de batterie à une prise électrique de la maison Brancher la fiche de la batterie B à celle du chargeur C REMARQUE enfoncer avec vigueur jusqu à l enclenchement des fiches 46 Une fois la batterie chargée prévoir de 18 à 24 heures pour la pleine charge débrancher le chargeur de la prise électrique puis débrancher la fiche de la batterie B de celle du chargeur C 47 Rebrancher la fiche...

Page 10: ...ELECTRICAL DIAGRAM DIAGRAMA ELÉCTRICO DIAGRAMME ÉLECTRIQUE ...

Page 11: ...207R 8 SPST8211Y 9 SAGI8217R 10 SPST8921N 11 SOTF0087L30 12 SPST9231N 13 SPST9230VB 14 SPST8119R 15 SPST9232JN 16R SPST9233DN 16L SPST9233SN 17 SPST9248 18 SPST9033A 19 SPST9234N 20 SPST9352N 21 ASGI0230N 22 SPST9235Y 23 SPST8091JWN 24 SPST8105N 25 SPST8106N 26 SAGI8962XGPGL 27 SPST8147N 28 SOFF0300L30 29 SPST8100KN 30 SAGI9429N 31 SPST9430N 32 SOTA0599 33 SPST8108N 34 SPST9435N 35 SPST9420N 36 SO...

Page 12: ...re the vehicle is used for the first time charge the battery for 18 hours to initiate it Failure to do this can result in permanent battery damage Use only with the included Peg Perego 24 Volt lead acid rechargeable battery and a Peg Perego 24 Volt Charger both included Year 3 Weight capacity 130 lbs 66 lbs Do not exceed the maximum total weight capacity of 130 lbs 60 kg 66 lbs 30 kg This includes...

Page 13: ... CONTAIN TOXIC AND CORROSIVE SUBSTANCES DO NOT TAMPER WITH THEM Batteries contain an acid based electrolyte Do not make direct contact between battery terminals as this can cause an explosion or fire Charging produces explosive gases Charge batteries in a well ventilated area away from sources of heat and flammable materials Exhausted batteries are to be removed from the vehicle Do not place the b...

Page 14: ...t all times Stop in time to avoid accidents and immediately release pedal when stuck Use the 2nd speed only after your child has the maturity and the reflexes to operate the vehicle safely MEANING of BEEPING SOUNDS ONE SINGLE BEEP means that the toy is ready to operate CONTINUOUS BEEP for 6 sec Means that the battery is fully discharged and the toy cannot operate anymore recharge the battery or ch...

Page 15: ...s wheels using the cable do not cover the cable because it may overheat do not leave it on hot surfaces and be careful about where and how you roll it up Do not leave vehicle or batteries near sources of heat such as radiators stoves fireplaces etc Protect vehicle from water rain snow etc When operating in overload conditions such as soft deep sand mud or rough uneven terrain the overload circuit ...

Page 16: ...tous deux inclus Âge 3 Capacité 60 kg 30 kg Ne pas dépasser la capacité maximale de 60 kg 30 kg Cela comprend aussi bien les conducteurs que le chargement Contient 1 véhicule de conduite pour enfants GATOR XUV 6x4 partiellement assemblé 1 Batterie rechargeable de 24 V scellée au plomb 1 Chargeur 24 V 4 moteurs poids lourds 175 W préinstallés matériel d assemblage parties à assembler stickers PREMI...

Page 17: ...causer une explosion ou un incendie Le chargement produit des gaz explosifs Mettre la batterie en charge dans un endroit bien aéré loin de toute source de chaleur et des matières inflammables Retirer la batterie déchargée du véhicule Ne pas placer la batterie près de vêtements afin d éviter tout dommage EN CAS DE FUITE Protégez vos yeux Évitez tout contact direct avec l électrolyte protégez vos ma...

Page 18: ...rcours Freiner à temps pour éviter les accidents et relâcher immédiatement la pédale si elle est coincée N utilisez la 2ème vitesse uniquement lorsque votre enfant a acquis la maturité et les réflexes nécessaires pour conduire le véhicule en sécurité SIGNIFICATION DES BIP UN SEUL BIP signifie que le jouet est prêt à être conduit UN BIP CONTINU de 6 secondes signifie que la batterie est entièrement...

Page 19: ...ur ses roues en utilisant le câble ne pas couvrir le câble car il pourrait surchauffer ne pas le laisser sur des surfaces chaudes et soyez attentifs à la façon et le lieu où vous l enroulez Ne pas laisser les batteries ou le véhicule à proximité de sources de chaleur telles que des radiateurs des fours des cheminées etc Protéger le véhicule contre l eau la pluie la neige etc Si le véhicule fonctio...

Page 20: ...adulto Considere un mínimo de 60 minutos para el montaje Antes de utilizar el vehículo por vez primera cargue la batería durante 18 horas para ponerlo en marcha No hacerlo puede causar daños permanentes a la batería Utilícelo solamente con la batería recargable Peg Perego incluida batería de plomo y ácido de 24 Volt y un Cargador Peg Perego de 24 Volt también incluido Años 3 Peso máximo 130 lbs 66...

Page 21: ... polaridad de la batería al conectarla al cableado PRECAUCIÓN SI SE PRODUCEN FUGAS Protéjase los ojos Evite el contacto directo con el electrolito proteja sus manos Ponga la batería en una bolsa plástica y siga las indicaciones que se dan a continuación SI EL ELECTROLITO ENTRA EN CONTACTO CON LA PIEL O CON LA ROPA Aplique agua fría durante un mínimo de 15 minutos Acuda a un médico inmediatamente E...

Page 22: ...rgía y el vehículo volverá a funcionar Si el disyuntor se abre las ruedas del juguete giran libremente Para aplicar el freno hay que levantar el pie del acelerador Enseñe a su hijo el uso adecuado de este vehículo para que se divierta jugando con seguridad Antes de ponerse en marcha asegúrese de que el camino está libre de personas y cosas Se conduce con las dos manos en el volante y sin apartar l...

Page 23: ...e el cable de recarga de la batería Por ejemplo no tire del cable para desenchufar la clavija no use el cable para arrastrar el vehículo sobre sus ruedas no tape el cable pues puede recalentarse no lo deje sobre superficies calientes y proceda con cuidado en lo que se refiere a cómo y dónde lo enrolla No deje el vehículo o las baterías cerca de fuentes de calor como radiadores hornos chimeneas etc...

Page 24: ...l information de contact ci dessous ALTO No vuelva su vehículo al almacén Somos una llamada telefónica gratis lejos y podemos ayudar Si usted es piezas que falta o necesita ayuda vea por favor la información del contacto abajo Model Number IGOD0522 PEG PEREGO U S A Inc 3625 INDEPENDENCE Dr FORT WAYNE IN 46808 fax 260 484 2940 call us toll free 1 800 728 2108 llame USA gratis 1 800 225 1558 PEG PER...

Reviews: