- 12 -
_
Adapter Team: Upper Ganciomatic base, lower
Ganciomatic base, footrest.
INSTRUCTIONS
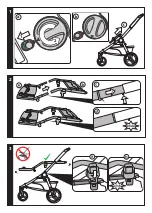
1 REMOVING THE GANCIOMATIC BASE: Simultaneously
press the safety button and turn the knob in the
direction of the arrow (fig_a). The safety button
indicator will be red (fig_b). Remove the base from
the frame (fig_c).
2 ASSEMBLING: The adapter is composed of a lower
Ganciomatic base (fig_a) and an upper Ganciomatic
base (fig_b). To assemble the two bases, press the
button underneath the tube on the lower base (fig_c)
and hook it until it locks into place (fig_d).
3 HOOKING IN PLACE: Point the adapter as shown.
Position the connections for the upper base on the
chassis housings (fig_a) and push downwards until
they lock into place (fig_b).
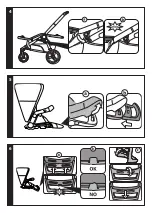
4 Hook the lower base of the adapter to the chassis
(fig_a) and push until it locks into place (fig_b).
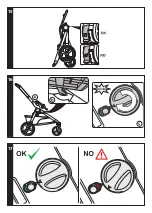
5 HOOKING ON THE FOOTREST: Pull off the fabric cover
on the seat footrest and raise the footrest (fig_a) and
position the footrest on the seat footrest (fig_b).
6 Insert the footrest and hook it in place, until it locks
into place, checking that it is hooked into place
correctly and appears as shown in the figure (fig_a -
fig_b). To remove it, release the footrest at the rear,
and then simultaneously lift and pull it out from the
front (fig_c).
WARNING: Only use the footrest with the
Seggiolino Pop-Up seat in the lower forward-
facing position.
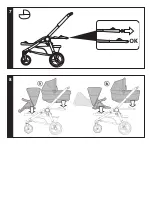
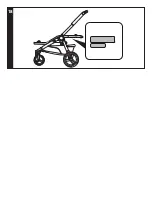
7 ADJUSTING THE UPPER GANCIOMATIC BASE: To hook
on the bassinet, you must lengthen the upper base by
pulling on the two levers at the back and extending
it until it locks into place. Check that the symbol is
visible on the tube.
GANCIOMATIC SYSTEM
The Ganciomatic System is a fast and convenient
system that allows you to attach the Seggiolino
Pop-Up seat, the Primo Viaggio SL car seat, and the
Bassinet (sold separately) to the frame's Ganciomatic
Base in one easy movement. Position them on the
Ganciomatic Base and press downwards on the
product with both hands until they lock into place.
Always apply the frame or stroller brake before
securing or releasing the products (refer to the
respective instruction manuals). Follow the directions
for specific product combinations.
8 TEAM C SEGGIOLINO POP-UP SEAT +
BASSINET
The figure shows how to hook the products into place.
The Bassinet must always be positioned at the top.
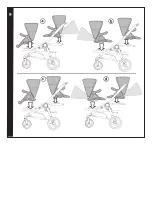
9 TEAM C 2 SEGGIOLINO POP-UP SEATS
Figures A, B, C and D show the positions in which the
seats may be installed. In configuration B, where the
child seat is secured to the lower base, the footrest
must first be set to the lowest position.
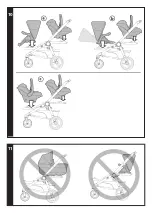
10 TEAM C SEGGIOLINO POP-UP SEAT +
PRIMO VIAGGIO SL CAR SEAT
Figure A-B shows how to hook the Seggiolino Pop-Up
seat and the Primo Viaggio SL.
TEAM C 2 PRIMO VIAGGIO SL CAR SEATS
Figure C shows how to hook the Primo Viaggio SL car
seat facing the parent.
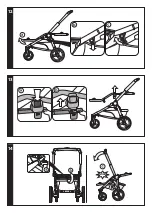
11 WARNING: the set-ups shown in the illustration
are not permitted.
The second seat must be hooked in place even
EN_English
Thank you for choosing a Peg-Pérego product.
WARNING!
_ IMPORTANT: Keep these instructions for future
reference. Read and keep them for safety use.
The child’s safety could be at risk if these
instructions are not followed.
_
This item was designed for the transport of 2 children
in the seat.
_
Do not use this product for a number of occupants
greater than that intended by the manufacturer.
_
WARNING! The assembly and preparation of the
product must be carried out by an adult.
_
Do not use this product if there are parts missing or
signs of breakage.
_
This article used in combination with:
The Seggiolino Pop-Up seat is approved for children
from birth up to a weight of 15 kg in the seat.
_
For new born babies is recommended to use the
backrest in the most reclined position.
_
The Primo Viaggio SL car seat is approved for children
from birth up to a weight of 13 kg.
_
When used in combination with car seat, this vehicle
does not replace a cot or a bed.
Should your child need to sleep, then it should be
placed in a suitable pram body, cot or bed.
_
The Navetta bassinet is approved for children who
cannot sit alone, turn over, or support themselves
on their hands or their knees, up to a maximum
permitted weight of 9 kg.
_
Don't apply and don't use any different mattress of
that specified by the Manufacturer in the Instruction
Manual of pram body.
_
Any carrying handle (if present) shall be left out of the
pram body during use.
_
WARNING! Ensure that all the locking devices are
engaged before use.
_
Check that the Peg Perego Ganciomatic products are
correctly fixed to the item.
_
WARNING! Check that the pram body or seat unit or
car seat attachment devices are correctly engaged
before use.
_
WARNING! To prevent injury, make sure the child is
a sufficient distance away when opening and closing
the product
_
Be careful to check if the child is present when
adjusting mechanisms (backrest, footrest, etc. ).
_
WARNING! This product is not a toy. Do not let your
child play with this product.
_
WARNING! Never leave the child unattended.
_
IMPORTANT: After assembly, check that the adapter
is properly connected to the Team chassis by raising
the Ganciomatic bases
_ IMPORTANT: DURING USE, DO NOT LIFT THE
PUSHCHAIR BY THE ADAPTER OR THE CARRYING
ELEMENTS FASTENED TO IT.
_
IMPORTANT: DO NOT LIFT THE PUSHCHAIR BY THE
ADAPTER DURING USE
_
IMPORTANT: USE SET UP AS SHOWN IN THIS
INSTRUCTION MANUAL.
_
THE MANUFACTURER WILL NOT BE HELD LIABLE
FOR IMPROPER USE OF THE ARTICLE
_
WARNING! This product is not suitable for running or
skating.
_
WARNING! Do not use accessories which are not
approved by the manufacturer.
_
The footrest may only be raised when the seat faces
out from the frame.
COMPONENTS OF THE ITEM
Check the contents of the packaging and if you have
any complaints please contact the Assistance Service.
Summary of Contents for TEAM
Page 2: ...3 2 1 1 2...
Page 3: ...6 5 4...
Page 4: ...8 7...
Page 5: ...9...
Page 6: ...10 11...
Page 7: ...12 13 14 click...
Page 8: ...15 16 17...
Page 9: ...18...
Page 26: ...26...
Page 27: ...27...


