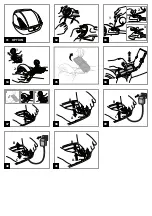
17 • Lower the seat.
18 • Turn the clasp behind the seat to the position
shown in picture A. With the clasp in the
position shown in picture B, the seat can be
opened.
19 • Attach the taillight sticker and snap the glass
cover into place.
20 • Attach the silver rear signal light stickers, and
snap the glass covers into place.
21 • Attach the silver front signal light stickers, and
snap the glass covers into place.
22 • Lift the seat and loosen the safety screw on the
cover inside the compartment under the seat.
Remove the cover.
23 • Connect the plugs and put the cover back.
Fasten the safety screw. Always remember to
lower the seat and to fasten it, after working in
the compartment under the seat. The vehicle is
ready for use.
INSERTING THE BATTERIES
To insert the batteries that run the lights and
electronic audio signals, follow these instructions:
24 • Loosen the screw on the battery cover on the
dash. Remove the cover.
25 • Remove the battery sheath and insert two 1.5V
AA batteries. (Batteries do not come with
vehicle.) Put the battery sheath back into the
dash.
26 • Put the cardboard dashboard into place and
fasten the cover screw.
VEHICLE FEATURES AND INSTRUCTIONS FOR USE
27 • A: Accelerator pedal. The brake goes on
automatically when the child lifts his/her foot
off the accelerator pedal.
28 • B: Front headlight button.
C: Flashing lights button.
D: Horn button.
E: When this button is pressed, the sound of an
engine roaring will be heard.
29 • Front carrier compartment.
30 • OPTIONAL: Helmet
31 • OPTIONAL: Rear carrier case.
NOTE: The helmet and the rear carrier case are sold
together.
REPLACING THE LIGHT BULBS
(2.5 Volt)
32 • Remove the front headlight glass, using a tool
to lift it. Gently pull on the light bulb, to extract
the light socket. Unscrew the burnt light bulb
from the socket and replace it. Push the light
socket back to its original position and put the
glass back, as shown in the figure.
33 • Remove the glass cover from the burnt light,
using a tool to lift it. Gently pull on the light
bulb, to extract the light socket. Unscrew the
burnt light bulb from the socket and replace it.
Push the light socket back to its original
position and put the glass back, as shown in
the figure.
REPLACING THE BATTERY
34 • Turn the clasp behind the seat to open it. Lift
the seat. Loosen the safety screw on the cover
inside the compartment under the seat, and
disconnect the plugs. Turn the vehicle upside
down to work on the bottom of it. Unscrew
and remove one of the stands. Remove the
axle.
35 • Lift the cover.
36 • Replace the dead or damaged battery. Push
the plug on the new battery through the hole
in the bottom, so that you can connect it to the
electrical system once you turn the vehicle
right-side-up.
37 • Put the cover back on the battery
compartment. Slip the axle back into place.
Put the stand back on and fasten it with the
screw. Set the vehicle back on its wheels and
connect the plugs. Put the cover back on the
compartment under the seat and fasten the
screw. Lower the seat and fasten the clasp.
BATTERY RECHARGE
WARNING: BATTERY CHARGING AND EVERY OTHER
OPERATION ON THE ELECTRICAL SYSTEM MUST BE
CARRIED OUT BY ADULTS ONLY.
THE BATTERY CAN ALSO BE CHARGED WITHOUT
REMOVING IT FROM THE TOY.
38 • Disconnect electrical system plug A from
battery plug B, by pressing on the sides of both
plugs.
39 • Plug the battery charger into an electrical
outlet, following the instructions for the battery
charger. Connect plug B to plug C from the
battery charger.
40 • When the battery has finished charging, unplug
the battery charger from the electrical outlet,
then disconnect plugs C and B.
41 • Connect plugs B and A, pressing until they snap
together. Always remember to lower and to
fasten the seat when you have finished working
under it.
Before riding, charge your batteries for 18 hours to
initiate them. Failure to do this will result in
permanent battery damage.
CAUTION
Only adults should recharge batteries,never
children.
Never allow children to handle batteries.
Do not mix old and new batteries.
CHARGE BATTERY
• Charge the batteries no longer than 24 hours,
following the instructions enclosed with the
battery charger.
• Charge the battery, as the vehicle shows low
power, in this way you will avoid damage to the
battery.
• If you don’t use your vehicle for a long period of
time unplug the battery from the main wire
harness of the vehicle. Remember to charge the
battery at least every three months.
• Never charge the battery upside down.
• Do not forget batteries during charging! Check
them periodically.
• Never use a replacement recharger or batteries
unless they are approved by PEG PEREGO.
• Batteries are sealed and maintenance free.
• Battery polarity must be observed when
connecting battery to wiring.
WARNING
• BATTERIES CONTAIN TOXIC AND CORROSIVE
SUBSTANCES. DO NOT TAMPER WITH THEM.
• Batteries contain an acid-based electrolyte.
• Do not make direct contact between battery
terminals, as this can cause an explosion or fire.
• Charging produces explosive gases. Charge
batteries in a well ventilated area away from
sources of heat and flammable materials.
• Exhausted batteries are to be removed from the
vehicle.
• Do not place the batteries near clothing to avoid
damage.
• Use only the recommended type of batteries and
storage batteries, or the equivalent.
IF A LEAK DEVELOPS
Shield your eyes. Avoid direct contact with the
electrolyte, protect your hands.
Place battery in a plastic bag and follow directions
listed below.
IF ELECTROLYTE COMES IN CONTAC WITH SKIN OR
CLOTHING
Flush with cool water for at least 15 minutes.
See a physician at once.
IF ELECTROLYTE IS INJESTED
Rinse your mouth and spit.
See a physician at once.
DISPOSAL OF BATTERIES
Help protect the environment!
Do not throw used batteries in your regular, house
hold trash.
Dispose of the old batteries in an approved
dumping station; contact your local environmental
protection agency office for further information.
CAUTION AA 1,5 VOLT BATTERY
The insertion of batteries must only be carried out
or supervised by adults. Do not let children play
with the batteries.
• The batteries should be replaced by an adult.
• Use only the type of battery specified by the
manufacturer.
• Respect the po/-
• Do not allow the batteries to be in contact with
metal parts (risk of fire or explosion).
• Always remove the batteries if the toy is not in use
for a long period.
• Do not throw batteries on the fire.
• Never attempt to charge batteries that are not
rechargeable.
• Remove dead batteries from the toy.
• Dispose of dead batteries into containers
provided for the recycling of dead batteries.
•PEG PEREGO® thanks you for choosing this
product. For over 50 years, PEG PEREGO has been
taking children for an outing: first with its famous
baby carriages and strollers, later with its pedal and
battery operated toy vehicles.
•Read this instruction manual carefully to learn the
use of this vehicle and to teach your child safe and
enjoyable driving. Please keep this manual for use
as a reference in the future.
•Our toys conform with the safety requirements
provided by the Council of the EEC, of the T.Ü.V.; of
the I.I.S.G. Istituto Italiano Sicurezza Giocattoli, and
the U.S. Consumer Toy Safety Specification F963.
Peg Perego S.p.A. is an ISO 9001
certified company.
The fact that we are certified provides
a guarantee of our honesty for our
customers, and fosters trust in the
company’s way of working.
•Peg Perego reserves the right to modify or change
their product. Price, literature, manufacturing
processes or locations or any combination of these
above mentioned entities may change at any time
for any reason without notice with impunity.
Years 2-5
PEG PEREGO offers after-sales services, directly or
with a network of authorized service centers for
repairs or replacement parts. See the back cover of
this instruction manual for a list of service centers.
Peg Perego is at the consumer's service, meeting
every need in the best way possible. This is why our
customers' opinions are so important and valuable
to us. We would be very grateful if you would kindly
fill in the CUSTOMER SATISFACTION
QUESTIONNAIRE after using one of our products.
You will find the questionnaire on the Internet at
"www.pegperego.com/SSCo.html.en-UK".
Please note any observations or suggestions you
may have on the questionnaire.
ADULT ASSEMBLY REQUIRED.
USE CARE WHEN UNPACKING AS COMPONENTS TO
BE ASSEMBLED MAY POSE A SMALL PARTS/SHARP
EDGE HAZARD.
BATTERY ALREADY INSTALLED IN VEHICLE.
ASSEMBLY
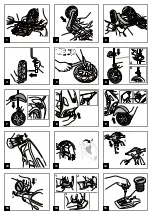
1 • Turn the article upside down so that you can
work on the bottom of it. Remove the two
bearings from the axle.
2 • Position the stands as shown in the figure.
3 • Fasten the stands with the supplied screws.
4 • Put the front wheel on the axle, keeping the
side with the plastic bearing on the inside.
5 • Put a stud into the special tool, and fasten the
wheel in place, hammering it all the way down.
6 • Slip the fender bearing onto the axle and push
it all the way to the end (picture B). Note: The
bearing is shaped so that it can only be put on
the axle one way (see detail in picture A).
7 • Slip the fender onto the axle and fasten it to
the fender bearing, as shown in the detail.
8 • Push the lower steering bearing all the way into
its hole, taking care to line it up correctly.
9 • Attach the axle unit with the wheel to the front
of the vehicle and fasten the fender to the
lower steering bearing.
10 • Attach the upper steering bearing.
11 • Attach the two decals to the body, as shown in
the figure.
12 • Attach the handlebars and fasten them with
the supplied screw.
13 • Stick the mirrors into their holes on the
handlebars and turn them outwards to fasten
them into place.
14 • Attach the foot mat, snapping it into the back
openings first and then the front openings
(bending the mat slightly). Press the central
part of the mat on both sides to fasten it
securely.
15 • Fasten the large plastic screw on the luggage
carrier.
16 • Lift the seat and place the carrier on the
vehicle. Fasten it with the four supplied screws.
ENGLISH
CUSTOMER SERVICE
ASSEMBLY INSTRUCTIONS
BATTERY MAINTENANCE AND SAFETY


