background image

1

1

1:1

K

 项目

  库

文件名

A

1

2

4

6

3

5

1

2

4

6

3

5

B

C

D

E

F

G

H

A

B

C

D

E

F

G

H

技术要求(版本号: 

封面

A

2017-01

1

.印刷颜色:单黑,pantone black C

2

3.警语部分首大写字母高度大于3mm(不适用)

4.说明书70P以下为钉装,70P以上为胶装(特殊要求除外);
5.此页为技术要求无需印刷

.该说明书 的幅面大小为 145*210mm。

16156000007273


广东美的生活电器制造有限公司

会   签

古广君

制  图

设  计

校  对

审  核

标准化

审  定
日  期

标记 处数 更改文件号

签  字

日  期

FT30-8MB

WM-FT30-8M (FT30-8MB)_SMS-01

说明书

 重点

校对项

1

.版面尺寸

2

.材质标注

3

.物料编码

4

.颜色标注

5

.客户型号

6

.产品名称

7.

重量标注

8.

电压功率

-----

-----

-----

9.说明书
70P以下为
钉装,70P
以上为胶装
(特殊要求
除外)

余泽莹

2019-8-19

材料:国产双胶纸

黑白机共用

A  2     更改客户型号 余泽莹 20190924

B        整版更新内容 余泽莹 20200114

Summary of Contents for FT30-8MBBV

Page 1: ...P以下为钉装 70P以上为胶装 特殊要求除外 5 此页为技术要求无需印刷 该说明书 的幅面大小为 145 210mm 16156000007273 广东美的生活电器制造有限公司 会 签 古广君 制 图 设 计 校 对 审 核 标准化 审 定 日 期 标记 处数 更改文件号 签 字 日 期 FT30 8MB WM FT30 8M FT30 8MB _SMS 01 说明书 重点 校对项 1 版面尺寸 2 材质标注 3 物料编码 4 颜色标注 5 客户型号 6 产品名称 7 重量标注 8 电压功率 9 说明书 70P以下为 钉装 70P 以上为胶装 特殊要求 除外 余泽莹 2019 8 19 材料 国产双胶纸 黑白机共用 A 2 更改客户型号 余泽莹 20190924 B 整版更新内容 余泽莹 20200114 ...

Page 2: ...INSTRUCTION MANUAL 12 TABLE FAN MODEL FT30 8MBWV FT30 8MBBV READ AND SAVE THESE INSTRUCTIONS 145x210mm K ...

Page 3: ...guard when fan is running 5 Unplug from outlet when not in use when moving fan from one location to another before putting on or taking off parts and before cleaning 6 Be sure fan is on a stable surface when operating to avoid overturning 7 DO NOT use fan in window Moisture may create electrical hazard RULES FOR SAFE OPERATION WARNING 1 To reduce the risk of fire or electric shock do not use this ...

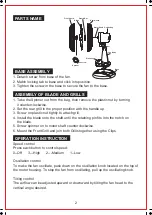
Page 4: ...ounterclockwise 6 Mount the Front Grill and join both Grills together using the Clips 1 Detach screw from base of the fan 2 Match locking tab to base and click into position 3 Tighten the screw in the base to secure the fan to the base Speed control Press each button to control speed 0 Off 3 High 2 Medium 1 Low Oscillation control To make the fan oscillate push down on the oscillation knob located...

Page 5: ...r sponge 3 Be sure not to get water or other liquid enter the inside of the motor 4 Dry all parts completely before reassembling and plugging into socket MAINTENANCE INSTRUCTION CLEANING USER SERVICING INSTRUCTIONS 3 1 Grasp plug and remove from the receptacle or other outlet device Do not unplug by pulling on cord 2 Open fuse cover Slide open fuse access cover on top of attachment plug towards bl...

Page 6: ...ite to Midea America Corp Customer Care Center 11411 NW 107th Street Suite 12 Miami FL 33178 For your records staple your sales receipt to this manual and record the following DATE OF PURCHASE ___________________________________________ PLACE OF PURCHASE ___________________________________________ STAPLE SALES RECEIPT HERE NOTE PROOF OF PURCHASE IS REQUIRED FOR ALL WARRANTY CLAIMS 4 ...

Page 7: ... period Damage caused by connection to an improper input voltage see specification label on your Fan Midea America Corporation makes no further warranties or representations express or implied except those contained herein No representative or dealer is authorized to assume any other liability regarding the fan The duration of the implied warranty granted under State law including warranties of me...

Page 8: ...MANUAL DE INSTRUCCIONES VENTILADOR DE MESA DE 30 5 cm MODELO FT30 8MBWV FT30 8MBBV LEE LAS INSTRUCCIONES Y GUÁRDALAS ...

Page 9: ...ndo 5 Desenchúfalo del tomacorriente cuando no esté en uso al trasladarlo de un lugar a otro antes de poner o sacar piezas y antes de limpiar 6 Comprueba que el ventilador esté sobre una superficie estable mientras funciona para evitar su caída 7 NO utilices el ventilador en ventanas La lluvia puede representar un peligro debido a la electricidad 1 Para reducir el riesgo de incendio o descarga elé...

Page 10: ...clinando la cabeza del ventilador a cualquier ángulo vertical que desees 1 Saca la hélice de la bolsa y retira la tuerca plástica girándola contrario a las manecillas del reloj 2 Pon la rejilla trasera en la posición correcta con el mango hacia arriba 3 Atornilla la tuerca de plástico firmemente para fijar la rejilla 4 Instala el aspa en el eje hasta que la clavija de fijación encaje en la muesca ...

Page 11: ...ilices detergentes abrasivos o solventes para no dañar la superficie No utilices los siguientes compuestos para limpiar gasolina disolvente mezclador 4 No permitas que entre agua ni ningún otro líquido a la caja del motor o las piezas internas LIMPIEZA 1 Toma el enchufe y desconéctalo del tomacorriente o de donde esté enchufado No tires del cable al desconectarlo 2 Abre la tapa del fusible Para ab...

Page 12: ... Midea America Corp Customer Care Center 11411 NW 107th Street Suite 12 Miami FL 33178 Para llevar un registro engrapa tu recibo de compra a este manual y anota lo siguiente FECHA DE COMPRA ___________________________________________ LUGAR DE COMPRA ___________________________________________ ENGRAPA EL RECIBO DE COMPRA AQUÍ NOTA NECESITAS EL COMPROBANTE DE COMPRA PARA CUALQUIER RECLAMACIÓN DE GAR...

Page 13: ...o las limitaciones o exclusiones anteriores pueden no aplicarse a usted Esta garantía le ofrece derechos legales específicos y usted puede tener otros derechos que varían de estado a estado Midea America Corporation ntiza de forma limitada como se explicita aquí al comprador original que cada Ventilador nuevo estará libre de defectos de materiales o mano de obra por el período de un 1 años desde l...

Reviews: