18
7081-148H
www.pelprostoves.com
CAUTION: DO NOT INSTALL STOVE IN SLEEPING ROOM
THE STRUCTURAL INTEGRITY OF THE MANUFACTURED HOME FLOOR,
CEILING and ROOF MUST BE MAINTAINED!
Your
PelPro Series
appliance has been tested and listed for mobile home installation. It may be
installed in a mobile home as a "Free Standing Stove" or a "Hearth Stove", see detailed install and
clearance requirements in these sections as they imply there.
In addition to all previously detailed installation requirements, mobile home in-stallations
must meet the following requirements in accordance with the Manufactured Home and
Saftey Standard (HUD) CFR 3280, Part 24:
The appliance must be secured to the mobile home structure by bolting it to the floor (using lag bolts).
Use the same holes that secured the appliance to the shipping pallet.
.
Electrically ground your stove or the pedestal to the steel frame of the home. Use a number 8 gauge
copper wire or equivalent.
The stove must have a permanent outside air source with a ¼ inch screen over the inlet.
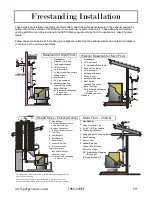
Figure 26, (B, C & D)
For transportation all chimney/vent above the mobile home must be removed.
Chimney/PL Vent must be 3” or 4” PL Vent and when extending through the roof, must extend a
minimum or 36” above the roofline of the mobile home and must be installed using a UL / ULC
listed ceiling fire stop (J), figure 26, and rain cap (L), figure 26.
REFER TO THE VENTING DIAGRAMS IN THIS MANUAL
FOR FURTHER EXHUAST CONFIGURATIONS.
INSTALL VENT AT CLEARANCES SPECIFIED
BY THE VENT MANUFACTURER.
Note:
When moving your mobile home, all exterior venting
must be removed. Upon completion of relocation, all venting
must be reinstalled, gas tight, and securely fastened.
Figure 26
A
Floor Pad
B
Combustion Air Intake
C
Fresh Air Duct
D
Fresh Air Hood
E
Stove Exhaust
F
Pipe Adapter
G
Clean Out Tee
H
Tee Support Bracket
I
Pipe
J
Firestop Spacer / Ceiling Sup-
port
K
Roof Flashing / Storm Collar
L
Rain Cap
Mobile Home Installation
B
A
C D
E F
G
H
J
K
L


