background image

 28 

7081-148H 

www.pelprostoves.com 


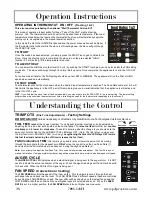
FEED RATE

START

FEED RATE

1

2

3

4


FINE TUNE ADJUSTMENTS

1

4

FAN

Increase

Decrease

Operation - 

Performance Enhancements


HIGH QUALITY FIRE

 should burn with a 

brisk, vibrant, yellow to white color flame. 

When watching the 

fuel burn in the grate, you should see a slight movement.  

The fuel should not be just setting there, doing 

nothing, like couch potatoes.  At the same time you should not see most the fuel being blown out of the burn 
grate, commonly know as “Pop Corning”. 


Another way to confirm a proper air and fuel mixture is to view the amount the glowing embers off to the left 
and right of the burn grate.  If there are no or little embers, the appliance requires more air.  If there are a large 
amount of embers and they continue to glow for over 15 to 30 seconds, the appliance requires less air. 

The proper setting will give you some embers, and these embers will last no longer then 15 seconds. 


A flame exhibiting a lazy, orange or sooty characteristic is a poor quality and inefficient flame.  A poor flame 
produces less heat, increases sooting and may cause a smoky exhaust.  If a poor flame exists for any period 
of time, clean your stove and exhaust system.   


NOTE:  It is a good practice to check the quality of your burn every time you start on a new  

skid of pellets. Because of handling, tree quality, season, transportation, etc., fuel may not be  

consistent from ton to ton or even bag to bag. 


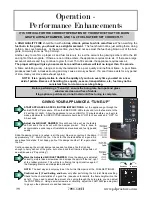
GIVING YOUR APPLIANCE A “TUNE-UP” 


START APPLIANCE AS PER LIGHTING INSTRUCTIONS. 

Let the appliance go through the 

entire START-UP procedure.  When the FEED RATE LED stays solid, turn the feed rate to the 
# 4 setting (or High).  Allow the appliance to run on HIGH for 10 minutes before you  begin to 
make adjustments.  AUGER CYCLE indicator should be lit “ON” for 3 seconds and  “OFF” for 
3-5 seconds.  


Adjust the AIR INLET DAMPER. 

This will have to be set, as the factory 

can  not  send  the  units  out  with  the  damper  pre-set.    This  is  done  to  
accommodate a wide range of installations, elevations and fuel type and 
quality. 


Slide the damper closed  (  pushed  in all  the  way)  Now  open  (pull  out)  the  damp 
approximately 1/8”.  Watch the fire.  Check for the characteristics of a good fire, 
see above for details.  If not happy, pull out the damper another 1/8”, again check 
the fire.  


Continue opening the air inlet damper as needed to obtain a fire that is brisk 
enough to carry ash out of the grate, but not so brisk that it carries full pellets out 
as well (known as “Pop corning”).  


Mark the Adjusted AIR INLET DAMPER. 

Once the damper is adjusted 

correctly, simple take a screwdriver and scrape the paint off the rod, right 
at the rubber grummet. This will help in finding the right location again if 
the Damper gets moved or adjusted accidently. 


        NOTE:  

The best way and only way to set the Air Inlet Damper is at the  FUEL SETTING #4. 


Confirm Low (1) Feed Setting and burn, 

only after performing the Air Inlet Damper setting. 

Check for the characteristics of a good fire, (see above for details, the flame height will not be 
as tall).  If you need to adjust the amount of air going through the burn grate, you can adjust 
the FAN TRIM pot.  Using a small screwdriver, carefully, adjust the FAN TRIM (see diagram) 
to give you the optimum burn and heat desired.


IT IS CRITICAL FOR THE CORRECT OPERATION OF YOUR STOVE THAT THE BURN 

GRATE, AIR INLET DAMPER,  AND 1 & 4 FUEL RATE BE SET CORRECTLY!  

Before performing a “Tune-Up”, ensure the burn grate, burn pot and glass  

window are clean and free of debris. 


If log option is purchased, do not install until fine tuning is complete. 

Summary of Contents for pellet stove

Page 1: ...ng Appliances in the USA Contact local building or fire officials to obtain a permit and information on any installation requirements and installation inspection requirements in your area To obtain a French translation of this manual please visit www pelprostoves com Pour obtenir une traduction française de ce manuel s il vous plaît visitez www pelprostoves com 7081 148H READ THIS ENTIRE MANUAL BE...

Page 2: ... safety of your family and for efficient satisfactory operation of your stove Initial Burn Setup of the stove is the most important step to ensure the efficient and satisfactory operation of your appliance for many years to come Pellet Stoves ARE NOT plug n play Know the quality and characteristics of the fuel you burn Corn or Wood Pellets can vary greatly from company to company from load to load...

Page 3: ...VICE PARTS ACCESSORIES 39 TYPE 10 LIMITED WARRANTY 40 SAFETY PRECAUTIONS DETERMING SIZE DISTANCE 11 TERMINATION 12 PLANNING OUTSIDE AIR 13 APPLIANCE PLACEMENT 14 FLOOR PROTECTION CLEARANCES TO COMBUSTIBLES INSTALLATION TOOLS OF THE TRADE 16 DIRECT VENT INSTALLATION 17 MOBIILE HOME INSTALLATION 18 FREESTANDING INSTALLATION 19 FIREPLACE INSERT MASONRY OR FACTORY 20 OPERATION BEFORE LIGHTING YOUR FIR...

Page 4: ... outlet in accordance with local building codes or in the absence of local codes with the National Electrical Code ANSI NFPA 70 A grounded surge protection unit is recommended Do not use an adapter plug or sever the grounding prong on the electrical plug Do not route the electrical cord underneath in front of or over the heater Do not unplug the stove if you suspect a malfunction Push the OFF Touc...

Page 5: ...ust system should be checked twice a year minimum for any build up of soot or creosote Do not touch the hot surfaces of the heater CAUTION Odors and vapors released during initial operation Curing of high temperature paint Open windows for air circulation Odors may be irritating to sensitive individuals NOTE Hearth Home Technologies grants no warranty implied or stated for the installation or main...

Page 6: ...mall amount of heat must pass out the exhaust of your stove along with gases into the atmosphere Your stove s heat output can be adjusted from setting 1 4 through the FEED RATE touch pad to vary your heat output from Low to High The room air fan can be manually adjusted through the FAN SPEED to run faster or slower to correspond to the amount of heat being produced The room air fan is also on a li...

Page 7: ...igh temperature limit switch installed If the temperature at the back of the firebox reaches approximately 250 F the switch will shut off the electricity going to the Vacuum Switch and to the Auger Motor The auger will automatically stop and the appliance will shut down when the exhaust temperature cools 120 F If this happens call your dealer or Hearth Home Technologies Customer Service 1 877 427 ...

Page 8: ...t 17 1 4 12 3 4 6 1 2 Exhaust 24 3 4 30 24 Shroud 1 8 1 4 Air Inlet 17 12 3 4 Exhaust 26 12 1 4 10 3 4 25 Air Inlet 7 Exhaust Exhaust 26 24 6 Exhaust Air Inlet 8 1 4 7 3 4 3 24 Bay View Freestanding Bay View Insert Built In Traditional Freestanding Traditional Insert Built In 19 23 Adjustable Hopper Approx Heating capacity sq feet 800 2 000 Approx Fuel burn rate per hour 1 4 5 5 lbs Hopper Capacit...

Page 9: ...ully read the ENTIRE installation section first Twice is better _____ Read the Installing Freestanding Insert or Built In sections _____ Determine the location and measurement needed your chosen location _____ Be sure to pre fit all items before you install fasten or install the stove permanently Remember measure twice cut once _____ Ensure ALL joints of PL vent and single wall stainless steel lin...

Page 10: ...a vent VENT SAFETY PRECAUTIONS A Clean Out Tee 4 must be installed at the bottom of all vertical runs These Tee s are to assist in periodically cleaning the vent Single or Double clean out tees may be used The exhaust system must be installed so the entire system can be cleaned without disassembly Termination must exhaust above the fresh air inlet elevation and parallel or above the exhaust output...

Page 11: ... Altitude above sea level NOTE In some cases it may be necessary to contact Hearth Home Technologies Customer Service personal to determine acceptable venting configurations and altitude adjustments 1 877 427 3316 The diagram to the right will help to give you a visual reference 0 1 2 3 4 5 6 7 8 9 10 10 20 30 Altitude in Thousands of Feet Equiva lent Pipe Length in Fe et 3 or 4 Inch Diameter Pipe...

Page 12: ...1 clearance above any door or window that opens C Minimum 3 clearance from any adjacent building D Minimum 7 clearance above any grade when adjacent to public walkways E Minimum 2 clearance above any grass plants or other combustible material Minimum 1 clearance above grade F Minimum 3 clearance above any forced air intake of any other appliance within 6 G Minimum 2 clearance below eves or overhan...

Page 13: ... least 1 foot away from the exhaust system termination When outside air is taken from an existing chimney the exhaust system must not terminate in the same chimney The outside air pipe on your stove is 2 OD The outside air connecting pipe must be at least 2 ID The outside air connecting pipe must be as short and free of elbows as possible and must fit over A not inside the outside air pipe on your...

Page 14: ...cove Installation 2 From Back Of Stove to Combustibles 3 From PL Vent to Combustibles 2 From Side of Stove to Combustibles 6 Non Combustible Surface on side of Heater 2 From Back Corner of Stove to Combustibles 6 Non Combustible Surface In Front of Heater 16 From Top Of Stove to Combustibles 36 to drapes doors anything that can swing Stove and floor protection must be installed on a level secure f...

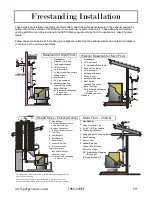
Page 15: ...ng on the brand of PL vent used Before placing the stove connect the Tee and measure off the 3 clearance ALCOVE INSTALLATION Minimum clearances to combustibles Figure 14 15 1 inch from back of appliance 6 inches from the sides 16 inches from the top 30 inches deep Figure 14 Figure 15 16 6 1 10 6 2 12 LCOVE HROUGH HE ALL A T T W 6 6 2 12 6 HROUGH HE ALL T T W ORNER 45 C 3 6 NTERIOR ERTICAL I V ORNE...

Page 16: ...t and wood drill bits Flashlight Wire stripper and wire cutter Hammer Bubble Level Utility knife Adjustable pliers 6 to 8 inches Small hand broom and dustpan Furniture and Floor Protection Supplies Caulking tube of RTV Hi Heat Silicone Caulking tube of Clear Silicone Hi Heat Aluminum Foil Tape 2 long Wood screws 10 Assortment of sheet and wood screws Stove Bright Hi Heat Stove Paint Before startin...

Page 17: ... 7 16 nuts supplied and secure tightly 6 Place a bead of RTV silicone around the end collar of the Quick Connect of your stove s exhaust C Firmly push the PL vent pipe adaptor J into the bead of RTV silicone Note If 4 PL vent is required use an 3 to 4 Pipe Adaptor Increaser J on the stove exhaust pipe 7 Connect the length of PL vent E that is in the thimble F onto the pipe adaptor D Fasten togethe...

Page 18: ... frame of the home Use a number 8 gauge copper wire or equivalent The stove must have a permanent outside air source with a inch screen over the inlet Figure 26 B C D For transportation all chimney vent above the mobile home must be removed Chimney PL Vent must be 3 or 4 PL Vent and when extending through the roof must extend a minimum or 36 above the roofline of the mobile home and must be instal...

Page 19: ...ide natural draft to help evacuate smoke from the appliance in case of power failure Follow the same basic steps in locating your appliance attaching the exhaust system and outside air intake to your stove as the previous examples 1 2 3 4 5 6 7 8 Main Floor Vertical 1 Pipe Adapter Clean Out Tee Cap 3 x 60 15 Pipe Length Tee Support Bracket Ceiling Support Firestop Spacer Roof Flashing Storm Collar...

Page 20: ...masonry fireplace tests are also relevant for installation in factory built fireplaces Installation must include a full height listed chimney liner meeting type HT requirements 2100D F per UL1777 US or ULC 8635 CAN The stainless steel liner must be securely attached to the insert flue collar and the chimney top Means must be provided to prevent room air passage to the chimney cavity of the firepla...

Page 21: ...lace must be restored to its original condition for safe use without the insert This sticker is supplied in the Owners Manual and accessories packaging found in the unit See the following statement THIS FIREPLACE HAS BEEN ALTERED TO ACCOMMODATE A FIREPLACE INSERT AND SHOULD BE INSPECTED BY A QUALIFIED PERSON PRIOR TO RE USE AS A CONVENTIONAL FIREPLACE When installing into a masonry chimney it is r...

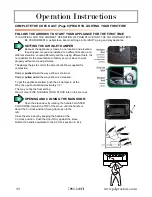
Page 22: ...to work properly without some adjustments The damper helps to control the amount of airflow supplied for combustion Damper pushed in all the way airflow is minimum Damper pulled out all the way airflow is increased To get the appliance started push the air damper in all the Way then pull outward approximately 1 2 This may not be the final setting We will cover FINE TUNNING YOUR STOVE later in this...

Page 23: ...tove s electrical components for 15 minutes If after 15 minutes your stove has heated to normal operating temperatures your stove will continue to run If the fire does not light and or burn properly the electricity to your stove s components will be shut off at the end of 15 minutes The FAN SPEED controls the speed of the room air fan This fan blows room air through the heat exchange tubes and bac...

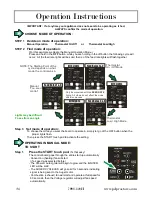
Page 24: ... setting All 4 Lights Feed Rates 1 2 All 4 Lights All 4 Lights Feed Rates 3 4 Feed Rates 1 4 Only be concerned with the lights All others do not effect the mode selection process FEED RATE NOTE The Starting Point of the cycle depends on what mode the control was in Thermostat On Off Mode Thermostat Low High Mode Manual You are in control OPERATING IN MANUAL MODE TO START Step 1 Press the START tou...

Page 25: ...ached the stove will automatically go into the low heat 1 cycle When the temperature in the room drops to the level set at the thermostat the stove will again cycle to the HIGH 2 3 or 4 preselected set ting For optimum heat transfer the FAN setting should be set at LOW or MEDIUM The appliance will run the FAN at HIGH speed when needed automatically TO SHUT DOWN To turn off the appliance press the ...

Page 26: ...y turn the stove off HI MED LOW FAN SPEED OFF FAN SPEED AUGER CYCLE FINE TUNE ADJUSTMENTS 1 4 FAN Increase Decrease Understanding the Control TRIM POTS Fine Tune Adjustments Factory Settings DO NOT ADJUST unless necessary or directed so by Hearth Home Technologies Customer Service FUEL FEED rates at the Lowest number 1 and highest number 4 settings can be adjusted by adjusting the fine tune trim p...

Page 27: ...o solid on LOW setting The AUGER CYCLE LED will go solid for 3 sec onds indicating signal being sent to auger motor 2 Place a small amount of a solid fuel fire starter such as those made from sawdust and wax or use wood shavings in the bottom of the burn grate Add a small handful of pellets to the starter material Add a small amount of fire starter over the pellets CAUTION DO NOT USE ANY FLAMMABLE...

Page 28: ...o run on HIGH for 10 minutes before you begin to make adjustments AUGER CYCLE indicator should be lit ON for 3 seconds and OFF for 3 5 seconds Adjust the AIR INLET DAMPER This will have to be set as the factory can not send the units out with the damper pre set This is done to accommodate a wide range of installations elevations and fuel type and quality Slide the damper closed pushed in all the w...

Page 29: ...ll heat output and visa versa Pellet feed rate at the same fuel settings may vary greatly from brand to brand and may vary somewhat from batch to batch within the same brand FINES FINES in pellets are pieces of sawdust that were not properly formed or are the results of pellets breaking down from handling transporting and or storage Fines adversely affect the operations and heat production of a pe...

Page 30: ...eason unless properly stored If you do decide to carry it over make sure to check the corn for proper moisture content FACTORS EFFECTING FEED RATES Generally the smaller and cleaner free from fine dust and debris the corn is the faster it will feed at a given setting and visa versa The extremes in corn size moisture and quality can cause several hours difference in burning time for a hopper full o...

Page 31: ...st system requires cleaning The air inlet damper requires adjustment To Clean Cold Stove Only Open door remove the burn grate knock out any debris It may be necessary to scrape the holes clean Clean between the Burn Grate and Burn Pot as well BURN POT A COLD STOVE ONLY Remove the burn grate Clean out the burn pot area of all debris CAUTION When replacing the grate make sure it fits prop erly in th...

Page 32: ...y be removed to have frayed broken or compacted gaskets replaced EXHAUST VENTING Soot and Fly Ash Formation and Need for Removal The by products of com bustion contain small particles of fly ash Fly ash will collect in the exhaust venting system and restrict the flow of flue gases Incomplete combustion such as during startup shutdown or incorrect operation of the room heater will lead to some sort...

Page 33: ...ttom edges GLASS CLEANING We recommend using a high quality fireplace or stove glass cleaner or a vinegar and water solution along with a rag Oven cleaner and window cleaners will leave a film on the glass that will attract smoke and creosote like a magnet Should a build up of creosote or carbon accumulate you may wish to use 000 steel wool and water to clean glass Ceramic is very hard and will no...

Page 34: ...perating feed auger motor The motor only runs for 3 seconds at a time When did the stove stopping feeding During the last use or when you went to start this time Last use Check for possible jam clean out drop chute area Trouble Shooting Yearly Maintenance Proper cleaning maintenance and the use of clean dry quality fuel will prevent the more common stove operational problems However when your stov...

Page 35: ...pect burn grate Remove all ash and clinkers Ensure air holes are free of debris or build up 3 Igniter is not glowing Remove burn grate close door and re start the appliance If the igniter does not glow red inside the tube it is defective Remove back panel and confirm wire connections and condition of wires If igniter is defective the stove can be started manually See manual lighting instructions 4...

Page 36: ... elements Smoke or smoke smell spillage 1 Exhaust System Hi Heat RTV silicone all joints even manufactured Ensure venting is gas tight Inspect exhaust fan and gasket area ensure a tight fit Proper maintenance and cleaning 2 Over Feeding Fuel over filling burn grate Check air inlet damper for proper setting Adjust feed rate to lower level The stove keeps going out 1 Fresh unburned fuel or powder li...

Page 37: ...inute Safety Delay mode F125 FAN LIMIT SWITCH Your pellet appliance has a convection fan control limit switch The room air fan s F125 temperature limit snap switch automatically sets the fan on high when your stove is producing heat fast than the fan is carrying it into the room This may occur when the heat control lever is set at 3 or 4 and the FAN SPEED is set to a very low or off setting After ...

Page 38: ...38 7081 148H www pelprostoves com Trouble Shooting F125 F125 Molex 9 Pin Connector Vacuum Switch Hopper Safety Switch F125 ...

Page 39: ...asket Combustion Fan 1 8 KS 5020 1052 Convection Fan w gasket KS 5060 1180 Gasket Convection Fan 1 8 KS 5040 1101 Control Board AcuTron 4 KS 5050 1130 Firebrick KS 5060 1160 Gasket Door 5 8 Dia X 60 long KS 5060 1150 Gasket Window Tape KS 5060 1200 Gasket Ash Pan KS 5060 1190 Gasket Exhaust KS 5070 1210 Glass Flat Stove Neo Ceramic KS 5030 1061 Igniter KS 5050 1140 1 piece Stainless Steel Brick Ho...

Page 40: ...tove NEITHER THE MANUFACTURER NOR THE SUPPLIERS TO THE PURCHASER ACCEPTS RESPON SIBILITY LEGAL OR OTHERWISE FOR THE INCIDENTAL OR CONSEQUENTIAL DAMAGE TO THE PROPERTY OR PERSONS RESULTING FROM THE USE OF THIS PRODUCT ANY WARRANTY IM PLIED BY LAW INCLUDING BUT NOT LIMITED TO IMPLIED WARRANTIES OF MERCHANT ABILITY OR FITNESS SHALL BE LIMITED TO ONE 1 YEAR FROM THE DATE OF ORIGINAL PUR CHASE WHETHER ...

Reviews: