background image

PelPro Cast Pellet Stove • 7093-600 • 07/13/16

pelprostoves.com

6

Installing 

Your 

Stove

Installing Your Stove

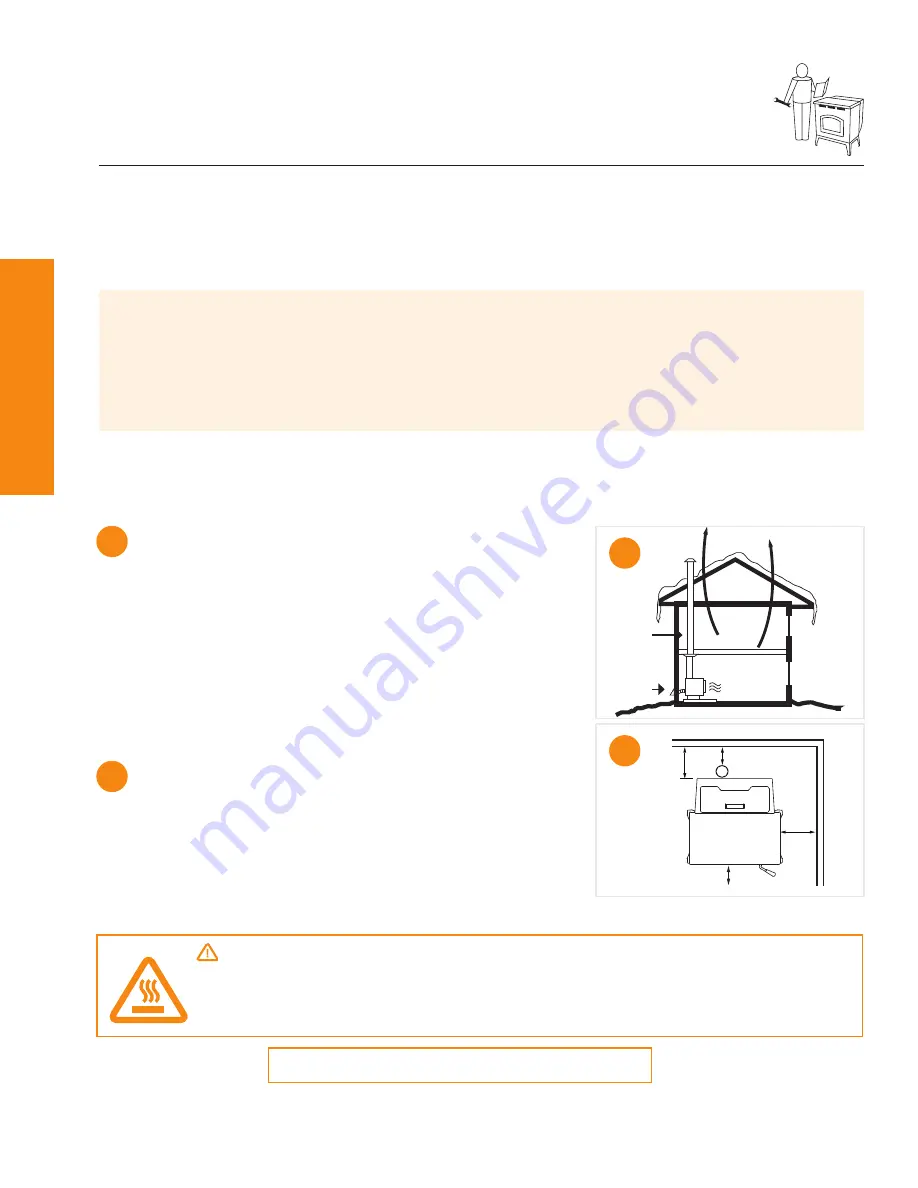
Your Home Acts Like a Chimney

We recommend that you help your home by:

1.  Using a minimum of 5 feet of vertical venting

2.  Use the supplied outside air kit

3.  Install your stove on a main floor location 

This will:

•  Help your stove breathe

•  Minimize smoke leakage in the house

•  Enhance performance

Clearance to Combustibles

The space between your stove and the items in 

your home that could burn. Materials such as:

•  Wood

•  Sheet rock (drywall)

•  Carpet

A

A

B

B

G

E

D

J

Pro Tip

We highly recommend your stove and pellet vent pipe be installed by a professional installer. Your 

retailer can make recommendations for you.

Installation MUST comply with local, regional, state and national codes and regulations.

Consult insurance carrier, local building inspector, fire officials or authorities having jurisdic-

tion over restrictions, installation inspection and permits.

1

2

3

     WARNING!

Asphyxiation Risk.  

DO NOT INSTALL IN A SLEEPING ROOM. Consumes oxygen in the room.

For Canada, the installation must conform to CAN/CSA-B365

Placement

Where you place your stove can significantly affect its performance and safety.

Getting Ready

Summary of Contents for PPC90

Page 1: ...sult in property damage bodily injury or even death Contact local building or fire officials about restrictions and installation inspection requirements in your area Note To obtain a French translation of this manual please contact your dealer or visit www pelprostoves com Pour obtenir une traduction francaise de ce manuel s il vous plait contracter votre revendeur ou visitez www pelprostoves com ...

Page 2: ...sting will be voided by the below actions DO NOT Install or operate damaged appliance Modify appliance Install other than as instructed by the manufacturer Operate the appliance without fully assembling all components Over fire burning at higher temperatures than recommended causing permanent damage to the stove Install any component not approved by the manufacturer Install parts or components not...

Page 3: ...your stove Venting your stove Using Your Stove 13 Starting your stove What to expect Comfort settings Turning your stove off Maintaining Your Stove 18 What you may need Where when and how Troubleshooting 22 Power related Blockage related Support 27 Contact information Ordering Parts Listings and Certifications 28 Mobile home approval Glass specification Efficiencies Stove dimensions Warranty ...

Page 4: ...ve from the pallet What s Included 1 2 Using a 3 8 wrench remove each bolt by reaching under your stove Tip your stove to opposite side and push bracket inward set stove down and repeat on other side Using a 7 16 wrench remove all four bolts attaching the shipping bracket to pallet Owner s manual Door handle Cleaning tool Power cord Pallet Removal Visit pelprostoves com or scan this code Outside a...

Page 5: ...pe L or PL vent Use 4 diameter vent if flue height is over 15 or if installation is over 3 000 ft above sea level Floor Protection Non combustible material such as a hearth pad is required underneath your stove Surge Protector Protect the electrical components of your stove by using a surge protector Pellet Fuel Use only wood pellets in your stove For best performance use premium low ash pellets 1...

Page 6: ...ls such as Wood Sheet rock drywall Carpet A A B B G E D J Pro Tip We highly recommend your stove and pellet vent pipe be installed by a professional installer Your retailer can make recommendations for you Installation MUST comply with local regional state and national codes and regulations Consult insurance carrier local building inspector fire officials or authorities having jurisdic tion over r...

Page 7: ... maintained C C Installation Video Visit pelprostoves com or scan this code Pro Tip This unit can be installed with a 3 to 6 inch 76 152mm Top Vent Offset Adapter Kit The 3 to 6 inch 76 152mm Top Vent Offset Adapter are tested to use 24 gauge single wall flue connector or Listed double wall flue connector to Class A Listed metal chimneys or masonry chimneys meeting International Conference of Buil...

Page 8: ... a height of 15 feet above the meter regulator assembly Clearance to each side of center line extended above natural gas or propane meter regulator assembly or mechanical vent Notice Do NOT terminate vent In any location that will allow flue gases or soot from entering or staining the building In any location which could create a nuisance or hazard In any enclosed or semi enclosed area such as a c...

Page 9: ...tion Straight back against wall Inches mm F Walls to stove 3 76 2 B A C A Placing Your Stove Stove must be installed on a non combustible floor If needed place floor protection such as a hearth pad beneath the stove Move stove from pallet onto your non combustible surface Do not operate the stove while it sits on the pallet Hearth pad minimum requirements Notice Clearances may only be reduced by m...

Page 10: ...ut T Wall Thimble 6 in 152 mm Minimum Venting Your Stove CAUTION Take appropriate precautions to locate utilities within the wall and avoid contact WARNING Do not terminate venting in any enclosed or semi enclosed area such as a carport garage attic crawl space under a sun deck or porch narrow walkway or closely fenced area or any location that can build up a concentration of fumes such as a stair...

Page 11: ...t with any installation requiring more than two 90 elbows or more than 15 feet of venting Minimum Vertical Vent for One Elbow 0 5 10 15 20 0 5 10 15 20 Horizontal Run ft Minimum Vertical Rise ft Horizontal Run FT Minimum Vertical Vent for One Elbow 0 5 10 15 20 0 5 10 15 Minimum Vertical Rise ft Minimum Vertical Vent for Two Elbows Length of Horizontal Sections FT 0 5 10 15 20 25 0 2 4 6 8 10 12 M...

Page 12: ...ropriate fasteners Take a Break Inspect your work _____ Confirm clearances to combustibles are maintained _____ Pipe joints are secure and properly sealed _____ Outside air kit installed properly _____ Confirm termination clearances 6 B CAUTION Never draw outside combustion air from Wall floor or ceiling cavity Enclosed space such as an attic garage or crawl space Install pellet venting through wa...

Page 13: ...wood by products Depending on the source material it may have a high or low ash content Higher Ash Content Material Hardwoods with a high mineral content Fuel that contains bark Standard grade pellets or high ash pellets Lower Ash Content Material Most softwoods Fuels with low mineral content Most premium grade pellets Fuel Tips Pro Tip We recommend the use of Pellet Fuels Institute certified pell...

Page 14: ...lower will continue to run even after your stove has been shut down Pro Tips Odors and vapors are released during initial startup after purchase burning your stove on HI for 30 minutes will allow the paint to cure Open windows or doors for air circulation until burn off is complete During start up and normal operation your stove s front door must be closed Priming is only required the first time y...

Page 15: ... scan this code 1 Plug in your stove WARNING Shock hazard Plug directly into properly grounded 3 prong receptacle Do NOT route cord under or in front of appliance Recommend the use of a surge protector 3 3 1 1 2 2 4 4 2 2 3 3 Confirm three baffles inside firebox are secure placing the side baffles before the center Add some pellets to hopper and fully close lid Confirm firepot is properly position...

Page 16: ...rdless of room temperature Starting your stove from an empty hopper ROOM 68 SET 72 HEATING Pro Tip If your stove is turned to the off position and then back on even if by mistake your stove will go through the shutdown process approximately 15 minutes and restart Thermostat Your PelPro stove comes with a built in thermostat system that provides easy temperature adjustments An external thermostat i...

Page 17: ...e this wood heater in a manner inconsistent with operating instructions in this manual If the fire is too large lazy or producing black soot adjust trim down one level at a time and allow 15 minutes for stabilization before making another adjustment If your fire is too small and sometimes goes out when there are pellets in the hopper adjust the trim up one level at a time and allow 15 minutes for ...

Page 18: ...eaner non abrasive cloth Ash vacuum Dropcloth Gloves Safety glasses Cleaning tool Cleaning Maintenance Important Regular cleaning helps to assure optimal performance of your stove Please refer to page 29 to log your maintenance and cleaning Cleaning your stove Visit pelprostoves com or scan this code Phillips head screwdriver Maintaing your stove Visit pelprostoves com or scan this code ...

Page 19: ...a metal container with a tight fitting lid The closed container of ashes should be placed on a non combustible surface or on the ground well away from all combustible materials pending final disposal If the ashes are to be disposed of by burial in soil or otherwise locally dispersed they should be retained in the closed container until all embers have been thoroughly cooled WEEKLY AS NEEDED OR Doo...

Page 20: ...ss Avoid striking scratching or slamming glass Do NOT clean glass when hot Do NOT use abrasive cleaners Do NOT operate with glass cracked broken or scratched Maintaining Your Stove Pro Tip The type of fuel you are burning will dictate how often you have to clean your firepot If the fuel you are burning has a high dirt or ash content it may be necessary to clean the firepot more than once a day Poo...

Page 21: ... Kit Ensure there are no obstructions in the outside air kit cap Having Trouble Visit the Troubleshooting section of this manual 1 Zone 1 Zone 2 Zone 2 Zone 3 Zone 3 Zone Caution When wood pellets are burned at a low temperature they produces organic vapors which combine with moisture to form creosote vapors Creosote vapors condense in the relatively cool chimney flue of a newly started or a low t...

Page 22: ...ker Reset snap disc located between drop tube and hopper Zone 2 Visually inspect wires blowers and power cord for breaks or wear to find cause of possible short circuit Zone 2 Component i e blower fails to start or fails to turn off Check all connections and power plugs are secure Visually inspect wires blowers and power cord to find cause of possible short circuit Pro Tip Check passages to assure...

Page 23: ...ions 1 Zone 1 Zone 2 Zone 2 Zone 3 Zone 3 Zone Rumbling whistling noise during operation Confirm exhaust path is clean and clear Zone 3 Adjust air fuel ratio using trim adjustment dial See page 17 for trim adjustment instructions Stove will not light Confirm firepot holes are clean and clear Zone 1 Ignitor is getting hot glows orange Inspect stove body Zone 2 Confirm fuel is in hopper close lid se...

Page 24: ... automatic mode Determine if your room is experiencing varying temperatures due to repeated opening closing of doors or windows correct if necessary Examine stove body Zone 2 Inspect ambient probe and confirm that at least 2 is exposed outside of stove body Slow or smoky start up and or lazy flame Confirm exhaust path is clean and clear clean your firepot and behind your baffles inside your firebo...

Page 25: ...r 4 During the ignition sequence the load does not ignite The unit will auto matically retry once from the first failed attempt Fuel No fuel Hopper Empty Feed Jam Feed doesn t turn Feed motor disconnected or failed Firepot Firepot Dirty so fuel is not near ignition hole in the firepot Igniter No power Debris in the end of the igniter chamber Fill the hopper Inspect and clear jam in the feed tube I...

Page 26: ...ins on the date of purchase Retain your original receipt as proof of purchase The warranty period for covered components is as follows Additional terms and limitations apply See page 30 for complete warranty information Components Covered Warranty Period Parts only Labor not included Electrical 1 Year Steel Parts excluding firepot 5 Years All replacement parts are covered for remainder of original...

Page 27: ...g Your Stove and Troubleshooting sections in this manual Visit pelprostoves com to access Order replacement parts Installation videos Troubleshooting videos Use and care videos Manuals and more To contact a Consumer Care Specialist email us at Info_PelPro hearthnhome com or call 877 427 3316 Support ...

Page 28: ...or through holes provided at bottom of your cast legs on your stove Listings and Certifications WARNING Asphyxiation Risk DO NOT INSTALL IN A SLEEPING ROOM Your stove consumes oxygen in the room Note This installation must conform with local codes In the absence of local codes you must comply with ASTM E1509 12 ULC S627 00 UM 84 HUD WARNING It is critical to have a working smoke detector installed...

Page 29: ...lbs Approximate Fuel Wood pellets Shipping Weight 340 lbs Standard EPA Certification 2015 test method ASTM E2779 10 O T L Tested and Listed by Portland Oregon USA OMNI Test Laboratories Inc C US BTU input output will vary depending on the brand of fuel you use in your stove Heating capacity depends on climate zone structure layout insulation windows etc Stove Dimensions This manual describes the i...

Page 30: ...The warranty period for covered components is as follows Parts Service Returns HHT is proud to offer the best technical and sales support in the industry If you have any questions about how to operate your appliance or if you need service parts please visit PelProStoves com or call 1 877 427 3316 Warranty Exclusions Warranty does not cover damage or breakage due to misuse improper handling or modi...

Page 31: ...__ ______________________________________________________________________ ______________________________________________________________________ ______________________________________________________________________ ______________________________________________________________________ ______________________________________________________________________ __________________________________________...

Page 32: ...PelPro Cast Pellet Stove 7093 600 07 13 16 Hearth Home Technologies 7571 215th Street West Lakeville Minnesota 55044 ...

Reviews: