background image

VFD68 Variable Frequency Drives (230 or 460 VAC) 

32


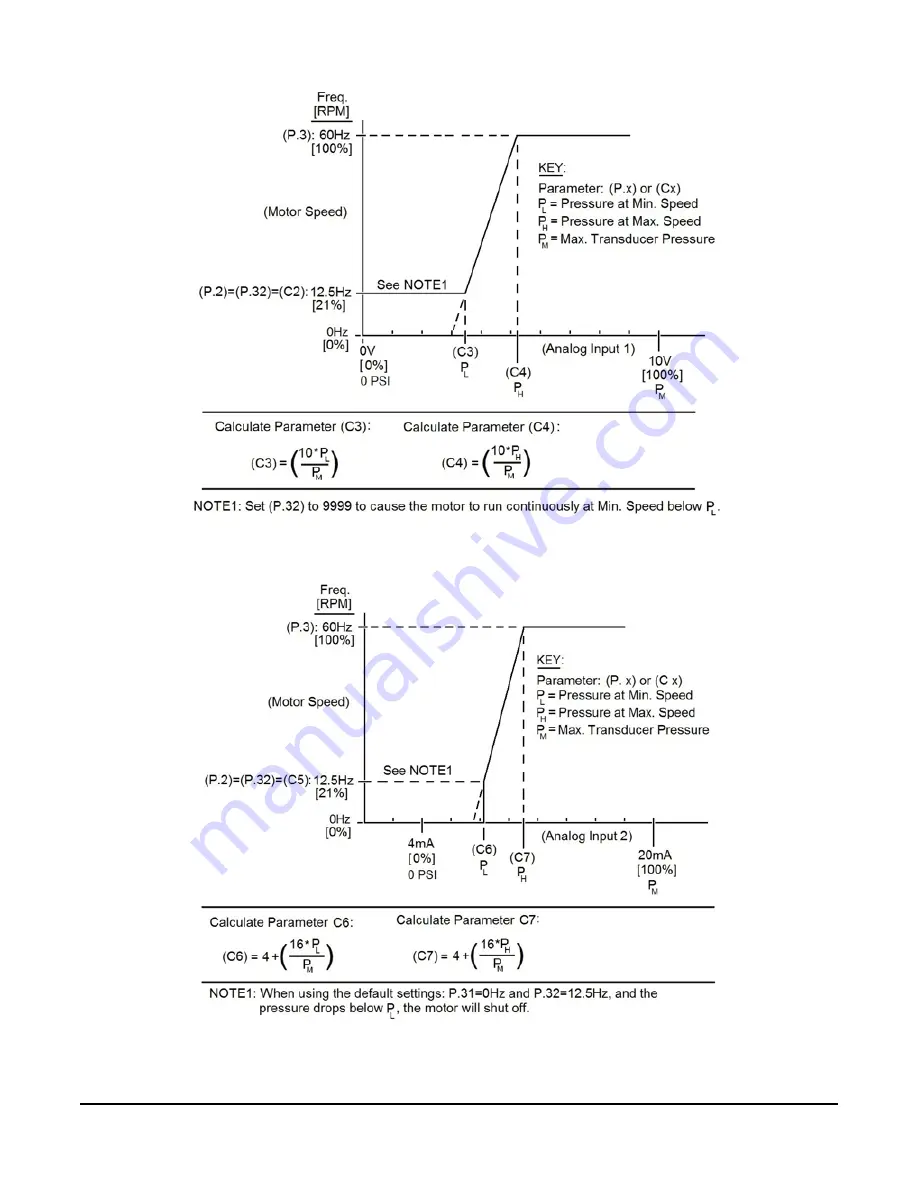
Figure 21: Applications Using 0

10 V Transducers

Figure 22: Applications Using 4

20 mA Transducers

Summary of Contents for VFD68BBB

Page 1: ...5 Dimensions 7 Mounting 8 Wiring 10 Precautions 11 Terminal Screw Torque Specifications 12 Branch Circuit Protection 12 Short Circuit Ratings 13 High Voltage Wire Size and Maximum Wire Length 14 Selec...

Page 2: ...requency Audible Motor Noise and EMI 33 Adjusting the Default Parameters 33 Enter the Parameter Adjustment Mode 33 Select and Change Most Parameters 33 Select and Change C Prefix Parameters 34 Exit th...

Page 3: ...ed equipment or other property additional precautions must be designed into the control system Incorporate and maintain other devices such as supervisory or alarm systems or safety or limit controls i...

Page 4: ...al Bulletin Part No 24 7664 3051 Table 1 VFD68 Drive Model Information Voltage kW Horsepower Dimensions H x W x D mm in B 200 240 VAC 50 60 Hz 0 1 1 8 128 x 68 x 81 5 x 2 11 16 x 3 3 16 C 400 480 VAC...

Page 5: ...5 to 2 times greater than the FLA current rating of the three phase motor IMPORTANT When selecting the motor do not exceed the maximum ampere rating of the VFD68 drive IMPORTANT Do not control both s...

Page 6: ...intended to be mounted in an enclosure that only allows access by trained and authorized personnel and that prevents the ingress of contamination It is designed for use in an environment classified a...

Page 7: ...5 61 VFD68BKL 150 5 91 138 5 43 220 8 66 208 8 19 155 6 10 VFD68BLL VFD68BMP 260 10 23 244 9 61 220 8 66 195 7 68 190 7 48 VFD68BNP Table 4 Three Phase 460 VAC Models mm in VFD Model H H1 W W1 D VFD6...

Page 8: ...ove the high voltage wiring cover at the bottom of the VFD68 drive Figure 4 Figure 3 Loosen the Cover Screws and Remove the Front Cover Cover Screws Cover Screw 1 1 2 2 Cover Latch FIG cvr_rmvl Figure...

Page 9: ...ble 5 Required Clearance Dimension 3 7 kW 5 HP or Less 5 5 7 5 kW 7 1 2 to 10 HP A 100 mm 4 in or more 100 mm 4 in or more B 10 mm 7 16 in or more 50 mm 2 in or more C Figure 5 Mounting the VFD68 Driv...

Page 10: ...d cause electric shock personal injury or death AVERTISSEMENT Risque de d charge lectrique Afin d viter tout risque de d charge lectrique attendre au moins 10 minutes apr s la d connexion de l aliment...

Page 11: ...inadequacy an earth ground fault due to wiring inadequacy or reduced motor insulation resistance Check the ground to earth insulation and phase to phase insulation of the VFD output side before applyi...

Page 12: ...e branch circuit protection in accordance with the National Electrical Code for the U S or the Canadian Electrical Code for Canada and any additional codes As specified UL Class T fuses or any faster...

Page 13: ...ximum allowable rating A 1 15 15 15 15 20 25 40 60 80 110 150 Table 9 VFD68Cxx Electrical Ratings 460 VAC kW HP 0 4 1 2 0 75 1 1 5 2 2 2 3 3 7 5 5 5 7 5 7 5 10 11 15 15 20 Rated fuse voltage V 480 V o...

Page 14: ...d regional regulations Table 11 230 VAC VFD68Bxx Drives Maximum Output Amperes and Wiring Sizes Part Number Rated Capacity kW HP Maximum Output Current Amperes Cable Wire Size AWG1 1 The recommended c...

Page 15: ...4 4 VFD68CMP 11 15 23 0 10 10 6 6 10 VFD68CNP 15 20 29 5 8 8 10 10 10 1 The recommended cable wire size is that of the cable THHW cable with a continuous maximum permissible temperature of 75 C 167 F...

Page 16: ...30 VAC drive rated for 1 49 kW 2 HP b The rating information plate Figure 1 on page 4 for that model indicates that the VFD66BGG drive has a voltage rating of 230 VAC and a maximum output rating of 7...

Page 17: ...ow voltage wiring Figure 8 2 Remove the high voltage wiring cover at the bottom of the VFD68 drive Figure 9 Figure 8 Loosen the Cover Screws and Remove the Front Cover Cover Screws Cover Screw 1 1 2 2...

Page 18: ...to high voltage output terminals U V and W on the drive Figure 10 5 Connect earth ground wiring to the earth ground terminals on the VFD68 drive and on the motor 6 Replace the high voltage wiring cove...

Page 19: ...output signal corresponding to output frequency RUN Open Collector Transistor Output VFD Running Switched low transistor conducts when the VFD output frequency is higher than the start frequency the...

Page 20: ...t N C During normal operation relay contacts B and C are connected maximum alarm load 230 VAC 0 3 A or 30 VDC 0 3 A C Relay Output C Relay output common 1 Gray cells indicate a terminal that is typica...

Page 21: ...djustment on page 25 and Parameter Settings Calculations for Motor Speed vs Pressure on page 31 for more information IMPORTANT Do not pull the wires out of the terminal block without pushing the orang...

Page 22: ...Parameters on page 33 For high pressure refrigerants other than R410a you must calculate and change the C x parameters For medium and low pressure refrigerants you must determine the proper P499R tran...

Page 23: ...plication with two transducers Figure 14 or Figure 15 use the parameter values in Table 17 and see Figure 17 on page 26 VFD68Bxx and VFD68Cxx Drive Basic and Advanced Parameters on page 27 and Adjusti...

Page 24: ...page 35 calculate and change the C x parameters based on the desired operating pressure range for the condensing fans on your application Table 18 Settings for Single 4 20 mA Transducer Setting Singl...

Page 25: ...or signals from one or two external analog input signal devices such as pressure transducers or analog controllers This is the typical mode of operation for the drive when it controls a condenser fan...

Page 26: ...operating amperes is displayed and are not lit when values other than frequency or amperes are displayed Monitor 4 digit LED Shows the frequency parameter number parameter values motor speed during op...

Page 27: ...common 0 400 Hz 20 Hz P 6 Low Speed The speed or frequency that the VFD68 output drives the attached motor when terminal RL is connected to terminal SD common 0 400 Hz 10 Hz P 7 Acceleration Time Defi...

Page 28: ...ost conditions causing a trip but not after thermal overload while the VFD operates runs 4 4 P 67 Number of Retries at Fault Occurrence The number of consecutive retries that will occur after a fault...

Page 29: ...the input signal type to be connected to terminal 4 Select 0 for 4 20 mA and position AI2 mode switch to I or select 1 for 0 5 V or 2 for 0 10 V and position AI2 mode switch to V 0 1 2 1 P 295 Magnitu...

Page 30: ...2 5 Hz C 3 Analog Input 1 Input voltage to start minimum speed ramp 0 300 1 90 V 38 C 4 Analog Input 1 Input voltage for setpoint where motor reaches maximum frequency or speed 0 300 2 74 V 54 8 C 5 A...

Page 31: ...for your application see the calculator on the Johnson Controls website at http www johnsoncontrols com content us en products building_efficiency products and systems commercial refrigeration commerc...

Page 32: ...VFD68 Variable Frequency Drives 230 or 460 VAC 32 Figure 21 Applications Using 0 10 V Transducers Figure 22 Applications Using 4 20 mA Transducers...

Page 33: ...eter setting mode The PRM LED illuminates Note See Table 19 on page 27 for information on the parameters Select and Change Most Parameters 5 Turn to select a parameter number on the display Example P...

Page 34: ...Adjustment Mode 16 Press twice to exit parameter setting mode PRM mode and enter manual operation mode PU mode The PU LED illuminates 17 Press twice to exit PU mode and enter EXT RUN mode for normal o...

Page 35: ...ccurs in the VFD the operation panel display changes to one of the status indications shown in Table 21 If the fault does not correspond to any of the faults in Table 21 or if you have any other probl...

Page 36: ...HOLD Operation panel lock Er1 to 4 Parameter write error LOCD Password locked Err VFD reset Warning OL Stall protection overcurrent oL Stall protection overvoltage RB Regenerative brake pre alarm not...

Page 37: ...c thermal O L relay function E FIN Heatsink overheat E ILF Input phase loss not used E OLT Stall prevention stop E BE Brake transistor alarm detection E GF Output side earth ground fault overcurrent a...

Page 38: ...reconnect the supply power to the drive If it is not easy to disconnect the supply power from the drive follow these steps 1 Disconnect the jumper between the SD and STF terminals on the low voltage t...

Page 39: ...otors required Inverter rated motors recommended Overload Capacity 150 of ampere rating for 1 minute Start Stop Use STF input to start or stop the motor Ambient Conditions Storage 40 to 65 C 40 to 149...

Reviews: