background image

10

www.PennBarry.com 

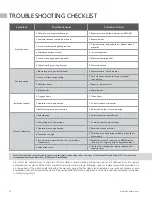
Symptom

Possible Cause(s)

Corrective Action

Excessive noise

1. Defective or loose motor bearings

1. Replace motor with same frame size, RPM,(HP)

2. Ventilator base not securely anchored

2. Reset properly

3. Loose or unbalanced wheel/propeller

3. Tighten screws, remove build-up, balance wheel/

propeller

4. Misaligned pulleys or shaft

4. correct alignment

5. Loose or damaged wheel/propeller

4. Replace wheel/propeller

6. Wheel running in wrong direction

6. Reverse direction

Fan inoperative

1. Blown fuse or open circuit breaker

1. Replace fuses or circuit breaker

2. Loose or disconnected wiring

2. Shut off power and check wiring for proper 

connections

3. Defective motor

3. Repair or replace motor

4. Broken belts

4. Replace belts

Insufficient airflow

1. Clogged filters

1. Clean filters

2. Operation in wrong direction

2. Correct rotation of propeller

3. Insufficient make-up air direction

3. Add make-up fan or louver opening

Motor overheating

1. Belt slippage

1. Adjust tension or replace belts

2. Overvoltage or under voltage

2. Contact power supply company

3. Operation in wrong direction

3. Reverse direction of motor

4. Fan speed too high

4. Slow down fan by opening variable pitch pulley on 

motor shaft

5. Incorrect motor (service factor 1.0, low ambient 

temperature)

5. Replace motor with correct open, NEMA service 

factors (1.15 or higher) with 40 degrees ambient

6. Undersized motor

6. Check motor ratings with catalog speed and air 

capacity chart

TROUBLESHOOTING CHECKLIST

Note: Care should be taken to follow all local electrical, safety and building codes. Provisions of the National Electric Code (NEC), as wells as the 

Occupational Safety and Health Act (OSHA) should be followed.

All motors are checked prior to shipment. If motor defects should develop, prompt service can be obtained from the nearest 

authorized service station of the motor manufacturer while under warranty. Exchange, repair or replacement will be provided on a 

no charge basis if the motor is defective within the warranty period. The PennBarry representative in your area will provide a name 

and address of an authorized service station if requested. WARNING: Motor guarantee is void unless overload protection is provided 

in motor wiring circuit.

Summary of Contents for Breezeway BC

Page 1: ...refully before attempting to assemble install operate or maintain the product described Protect yourself and others by observing all safety information Failure to comply with instructions could result...

Page 2: ...DUCTION 3 5 START UP AND OPERATION 6 7 MAINTENANCE 8 9 TROUBLESHOOTING CHECKLIST 10 11 WALL MOUNTING SLEEVE ASSEMBLY 12 WEATHERSHIELD ASSEMBLY 13 2 PIECE WALL MOUNTING SLEEVE WEATHER SHIELD GUARD ASSE...

Page 3: ...nents or finishes If the unit is scratched due to mishandling the protective coating may be damaged Incorrect lifting may damage the fan and void the warranty Storage Long term storage requires specia...

Page 4: ...mmends the use of guards on all exposed non ducted fans Installing the Panel Fan Wall openings must be square and must be a minimum of 1 2 greater than the outside dimension of the panel fan housing w...

Page 5: ...on adjustments Ground motor adequately and securely Protect power lines from sharp objects Do not kink power line or permit it to contact hot surfaces chemicals grease or oil Use only UL recognized el...

Page 6: ...oaches to the unit are free from obstruction To ensure maximum air movement make sure adequate supply air is available Before putting fan into operation complete the following check list a Turn off an...

Page 7: ...k rotating components for adequate clearance b Check proper belt tension and pulley alignment c Check installation and anchoring d Check fan bearings Switch on electrical supply and allow fan to reach...

Page 8: ...r c Under extreme temperature conditions and extremely dirty atmospheres lubrication should be at least once or twice a month Motor Lubrication In general standard motors are furnished with prelubrica...

Page 9: ...he fan for the first time completely inspect the ductwork and interior of the fan with power locked off to make certain there is no foreign material which can be sucked into or blown through the ductw...

Page 10: ...tage or under voltage 2 Contact power supply company 3 Operation in wrong direction 3 Reverse direction of motor 4 Fan speed too high 4 Slow down fan by opening variable pitch pulley on motor shaft 5...

Page 11: ...correctly Incorrectly sized shafts belts pulleys impellers etc can damage the fan Typical Parts List 1 Panel 2 Venturi Orifice 3 Fan Blade Cast Aluminum or Fabricated Steel 4 Ball Bearing Motor 5 Str...

Page 12: ...2 Parts List Item Quantity Description 1 4 Wall Sleeve Panel 2 1 4 20 X 3 4 Self Tapping Screw 3 1 4 20 X 3 4 Whiz Bolt 4 1 4 20 Whiz Nut NOTES 1 Make sure all bends are to the outside 2 Use caulk to...

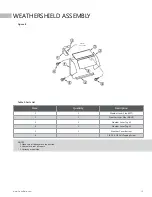
Page 13: ...ist Item Quantity Description 1 1 Weather Cover Side LEFT 2 1 Weather Cover Side RIGHT 3 1 Weather Cover Top 1 4 1 Weather Cover Top 2 5 1 Weather Cover Bottom 6 1 4 20 X 3 4 Self Tapping Screw NOTES...

Page 14: ...em Quantity Description 1 40 1 4 20 X 3 4 Self Tapping Screw 2 2 Screen Guard 3 5 3 8 16 X 1 Whiz Bolt 4 5 3 8 16 Whiz Nut 5 10 390 X 1 875 Diameter Washer NOTES 1 Equally space hardware connecting bo...

Page 15: ...t 5 5 5 3 8 16 Whiz Nut 6 10 10 390 X 1 875 Diameter Washer NOTES 1 Assemble the sheet metal parts first and then attach the screen second 2 Make sure that all bends are to the outside 3 Use caulk to...

Page 16: ...ual illustrates the appearance of PennBarry products at the time of publication View the latest updates on the PennBarry website 2018 PennBarry All Rights Reserved Revised AUGUST 2018 PennBarry is pro...

Reviews: