Operation & Maintenance Manual
Zephyr Ceiling/Wall Ventilating Fans Models ZL1 & ZL2
2
PENNBARRY
1401 North Plano Road, Richardson, Texas 75081
Phone: 972-234-3202
Fax: 972-497-0468
PREPARE THE FAN/LIGHT
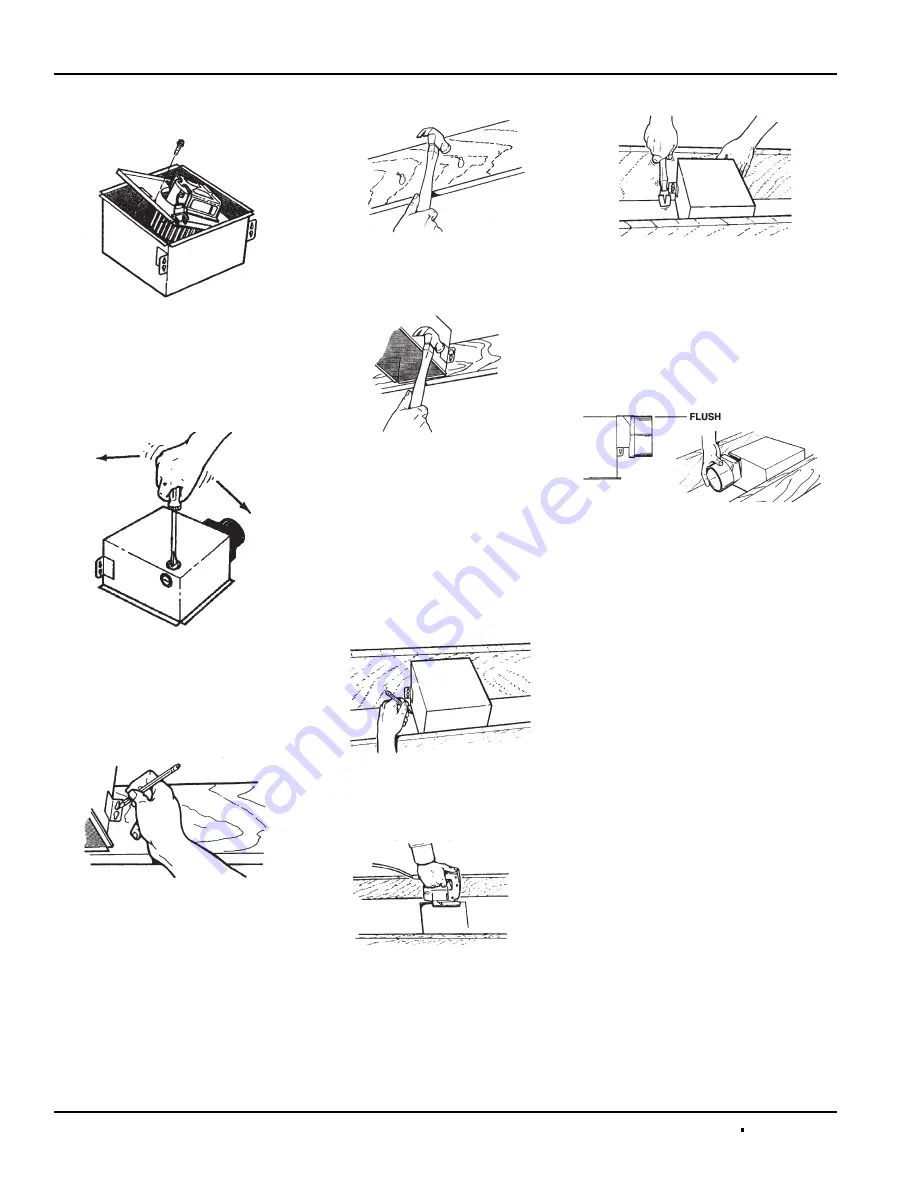
Figure 3
1. Unplug motor and remove the sheet
metal screw next to the receptacle.
Lift the fan assembly out of the
housing, being careful not to bend
blower wheel.
Figure 4
2. Choose either the top or side knock-
out. Remove knockout by bending it
back and forth to break tabs.
INSTALLATION OF THE FAN LIGHT
New Construction
Figure 5
1. Choose the location for your fan/
light in the ceiling. For best possible
performance, use the shortest
possible duct run and a minimum
number of elbows.
2. Position mounting brackets against
joist so that bottom edge of housing
will be flush with finished ceiling. A
handy measuring guide is embossed
on the housing to make this easy.
Mark the top keyhole slot on both
mounting brackets.
Figure 6
3. Set housing aside and drive nails
partially into joist at the top of both
keyhole marks.
Figure 7
4. Hang housing from nails and
pound nails tight. To ensure a
noise-free mount, pound another
nail through the lower hole of
each mounting bracket.
Existing Construction
1. Choose the location for your fan/
light in the ceiling. For best possible
performance, use the shortest
possible duct run and a minimum
number of elbows.
Figure 8
2. In attic, position mounting brackets
against joist. Trace outline of hous-
ing on ceiling material.
Figure 9
3. Set housing aside and cut ceiling
opening slightly larger than marked.
Figure 10
4. Place housing in opening so that its
bottom edge is flush with finished
ceiling. Nail to joist through top key-
hole on both sides. To ensure a
noise-free installation, drive another
nail through the lower hole of each
mounting bracket.
DUCT WORK
Figure 11
1. Snap the damper/duct connector
onto housing. Make sure that
tabs on the connector lock into
slots in housing. Top of damper/
duct connector should be flush
with top of housing.
2. Connect 4" round duct to
damper/duct connector and extend
duct to outside through a roof or wall
cap. Check damper to make sure
that it opens freely. Tape all duct
connections to make them secure
and air tight.


