9
9
2.
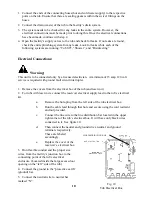
Connect the reservoir outlet pipe to the outlet adapter with the provided flex coupling and
tighten. Reference Figure 9.
3.
Connect the reservoir supply hose, from the reservoir plumbing assembly, to the water
line port at the back of the tub.
4.
Connect the overflow tee to the drain of the tub.
Water Supply Hose Connections:
1.
Locate one of the provided connecting hoses (packed with the tub) and connect the male
thread end to the hot water supply ball valve.
2.
Connect the male threaded end of the other provided connecting hose to the cold water
supply ball valve.
Anchoring the Tub/Reservoir:
Note:
These instructions for anchoring the tub are written with the assumption that the
installation is being done on a concrete floor. If this is not the case, the tub can be
anchored with simple lag screws (not provided). There are two anchoring holes for
anchoring the tub.
1.
Place the tub/reservoir in the final installation position. The reservoir should be against
the wall.
2.
Locate and mark (on the floor) the location of the tub anchoring points. (two 3/8”
diameter holes in the return flange located inside the large access doors on the tub) If
installing a tub with reservoir, there are also two anchoring points for the reservoir. These
are located in the return flanges just inside the access doors of the reservoir.
3.
Remove the tub and drill a 5/16” diameter x 1 1/2 inches deep hole in the floor at the
marked locations. A masonry drill will be required.
4.
Clean the drilled holes and clean the drilling dust from the area.
5.
Place the tub/reservoir back into position, over the anchoring holes.
6.
Insert the provided anchors through the flange and into the anchor holes just drilled.
7.
Tighten the nuts until the anchor locks the tub in position.
Water Supply and Drain Connections:
It is required that a licensed plumber make all plumbing connections. He can select
the best method of connection and if
Reduced Pressure Zone Backflow Preventers are
required.


