17
04 Mat Installation
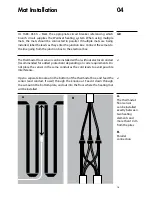
Unroll the Warmset mat to cover the space. It is important to check the layout
by test-
fi
tting the entire system. Con
fi
rm that there are no folds or large
ripples. (UL 1683, 65.3c – That the heating product shall not extend beyond
the room or area in which it originates.)
Once the system has been
fi
tted in place; it must be secured to the sub-
fl
oor .
Warmset mats should be secured to the
fl
oor using non-conductive, double-
sided building tape. If need be, stabilize your installation with staples or hot
glue. At no time should you ever staple the heating ribbon itself. This will
jeopardize the functionality of your system. Only the mesh should be stapled
or glued.
As the mats are being laid, it is important to ensure that they lie as
fl
at as
possible. This will help make a smooth surface for spreading mortar.
Do not completely cover the heating ribbon with tape.
Once the entire system has been
fi
tted and secured, test the resistance of the
system as outlined in part 2.3, and note it in the table located on page 28.
Connect the leads from the heating mats back to the electrical box or
junction box. The cold leads can be installed with or without electrical
conduit (recommended for added protection) depending on code re-
quirements. If conduit is required by code, install 1/2” (minimum) conduit
from the bottom plate up to the electrical box. For multiple power leads
(multiple mats) install 3/4” conduit.
Drill a 1/2” hole in the base plate directly below the electrical box, or if it
being used, junction box. Run the line from the mats through this hole up
to the junction box or electrical box.
4.4
4.5
>
>
4.6
4.7
>
Never cut the heating ribbon to make it
fi
t.
Doing so will cause the system to malfunction dangerously.
Caution


