
background image

2

Thank you for purchasing your
Hydromatic

®

pump. To help

ensure years of trouble-free 
operation, please read the 
following manual carefully.

Before Operation: 

Read the following instructions
carefully. Reasonable care and
safe methods should be practiced.
Check local codes and
requirements before installation.

Attention: 

This manual contains important
information for the safe use of
this product.  Read this manual
completely before using this
product and refer to it often for
continued safe product use.
DO NOT THROW AWAY OR
LOSE THIS MANUAL.  Keep it
in a safe place so that you may
refer to it often.

WARNING: Before handling
these pumps and controls,
always disconnect the power
first. Do not smoke or use 
sparkable electrical devices or
flames in a septic (gaseous) or
possible septic sump.

To reduce risk of electrical shock:

1.

Risk of Electrical Shock:

This pump has not been
investigated for use in 
swimming pool areas.

2.

Risk of Electrical Shock:

Connect only to a properly
grounded receptacle.

Septic tank is to be vented

in accordance with local
plumbing codes.

Do not smoke or use sparkable

electrical devices or flame in a
septic (gaseous) or possible
septic sump.

If a septic sump condition

exists and if entry into sump is
necessary, then (1) provide
proper safety precautions per
OSHA requirements and (2) 
do not enter sump until 
these precautions are strictly
adhered to.

Do not install pump in location

classified as hazardous per
N.E.C., ANSI/NFPA 70 - 2001.

Failure to heed above  cautions

could result in injury or death.

General
Information

Pump
Warning

NOTE: Some city regulations
do not allow installing a 
pump with plastic pipe. Check
local regulations.

5. In applications where the

pump may sit idle for months
at a time, it is recommended
that the pump(s) be cycled
every month to ensure the
pumping system is working
properly when needed.

6. Hydromatic check valve

should be installed in 
discharge pipe.

7. An audible alarm system for

high water conditions should
be installed in every pump for
greater protection, such as the
Q Alert for indoor use, rated
NEMA

I. For additional 

control panels contact your
Hydromatic distributor.

8. Connect to power source 

using 3-prong grounded AC
receptacle. Do not remove
ground pin from electrical
plug. Do not use an 
extension cord.

9. Use pump partially or

completely submerged for
pumping waterlike liquids
(temperature to 140° F). The
SP50 will pump solid materials
up to 1-1⁄2" (spherical) in
diameter. This pump has not
been investigated for use in
swimming pool areas.

10.

Caution: 

Do not pump

flammable liquids, strong
chemicals or salt water.

Installation
Instructions

These important instructions must
be followed for satisfactory 
performance of your pump.
Before installation, check 
your local electrical and 
plumbing codes.

1. Provide proper sump.

Recommended minimum sump
diameter is 18".

2. Make sure sump is free of

string, cloth, nails, gravel, etc.
before installing pump.

3. Do not set pump directly on

the bottom of sump if it is not
solid. Raise the pump by using
bricks or concrete blocks
underneath it.

4. Use steel or plastic pipe for all

connecting lines between
pump and sewer outlet.

Summary of Contents for HYDROMATIC SP50

Page 1: ...SP50 SP50AB Now Includes SP50AB Information NOTE To the installer Please make sure you provide this manual to the owner of the pumping equipment or to the responsible party who maintains the system Pump Installation and Service Manual ...

Page 2: ...ilure to heed above cautions could result in injury or death General Information Pump Warning NOTE Some city regulations do not allow installing a pump with plastic pipe Check local regulations 5 In applications where the pump may sit idle for months at a time it is recommended that the pump s be cycled every month to ensure the pumping system is working properly when needed 6 Hydromatic check val...

Page 3: ...3 Pump Installation ...
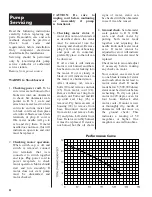
Page 4: ...e plug 12 from top of housing and pour oil in container preferably glass so that oil can be observed If oil is clear it will indicate motor is not burned and there has been no water leaking into the motor If oil is cloudy or black it will indicate water in the motor or a burned stator After draining oil remove bolts 10 and remove cord nut 25 from motor cord 21 Remove rubber seal ring from around c...

Page 5: ... sure it is not chipped Inspect seal after shaft is in place If seal has been chipped it must be replaced Do not replace rotating part of seal until the balance of the pump is assembled 7 Bearings When the pump rotor has been removed check bearings before replacing If bearings are rusted or rough when turned they must be replaced Pull bearings with a bearing puller If puller cannot be replaced ove...

Page 6: ...dy for check run before air testing and filling with oil Plug cord 21 into power receptacle and push up on switch chamber diaphragm 23 to start motor Motor should start and run smoothly When pressure is released on diaphragm motor should stop Repeat operation 2 to 3 times to be sure operation is satisfactory and not binding 9 Air test To air test unit put air fitting in plug opening 12 and charge ...

Page 7: ...36 2 Motor Housing 1 25 75 005 1 Cord Nut 1 26 139 014 1 Ring Seal 1 27 6000 053 1 Ground Wire 1 28 6000 061 1 Black Wire 2 1 60 000 5 Handle Pump 1 3 77 003 1 O Ring Sq cut 1 4 202 000 2 Volute 1 5 203 000 2 Bottom Plate 1 6 614 001 2 Impeller 1 7 19109A070 Jam Nut 1 9 14525A010 Seal Assy 1 10 19100A012 Screw 4 11 24709110000 Oil Paraffinic 1 12 14981 001 1 Plug Pipe 1 4 1 13 19099A029 Screw 1 4 ...

Page 8: ...9A029 Screw 1 4 20 2 14 15 30 021 1 Screw 1 16 5502 005 1 Bracket Switch 1 17 208 010 2 Flange Discharge 1 18 324 001 1 Gasket Discharge Flange 1 19 19103A052 Bolt 2 20 13349 000 1 Motor 115 V single phase 1 21 14623 020 1 Power Cord 20 1 22 13425 069 1 Nameplate 1 23 14974 309 5 Switch Pressure Ass y Pg 1 24 56 013 2 Motor Housing 1 25 75 007 1 Cord Nut 1 26 139 014 1 Ring Seal 1 22 12 1 24 20 3 ...

Page 9: ..._____________ ______________________________________________ ______________________________________________ ______________________________________________ ______________________________________________ ______________________________________________ ______________________________________________ ______________________________________________ ______________________________________________ __________...

Page 10: ..._____________ ______________________________________________ ______________________________________________ ______________________________________________ ______________________________________________ ______________________________________________ ______________________________________________ ______________________________________________ ______________________________________________ __________...

Page 11: ..._____________ ______________________________________________ ______________________________________________ ______________________________________________ ______________________________________________ ______________________________________________ ______________________________________________ ______________________________________________ ______________________________________________ __________...

Page 12: ...disposition Any transportation charges involved in such disposition shall be for the Buyer s account The Buyer s exclusive and sole remedy on account or in respect of the furnishing of material that does not conform to this contract or to this written warranty shall be to secure replacement thereof as aforesaid Hydromatic shall not in any event be liable for the cost of any labor expended on any s...

Reviews: