background image

Fairbanks Nijhuis™

11/19/18

Models 1810, 1820, 1840 Split-Case Pumps
Repair Parts Index, Instruction And Repair Manual

35

Models 1810, 1820, 1840 Instruction & Repair Manual   


   35 

______________________________________________________________________________________________ 


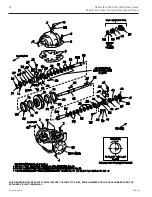
Figure 5.  Model 1810 Exploded View. 


WHEN ORDERING SPARE PARTS ALWAYS INCLUDE THE PUMP TYPE, SIZE, SERIAL NUMBER AND THE PIECE NUMBER FROM THE 

EXPLODED VIEW IN THIS MANUAL. 


(AS VIEWED FROM INBOARD END)

ROTATION

CURVE OF IMPELLER

BLADE

21

12

48

25

26

27

43

10

41

66

78

78

59

28

42
44

47

45

46

18
19

20

22

23

52

23

56

64†

62

9

63

58

24

65

28

66

57†

56

23

52

21
39 10

27

26

25

37

18

19

20

2

1

22

36

35A*

35

38

34

32

12

29

31

76

77

23

68

67

69

2

68

78

61

78

7

8

2

70

71

6

OMITTED WHEN

MECHANICAL SEAL

IS USED

SINGLE SEAL

COLLAR

SEAL COMPONENTS

55

54

53

50

49

SUCTION

OUTBOARD

GROUP

INBOARD

GROUP

DISCHARGE

  PC. NO. 7 NOT REQUIRED FOR PS #1 & #2. REFER PC. NO. 68.

     PC. NO. 68  FOR PS #1 & #2 ONLY. FOR OTHER PS REFER PC. NO. 7.

* POWER FRAMES 6B, 7A & 7 ONLY.

  PC. NO. 7 NOT REQUIRED FOR PS #1 & #2. REFER PC. NO. 68.

     PC. NO. 68  FOR PS #1 & #2 ONLY. FOR OTHER PS REFER PC. NO. 7.

 †  FOR 10x12x18D, SHAFT SLEEVE CONSISTS OF PC. NO. 79, PC. NO. 60, PC. NO. 64 AND PC. NO. 72.

* POWER FRAMES 6B


Summary of Contents for 1800 Series

Page 1: ...taller Please make sure you provide this manual to the owner of the equip ment or to the responsible party who maintains the system Part FM 03 523 2018 Pentair plc 11 19 18 Model 1800 FAIRBANKSNIJHUIS REPAIR PARTS INDEX INSTRUCTION AND REPAIR MANUAL SPLIT CASE PUMPS ...

Page 2: ... 14 15 1810 1820 1840 5A 6 x 8 x 14HH 16 17 1810 1820 1840 5 6 x 8 x 15 6 x 8 x 18A B C 6 x 8 x 20 8 x 10 x 12 12A 8 x 10 x 15A B 8 x 10 x 17B 18 19 1810 1820 1840 6B 8 x 10 x 21 8 x 10 x 21A 10 x 12 x 12B 10 x 12 x B C 10 x 12 x 18 20 21 1810 1820 1840 7A 10 x 12 x 18D 22 1810 1820 1840 7 12 x 14 x 15B 12 x 14 x 18A 14 x 16 x 18 23 Split Case Model Designations 1810 Vertical Flexible Shaft 1820 H...

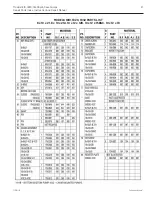
Page 3: ...lit Case Pumps Repair Parts Index Instruction And Repair Manual 3 MODEL 1820 PIECE NUMBERS Models 1810 1820 1840 Repair Parts Index 3 ______________________________________________________________________________________________ MODEL 1820 PIECE NUMBERS ...

Page 4: ...lit Case Pumps Repair Parts Index Instruction And Repair Manual 4 MODEL 1810 PIECE NUMBERS 4 Models 1810 1820 1840 Repair Parts Index ______________________________________________________________________________________________ MODEL 1810 PIECE NUMBERS ...

Page 5: ...lit Case Pumps Repair Parts Index Instruction And Repair Manual 5 MODEL 1840 PIECE NUMBERS Models 1810 1820 1840 Repair Parts Index 5 ______________________________________________________________________________________________ MODEL 1840 PIECE NUMBERS ...

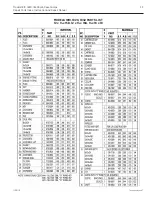
Page 6: ...pair Manual 6 MODELS 1810 1820 1840 PARTS LIST 2 X 2 1 2 X 9 2 X 2 1 2 X 10 2 X 2 1 2 X 12 6 Models 1810 1820 1840 Repair Parts Index ______________________________________________________________________________________________ MODELS 1810 1820 1840 PARTS LIST 2 X 2 1 2 X 9 2 X 2 1 2 X 10 2 X 2 1 2 X 12 ...

Page 7: ...pair Manual 7 MODELS 1810 1820 1840 PARTS LIST 2 X 2 1 2 X 9 2 X 2 1 2 X 10 2 X 2 1 2 X 12 Models 1810 1820 1840 Repair Parts Index 7 ______________________________________________________________________________________________ MODELS 1810 1820 1840 PARTS LIST 2 X 2 1 2 X 9 2 X 2 1 2 X 10 2 X 2 1 2 X 12 ...

Page 8: ...0 1820 1840 PARTS LIST 2 1 2 X 3 X 10B 2 1 2 X 3 X 12 3 X 4 X 10B C 3 x 4 x 14 4 x 5 x 10B 8 Models 1810 1820 1840 Repair Parts Index ______________________________________________________________________________________________ MODELS 1810 1820 1840 PARTS LIST 2 1 2 X 3 X 10B 2 1 2 X 3 X 12 3 X 4 X 10B C 3 x 4 x 14 4 x 5 x 10B ...

Page 9: ...0 1820 1840 PARTS LIST 2 1 2 X 3 X 10B 2 1 2 X 3 X 12 3 X 4 X 10B C 3 x 4 x 14 4 x 5 x 10B Models 1810 1820 1840 Repair Parts Index 9 ______________________________________________________________________________________________ MODELS 1810 1820 1840 PARTS LIST 2 1 2 X 3 X 10B 2 1 2 X 3 X 12 3 X 4 X 10B C 3 x 4 x 14 4 x 5 x 10B ...

Page 10: ...Instruction And Repair Manual 10 MODELS 1810 1820 1840 PARTS LIST 4 x 5 x 11A C 4 x 5 x 15 10 Models 1810 1820 1840 Repair Parts Index ______________________________________________________________________________________________ MODELS 1810 1820 1840 PARTS LIST 4 x 5 x 11A C 4 x 5 x 15 ...

Page 11: ...Instruction And Repair Manual 11 MODELS 1810 1820 1840 PARTS LIST 4 x 5 x 11A C 4 x 5 x 15 Models 1810 1820 1840 Repair Parts Index 11 ______________________________________________________________________________________________ MODELS 1810 1820 1840 PARTS LIST 4 x 5 x 11A C 4 x 5 x 15 ...

Page 12: ...1820 1840 PARTS LIST 4 x 6 x 18B 5 x 6 x 11A C 5 x 6 x 15 5 x 6 x 7 6 x 8 x 11 8 x 8 x 11B 12 Models 1810 1820 1840 Repair Parts Index ______________________________________________________________________________________________ MODELS 1810 1820 1840 PARTS LIST 4 x 6 x 18B 5 x 6 x 11A C 5 x 6 x 15 5 x 6 x 7 6 x 8 x 11 8 x 8 x 11B ...

Page 13: ...820 1840 PARTS LIST 4 x 6 x 18B 5 x 6 x 11A C 5 x 6 x 15 5 x 6 x 17 6 x 8 x 11 8 x 8 x 11B Models 1810 1820 1840 Repair Parts Index 13 ______________________________________________________________________________________________ MODELS 1810 1820 1840 PARTS LIST 4 x 6 x 18B 5 x 6 x 11A C 5 x 6 x 15 5 x 6 x 17 6 x 8 x 11 8 x 8 x 11B ...

Page 14: ...Parts Index Instruction And Repair Manual 14 MODELS 1810 1820 1840 PARTS LIST 6 x 8 x 11HH 14 Models 1810 1820 1840 Repair Parts Index ______________________________________________________________________________________________ MODELS 1810 1820 1840 PARTS LIST 6 x 8 x 11HH ...

Page 15: ... Parts Index Instruction And Repair Manual 15 MODELS 1810 1820 1840 PARTS LIST 6 x 8 x 11H Models 1810 1820 1840 Repair Parts Index 15 ______________________________________________________________________________________________ MODELS 1810 1820 1840 PARTS LIST 6 x 8 x 11H ...

Page 16: ...Parts Index Instruction And Repair Manual 16 MODELS 1810 1820 1840 PARTS LIST 6 x 8 x 14HH 16 Models 1810 1820 1840 Repair Parts Index ______________________________________________________________________________________________ MODELS 1810 1820 1840 PARTS LIST 6 x 8 x 14HH ...

Page 17: ...Parts Index Instruction And Repair Manual 17 MODELS 1810 1820 1840 PARTS LIST 6 x 8 x 14HH Models 1810 1820 1840 Repair Parts Index 17 ______________________________________________________________________________________________ MODELS 1810 1820 1840 PARTS LIST 6 x 8 x 14HH ...

Page 18: ...RTS LIST 6 x 8 x 15 6 x 8 x 18A B C 6 x 8 x 20 8 x 10 x 12 12A 8 x 10 x 15A B 8 x 10 x 17B 18 Models 1810 1820 1840 Repair Parts Index ______________________________________________________________________________________________ MODELS 1810 1820 1840 PARTS LIST 6 x 8 x 15 6 x 8 x 18A B C 6 x 8 x 20 8 x 10 x 12 12A 8 x 10 x 15A B 8 x 10 x 17B ...

Page 19: ...RTS LIST 6 x 8 x 15 6 x 8 x 18A B C 6 x 8 x 20 8 x 10 x 12 12A 8 x 10 x 15A B 8 x 10 x 17B Models 1810 1820 1840 Repair Parts Index 19 ______________________________________________________________________________________________ MODELS 1810 1820 1840 PARTS LIST 6 x 8 x 15 6 x 8 x 18A B C 6 x 8 x 20 8 x 10 x 12 12A 8 x 10 x 15A B 8 x 10 x 17B ...

Page 20: ...0 1820 1840 PARTS LIST 8 x 10 x 21 8 x 10 x 21A 10 x 12 x 12B 10 x 12 x 15B C 10 x 12 x 18 20 Models 1810 1820 1840 Repair Parts Index ______________________________________________________________________________________________ MODELS 1810 1820 1840 PARTS LIST 8 x 10 x 21 8 x 10 x 21A 10 x 12 x 12B 10 x 12 x 15B C 10 x 12 x 18 ...

Page 21: ...0 1820 1840 PARTS LIST 8 x 10 x 21 8 x 10 x 21A 10 x 12 x 12B 10 x 12 x 15B C 10 x 12 x 18 Models 1810 1820 1840 Repair Parts Index 21 ______________________________________________________________________________________________ MODELS 1810 1820 1840 PARTS LIST 8 x 10 x 21 8 x 10 x 21A 10 x 12 x 12B 10 x 12 x 15B C 10 x 12 x 18 ...

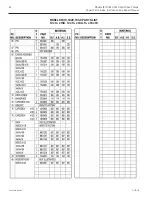
Page 22: ...arts Index Instruction And Repair Manual 22 MODELS 1810 1820 1840 PARTS LIST 10 x 12 x 18D 22 Models 1810 1820 1840 Repair Parts Index ______________________________________________________________________________________________ MODELS 1810 1820 1840 PARTS LIST 10 x 12 x 18D ...

Page 23: ...Repair Manual 23 MODELS 1810 1820 1840 PARTS LIST 12 x 14 x 15B 12 x 14 x 18A 14 x 16 x 18 Models 1810 1820 1840 Repair Parts Index 23 ______________________________________________________________________________________________ MODELS 1810 1820 1840 PARTS LIST 12 x 14 x 15B 12 x 14 x 18A 14 x 16 x 18 ...

Page 24: ...Repair Manual 24 MODELS 1810 1820 1840 PARTS LIST 12 x 14 x 15B 12 x 14 x 18A 14 x 16 x 18 24 Models 1810 1820 1840 Repair Parts Index ______________________________________________________________________________________________ MODELS 1810 1820 1840 PARTS LIST 12 x 14 x 15B 12 x 14 x 18A 14 x 16 x 18 ...

Page 25: ...hat could damage the bearings A thorough flushing of the old grease with the new grease is required to minimize this potential incompatibility Avoid using the following 1 grease of vegetable or animal base that can develop acids or 2 grease containing rosin graphite talc or other impurities Under no circumstances should grease be reused CAUTION Over lubrication should be avoided as it may result i...

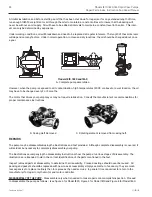
Page 26: ...manufacturer s recommendations for proper maintenance instructions B Casing Half Removed C Rotating element removed from casing half REPAIRS The pump may be disassembled using the illustrations and text provided Although complete disassembly is covered it will seldom be necessary to completely disassemble your pump The illustrations accompanying the disassembly instructions show the pump at variou...

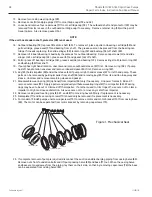
Page 27: ... it from outer end with a brass drift or similar non marring tool using a small hammer Models 1810 1820 1840 Instruction Repair Manual 27 ______________________________________________________________________________________________ 1 Break the electrical connections to motor or take other steps needed to prevent drive unit from being unintentionally energized during disassembly 2 Close such valve...

Page 28: ...d from casing halve 69 Figure 1 Mechanical Seal 28 Models 1810 1820 1840 Instruction Repair Manual ______________________________________________________________________________________________ 13 Remove two casing wearing rings 28 14 Remove zerks 10 and pipe plugs 12 from cartridge caps 32 and 42 15 Loosen and remove four capscrews 31 from cartridge cap 32 The outboard shaft end protector 29 may ...

Page 29: ... 1825 10 1822 10 1823 10 1824 15 31 32 7 12 1823 12 1824 14 1824 18 3 64 3 4 1823 4 1824 11 11 64 5 6 1823 6 1824 6 1825 8 1822 8 1823 8 1824 13 31 64 7A 10 1924D 18 51 64 Figure 2 Locating Shaft Sleeve on Shaft Right Hand Rotation Power Series Pump Size A Power Series Pump Size A Power Series Pump Size A 1 2 1823 2 1842 2 1825 8 15 64 4 4 1825 5 1822 5 1823 5 1824 6 1822 8 1821 11 59 64 5A 6 1823...

Page 30: ...e throughout the procedures by resting it against soft wood on the surface of workbench 30 Models 1810 1820 1840 Instruction Repair Manual ______________________________________________________________________________________________ DISSASSEMBY OF A PUMP WITH MECHANICAL SEALS 1 Perform disassembly procedure as previously given through step 8 2 Loosen and remove four nuts 18 and washers 19 thus fr...

Page 31: ...rings on the shaft in order shown in figure 1 for each half of double seal assembly 53 Models 1810 1820 1840 Instruction Repair Manual 31 ______________________________________________________________________________________________ H Shaft with sleeve and key in position CAUTION Impeller wearing ring must be given special care because they press fit Be sure rings are positioned squarely over the ...

Page 32: ...d in cartridge caps 14 Slide casing wearing rings 28 over impeller wearing rings 61 and set rotating elements into casing halves 69 Make certain the holes that are drilled in bottom of surface of casing wearing rings locate over pins 66 previously set in casing halve 69 Grease zerks or breather tube should face outward 15 Install key 24 in motor end of shaft 65 Check positioning and alignment of p...

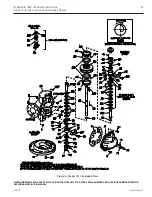
Page 33: ...ts See Figure 5 1 Plug 2 Plug 6 Capscrew 7 Capscrew 8 Casing 9 Gasket 10 Grease Fitting 12 Plug 18 Nut 19 Washer 20 Clamp 21 Gland Half 22 Swing Bolt 23 Packing 24 Key 25 Capscrew 26 Bearing Cap 27 Pin 28 Wearing Ring 29 Protector 31 Capscrew 32 Cartridge Cap 34 Gasket 35 Retaining Ring 35A Retaining Ring 36 Cartridge 37 Grease Seal 38 Bearing 39 Slinger 40 Slinger 41 Capscrew 42 Cartridge Cap 43 ...

Page 34: ...THIS MANUAL 6 71 70 2 8 7 25 10 21 23 52 23 56 57 58 49 50 53 55 54 9 26 27 36 35 32 34 38 29 31 12 35A 18 37 19 59 20 78 28 65 63 24 62 25 26 27 10 48 21 46 18 19 20 22 52 23 23 2 1 69 67 68 2 56 64 45 47 44 12 41 42 43 66 78 61 61 78 78 66 28 22 SINGLE SEAL COLLAR OMITTED WHEN MECHANICAL SEAL IS USED OUTBOARD SEAL COMPONENTS INBOARD AS VIEWED FROM INBOARD END ROTATION CURVE OF IMPELLER BLADE SUC...

Page 35: ...LADE 21 12 48 25 26 27 43 10 41 66 78 78 59 28 42 44 47 45 46 18 19 20 22 23 52 23 56 64 62 9 63 58 24 65 28 66 57 56 23 52 21 39 10 27 26 25 37 18 19 20 2 1 22 36 35A 35 38 34 32 12 29 31 76 77 23 68 67 69 2 68 78 61 78 7 8 2 70 71 6 OMITTED WHEN MECHANICAL SEAL IS USED SINGLE SEAL COLLAR SEAL COMPONENTS 55 54 53 50 49 SUCTION OUTBOARD GROUP INBOARD GROUP DISCHARGE PC NO 7 NOT REQUIRED FOR PS 1 2...

Page 36: ...R BLADE 21 12 48 25 26 27 43 10 41 66 78 78 59 28 42 44 47 45 46 18 19 20 22 23 52 23 56 64 62 9 63 58 24 65 28 66 57 56 23 52 21 39 10 27 26 25 37 18 19 20 2 1 22 36 35A 35 38 34 32 12 29 31 76 77 23 68 67 69 2 68 74 73 75 78 61 78 7 8 2 70 71 6 OMITTED WHEN MECHANICAL SEAL IS USED SINGLE SEAL COLLAR SEAL COMPONENTS 55 54 53 50 49 SUCTION OUTBOARD GROUP INBOARD GROUP DISCHARGE PC NO 7 NOT REQUIRE...

Page 37: ...THIS PAGE INTENTIONALLY LEFT BLANK ...

Page 38: ...THIS PAGE INTENTIONALLY LEFT BLANK ...

Page 39: ...THIS PAGE INTENTIONALLY LEFT BLANK ...

Page 40: ......

Reviews: