Firmly insert connector into the valve body. Press locking clip
into position. Make certain the clip is fully engaged.
To remove a clip:
1. Turn off water and release water pressure at the valve.
2. Push the water line connectors into the valve body. This will
help release O-rings that may have seated in place.
3. Remove the clip by inserting a flat blade under the top
center of the clip and lifting (prying up) (Figure 4 Connector
Assembly).
WARNING:
Do not use pliers to remove a clip. It is likely
the clip will break.
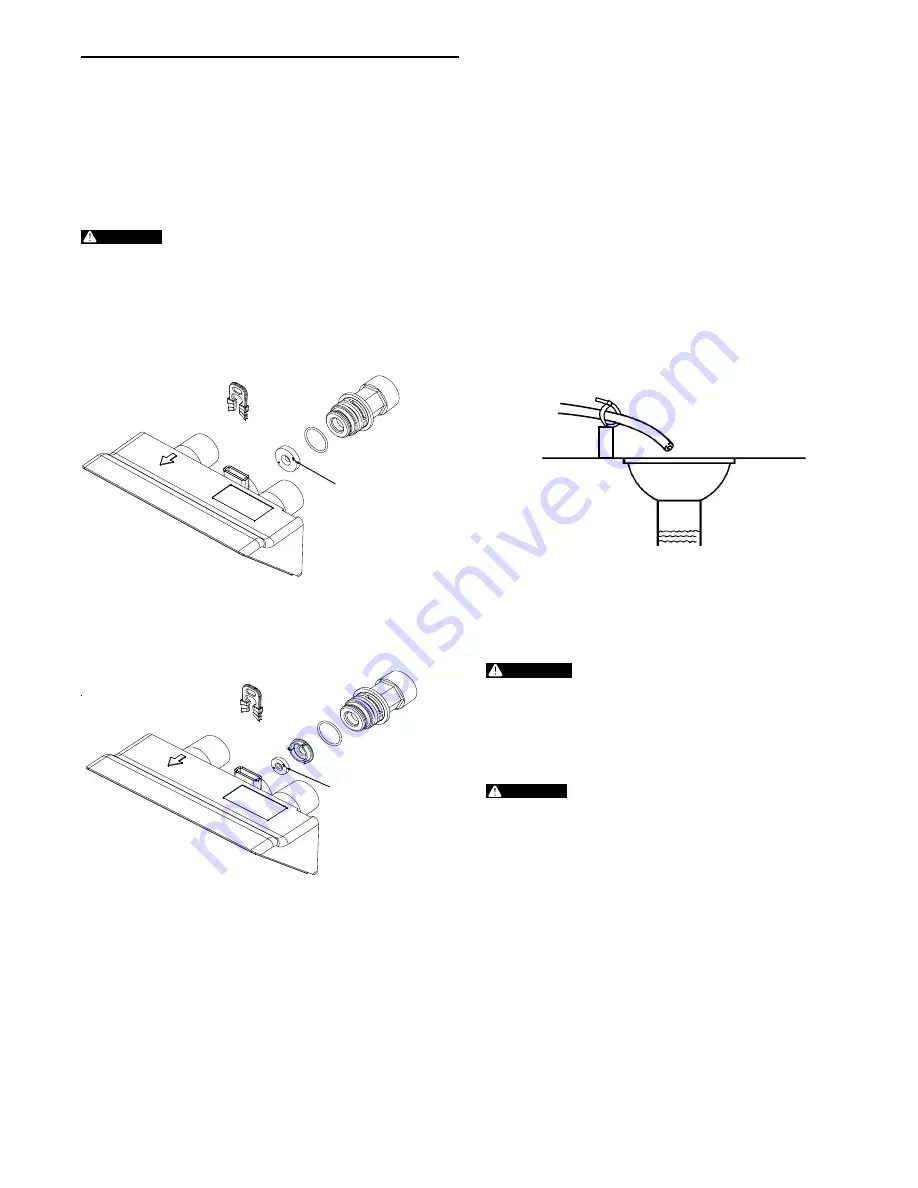
Drain Line Flow Control
The drain line flow control (DLFC) requires assembly
(Figures 4 and 5).
Install washer with printed
lettering facing the valve body.
1 Inch Drain Line Flow Control
Rates 8 - 20 GPM
Figure 5 - 1" Drain Line Flow Control
Install washer with printed
lettering facing the valve body.
3/4 Inch Drain Line Flow Control
Rates 4 - 7 GPM
Figure 6 - 3/4" Drain Line Flow Control
Note: Install DLFC washer with printed lettering facing the
valve body.
EQUIPMENT INSTALLATION
continued
Drain Line Connection
NOTE: Standard commercial practices are expressed here.
Local codes may require changes to the following
suggestions. Check with local authorities before
installing a system.
4. Use appropriate fittings to connect tubing to the DLFC
connection on valve.
5. The drain line may be elevated up to 6 feet (1.8 m) providing
the run does not exceed 15 feet (4.6 m) and water pressure
at the filter is not less than 40 psi (2.76 bar). Elevation can
increase by 2 feet (61 cm) for each additional 10 psi (.69 bar)
of water pressure at the drain connector.
6. Where the drain line is elevated but empties into a drain
below the level of the control valve, form a 7 inch (18 cm)
loop at the far end of the line so that the bottom of the loop
is level with the drain line connection. This will provide an
adequate siphon trap.
7. Secure the discharge end of the drain line to prevent it from
moving.
Right Way
Figure 7 Drain Line Connection
NOTE:
Waste connections or drain outlet shall be designed
and constructed to provide for connection to the
sanitary waste system through an air gap of two
pipe diameters or one inch (22 mm), whichever is
larger.
WARNING:
Never insert drain line directly into a drain,
sewer line, or trap (Figure 7 Drain Line
Connection). Always allow an air gap between
the drain line and the wastewater to prevent
the possibility of sewage being back-siphoned
into the filter.
Electrical Connection
WARNING:
This valve and control are for dry location use
only unless used with a Listed Class 2 power
supply suitable for outdoor use.
The 363 controller operates on 12-volt alternating current
power supply. This requires use of the an AC adapter with your
system.
Make sure power source matches the rating printed on the AC
adapter.
4002493 Rev A
4002492 Rev A
Autotrol
®
363 Demand Automatic Filter Valve • 5


