background image

7

IntelliFlo VS+ SVRS Installation and User’s Guide

Section 3

Operating IntelliFlo VS+ SVRS

This section describes how to operate the IntelliFlo VS+ SVRS pump using the control panel buttons and menu
features.

Starting the pump

To start the pump

1. Be sure the pump is powered on and the green power LED is on.

2. Select one of the speed buttons, then press the 

Start 

button (LED on) to start the pump.

Stopping the pump

To stop the pump

Press the 

Stop 

button to stop the pump.

Note: 

The pump can automatically restart if the communication cable is connected.

Servicing Equipment (Disconnect Power to Pump)

When servicing equipment (filters, heaters, chlorinators etc.), disconnect the communication cable,
and switch OFF circuit breaker to remove power from the pump

Operating the IntelliFlo VS+ pump at preset speeds

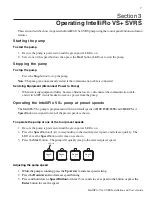
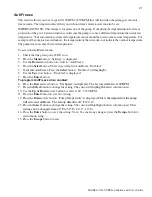
The IntelliFlo VS+ pump is programmed with four default speeds of 

1100

1500,


2350 

and 

3110

 RPM.  A

Speed

 button is assigned to each of the preset speeds as shown.

To operate the pump at one of the four preset speeds

1. Be sure the pump is powered on and the green power LED is on.

2. Press the 

Speed

 button (

1

4

)  corresponding to the desired preset speed, and release quickly.  The

LED above the 

Speed

 button will come on as shown.

3. Press the 

Start 

button.  The pump will quickly ramp to the selected preset speed.

Adjusting the pump speed

1.

While the pump is running, press the 

Up Arrow

 to increase speed setting.

2.

Press the 

Down Arrow

 to decrease speed Setting.

3.

Press and hold down a 

Speed Button

 for three (3) seconds to save speed to the button or press the

Enter

 button to save the speed.

Speed 

1

Speed 

2

Speed 

3

Speed 

4

LED lit

Summary of Contents for IntelliFlo VS+ SVRS

Page 1: ...NS Installation and User s Guide IntelliFlo VS SVRS Variable Speed Programmable Pump with Safety Vacuum Release System SVRS Protection Compatible with IntelliComm communication center EasyTouch IntelliTouch and SunTouch control systems AUTO HEATER SPA 100 F 95 F AIR 70 F MON 09 30 AM ...

Page 2: ...or other countries Teflon is a registered trademark of E I Du Pont De Nemours and Company Corporation Unless noted names and brands of others that may be used in this document are not used to indicate an affiliation or endorsement between the proprietors of these names and brands and Pentair Water Pool and Spa Inc Those names and brands may be the trademarks or registered trademarks of those parti...

Page 3: ...ttings Pump Address 10 Settings Set Time 10 Settings Set AM PM or 24 Clock 11 Settings Set Temperature Unit 11 Settings Screen Contrast Level 11 Settings Language 12 Settings Set Minimum Speed RPM 12 Settings Set Maximum Speed RPM 12 Settings SVRS Auto Restart 13 Settings Password 14 Password Protection 14 Settings Ramp Speed 15 External Control 17 Features Quick Clean 17 Programming for Constant ...

Page 4: ...Reassembly Seal Replacement 38 Shaft Seal Replacement 38 Drive Assembly Removal and Installation 39 Replacement Parts 40 Illustrated Parts List 40 IntelliFlo VS Flow and Power vs Flow Pump Curve 41 IntelliFlo VS Electrical Specifications 41 Section 6 Troubleshooting 43 IntelliFlo VS Pump Dimensions 41 Alerts and Warnings 43 Suction Blockage 43 SVRS Blockage 43 General IntelliFlo VS Troubleshooting...

Page 5: ...f a person comes in close proximity to an open pool or spa drain or a loose or broken drain cover or grate The IntelliFlo VS SVRS pump when installed according to the manufacturer s instructions is designed to help prevent injuries caused by body entrapment in pools This pump does not however protect against limb entrapments disembowelments when a person sits on a broken or uncovered pool drain or...

Page 6: ...rs that meet ASME ANSI A112 19 8 Suction Fittings for Use in Swimming Pools Wading Pools Spas and Hot Tubs and either i A safety vacuum release system SVRS meeting ASME ANSI A112 19 17 Manufactured Safety Vacuum Release Systems SVRS for Residential and Commercial Swimming Pool Spa Hot Tub and Wading Pool Suction Systems and or ASTM F2387 Standard Specification for Manufactured Safety Vacuum Releas...

Page 7: ...sciousness resulting in danger of drowning SVRS devices shall only be installed in conjunction with ASME A112 19 8 suction fitting or a 12 in x 12 in 305 mm x 305 mm drain grate or larger or an approved channel drain system at each suction outlet or drain outlet All SVRS devices shall be factory set or field adjusted to site specific hydraulic conditions Once installed the system shall be tested b...

Page 8: ...zed or installed or used in applications other than for which the pump was intended can result in severe personal injury or death These risks may include but not be limited to electric shock fire flooding suction entrapment or severe injury or property damage caused by a structural failure of the pump or other system component The use of alcohol drugs or medication can greatly increase the risk of...

Page 9: ...o its original integrity and has a maximum dimension of 18 feet 5 49m and a maximum wall height of 42 inches 1 07m For hot tubs and spa pumps do not install within an outer enclosure or beneath the skirt of a hot tub or spa unless so marked IntelliFlo VS SVRS is capable of generating systems pressures up to 50 psi Installers must ensure that all system components are rated to withstand at least 50...

Page 10: ...viii IntelliFloVS SVRS Installation and User s Guide Blank Page ...

Page 11: ...for additionalinformation This pump is intended to be used as part of a complete pool safety system It complies with theASME ANSIA112 19 17 2002 SVRS standard which defines how fast the pump must stop on a suction blockage event Thispumpmaynotprotectindividualsfromhairentrapment limbentrapmentorevisceration The operator must ensure that all suction and return fittings are clean and unobstructed wh...

Page 12: ...looded and elevated suction for pump with suction levels at pump strainer at 25 mercury Hg SVRS feature requires no special plumbing or electrical connections Features Adjusts to various pool sizes Prevents thermal overload Detects and prevents damage from under and over voltage conditions Protects against freezing Communicates with a Pentair EasyTouch IntelliTouch or SunTouch control system or In...

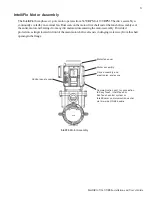
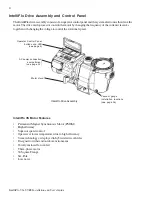
Page 13: ... seal the entire motor and bearings from any dirt and moisture entering the motor assembly For added protection aslingerlocatedinfrontofthemainmotorshaftsealassistsinslingingwaterawayfromtheshaft openingintheflange Drive assembly and electronics enclosure IntelliFlo Motor Assembly Motor fan cover Control panel cover Communication port for connection to EasyTouch IntelliTouch or SunTouch control sy...

Page 14: ...ntroltherotationalspeed IntelliFlo VS Motor Features Permanent Magnet Synchronous Motor PMSM Highefficiency Superior speed control Operates at lower temperatures due to high efficiency Same technology as deployed in hybrid electric vehicles Designed to withstand outdoor environment Totally enclosed fan cooled Three phase motor 56 Square Flange Six Pole Low noise Motor stand Operator Control Panel ...

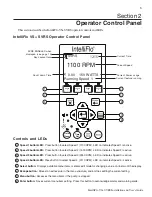
Page 15: ...t Speed 4 3110 RPM LED on indicates Speed 4 is active Select button Displays available menu items or enters edit mode for changing a value on line two of the display Escape button Moves to next level up in the menu structure and or stops editing the current setting Menu button Accesses the menu items if the pump is stopped Enter button Saves current menu item setting Press this button to acknowled...

Page 16: ...or in a mode to start automatically Reset button Reset alarm or alert LEDs On This green power LED is on when IntelliFlo VS is powered on Warning LED is on if a warning condition is present Alarm The green LED is on if an alarm condition occurs See Alerts and Warning on page 39 Control Panel LCD Line 1 Key icon indicates password protect mode is active If password protect is not enabled no key ico...

Page 17: ...uit breaker to remove power from the pump Operating the IntelliFlo VS pump at preset speeds The IntelliFlo VS pump is programmed with four default speeds of 1100 1500 2350 and 3110 RPM A Speed button is assigned to each of the preset speeds as shown To operate the pump at one of the four preset speeds 1 Be sure the pump is powered on and the green power LED is on 2 Press the Speed button 1 4 corre...

Page 18: ...ntil the next scheduled speed program 2 Egg Timer Duration Speeds 1 4 can be programmed to run for a duration of time once pressed This means that the Speed button is pressed and then the start button and the pump runs a programmed speed and the speed will turn off at the end of a preprogrammed amount of time Speeds 5 8 have no direct pump speed buttons and therefore cannot be programmed with an E...

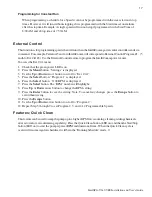
Page 19: ... Default 1100 RPM Speed Default 1500 RPM Program 2 page 17 FEATURES Quick Clean Set Speed 1100 3450 RPM Default 3450 RPM Time 1 min to 10 hrs Default 10 minutes Time Out Duration 1 min to 10 hrs Default 3 hours Time Out page 19 PRIMING DISABLED ENABLED 1 min to 30 min hrs Default 11 minutes MAX PRIMING TIME page 21 ANTI FREEZE Disabled Enabled Default Enabled Program 3 Speed Default 2350 RPM Speed...

Page 20: ...actory default setting is address 1 4 To change the pump address press the Select button The first digit 1 selected 5 Press Up or Down arrow button to change the address number from 1 16 6 Press the Enter button to save the setting To cancel any changes press the Escape button to exit edit mode without saving 7 Press the Escape button to exit Settings Set Time Use SetTime tosettheIntelliFloVS syst...

Page 21: ...on 2 Press the Menu button Settings is displayed 3 Press the Select button PumpAddress is displayed 4 Use the Up or Down arrow button to scroll to Temperature Units menu item The Factory default setting is F Fahrenheit 5 Press the Select button F is displayed 6 Press Up or Down arrow button to choose between Celsius C or Fahrenheit F 7 Press the Enter button to save the setting To cancel any chang...

Page 22: ...peed setting from 1100 to 1700 RPM 7 Press the Enter button to save the setting To cancel any changes press the Escape button to exit edit mode without saving 8 Press the Escape button to exit Settings Set Maximum Speed RPM The maximum speed can be set from 1900 RPM to 3450 RPM The default setting is 3450 This setting is usedtosetthemaximumrunningspeedofthepump WhenthepumpissettoPriming Enabled th...

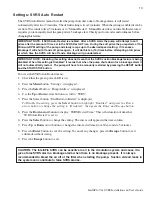
Page 23: ...m it will not automatically restart The pump will have to be manually restarted by pressing the RESET button and the START STOP button To access the SVRSAuto Restart menu 1 Check that the green power LED is on 2 Press the Menu button Settings is displayed 3 Press the Select button PumpAddress is displayed 4 Use the Up or Down arrow button to scroll to SVRS 5 Press the Select button EnabledAuto Res...

Page 24: ...and press up and down arrow to change password number to desired setting 15 Press the Enter button to save the setting To cancel any changes press the Escape button to exit edit mode without saving 16 Press the Escape button to exit Password Protection Password The default for this setting is disabled which means the pump does not have password protection When this feature is enabled for a preset ...

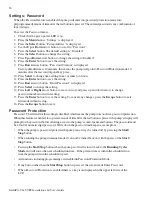
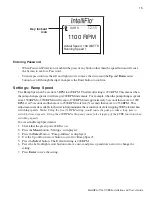
Page 25: ... and then move to 2300 RPM wait five 5 seconds then move to 2350 RPM This adjustmentismadeavailabletotheusertohelpminimizetheoccurrenceofafalsetrippingSVRSalarmwhen switching speeds Note Using the five 5 RPM setting would cause the pump to take a long time to switch between speeds Using the 400 RPM setting may cause false tripping of the SVRS function when switching speeds To access the Ramp Speed...

Page 26: ...fault setting is DISABLED To create a schedule for speed 5 8 Press Select to highlightDisabled 7 Use the Up or Down arrow button to scroll to Schedule 8 Press the Enter button 9 Press the Down arrow button Set speed will be displayed 10 Press the Select button to change the speed The first digit will highlight ones digit 11 Use the Up or Down arrow button to change the speed 12 Press the Enter but...

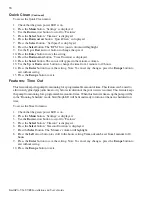
Page 27: ...ing Note To cancel any changes press the Escape button to exitwithoutsaving 10 Press the Escape button 11 Use the Up or Down arrow button to scroll to Program 2 12 Repeat Step 5 through 9 to set Program 2 3 and 4 12 Programmable Speeds Features Quick Clean This feature can be used to ramp the pump up to a higher RPM for vacuuming cleaning adding chemicals after a storm for extra skimming capabilit...

Page 28: ...on to exitwithoutsaving 15 Press the Escape button to exit Features Time Out This feature keeps the pump from running for a programmable amount of time This feature can be used to allow newly glued pipe joints time to dry before circulation of the pool water is resumed This feature keeps thepumpfromrunningforaprogrammableamountoftime Whenthisfeature stimeisupthepumpwillbe in the Running Schedule m...

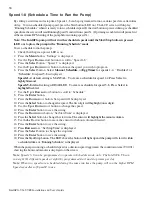
Page 29: ...t will try to restart after 10 minutes unlike the IntelliFlo which will not restart after a Priming Dry Alarm Primed Sensitivity The primed sensitivity can be set from 1 to 100 The factory default setting is 1 meaningthatthepumpisatitsmostsensitivesettinginregardstodeterminingifthepumphasattainedaprime or not Increasing this number will decrease the amount of flow needed for the pump to sense that...

Page 30: ...ity The default for this setting being 1 13 Press the Select button to change the setting The cursor will highlight the number 14 Use the up or Down arrow button to change the time from 1 to 100 Increasing the number makes the Priming less sensitive 15 Press Enter to save 16 Press the Down arrow button Screen will read Priming Delay The default for this setting is 20 seconds 17 Press the Select bu...

Page 31: ...Use the Down arrow button to scroll to AntiFreeze 4 Press the Select button The factory default isAntiFreeze Enabled 5 To disableAntiFreeze Press the Select button Enabled will highlight 6 Use the Up arrow button Disabled is displayed 7 Press the Enter button To program AntiFreeze when enabled 8 Press the Down arrow button Set Speed is displayed The factory default is 1100 RPM 9 Press the Select b...

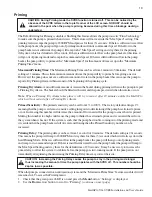
Page 32: ... filter and piping system The IntelliFlo VS pump is a variable speed pump Typically the lower speeds are used for filtration and heating The higher speeds can be used for spa jets water features and priming CAUTION Before starting this procedure first read the following Before removing the pump lid 1 Press the Stop button if the pump is running before proceeding 2 Disconnect the communication cabl...

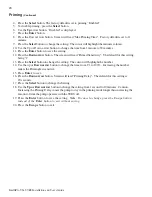
Page 33: ...pump 1 Turnthepumpclampandlidinacounterclockwisedirectionuntilit stopsandremovethem 2 Fillthepumpstrainerpotwithwater 3 Checkthesystemandensurewaterhasanopenpathforfreesystem flow 4 Reinstallthepumpclampandlidontothestrainerpot Thepumpisnow readytoprime 5 Makesureallelectricalconnectionsarecleanandtight 6 Opentheairreleasevalveonthefilter andstandclearofthefilter 7 Switch the IntelliFlo VS pump on...

Page 34: ...am number priority is as follows Example If programs 1 and 2 are activated program 2 will run regardlessoftheassignedspeed RPM Thehigherprogramnumber 2beinghigher willalwaystake priority ThefollowingtableshowsthewiringterminaldescriptionsforIntelliComm External Control r e b m u n l a n i m r e T e m a n l a n i m r e T e g a t l o V m u m i x a M t n e r r u c e p y t e s a h P y c n e u q e r F ...

Page 35: ...rtcommunicatingwiththeIntelliFloVSuntilthepumpisassignedtoacircuit The IntelliFloVS default pump address is one which is the only address that works with EasyTouch See page 10 for details about how to check the pump address and change if necessary For more information refer to the EasyTouch User s Guide P N 520584 ToconnecttheIntelliFloVScommunicationcabletoEasyTouchloadcenter 1 CAUTION Switch the...

Page 36: ...nect pin 6 green to EasyTouch screw terminal pin 2 green IntelliFloVS Connectpin7 yellow toEasyTouchscrewterminalpin3 yellow 9 Insert the screw terminal onto the EasyTouch COMPORT J20 board connector Note Multiple wires may be inserted into a single screw terminal Pin configuration EasyTouch J20 screw terminal h c u o T y s a E l a n i m r e t w e r c s r o t c e n n o c o l F i l l e t n I e l b ...

Page 37: ...h voltage cover panel Retaining screw 10 Close the control panel into its original position and secure it with the two access screws 11 Install the high voltage cover panel and secure it with the two retaining screws 12 Close the EasyTouch load center front door Fasten the two spring latches 13 Switch the power on to the EasyTouch load center ...

Page 38: ...lliFlo VS default pump address is one See page 10 for details about how to check the pump address and change if necessary For more information refer to the IntelliTouch User s Guide P N 520102 ToconnecttheIntelliFloVScommunicationcabletoIntelliTouchloadcenter 1 CAUTION Switch the main power off to the IntelliTouch load center 2 Unlatch the IntelliTouch load center front door spring latches and ope...

Page 39: ...lliFloVS Connectpin6 green toIntelliTouchscrewterminalpin2 green IntelliFloVS Connectpin7 yellow toIntelliTouchscrewterminalpin3 yellow 7 Close the control panel into its original position and secure it with the two access screws 8 Install the high voltage cover panel and secure it with the two retaining screws 9 Close the load center front door Fasten the two spring latches 10 Switch the power on...

Page 40: ...gh the low voltage raceway to the motherboard 4 Strip back the cable conductors in Insert the wires into the screw terminals provided in the kit Secure the wires with the screws Make sure to match the color coding of the wires Yellow DT Green DT 5 Insert the connector on the COMPORT J11 screw terminal on the motherboard 6 When the connection is completed close the control panel and secure it with ...

Page 41: ...mp may cause serious personal injury In order to avoid the possibility of personal injury make sure the suction and discharge valves are open and that the strainer pot is cool to the touch then open with extreme caution CAUTION To prevent damage to the pump and filter and for proper operation of the system clean pump strainer and skimmer baskets regularly Pump Strainer Basket Service IftheIntelliF...

Page 42: ...lasteadystreamofwatercomesout 16 Closethemanualairreliefvalve Motor Service 1 Protectfromheat Shadethemotorandcontrollerfromthesun Anyenclosuremustbewellventilatedtopreventoverheating Particularattentionshouldbepaidtothe motorfancoverandthecoolingfinsbetweenthedriveandthemotor Provideamplecrossventilation 2 Protectagainstdirt Protectfromanyforeignmatterorsplashingwater Donotstore orspill poolchemi...

Page 43: ...VSpumpelectronicsfromdamageduetofreezingconditions thepumpwillswitch it self on to generate internal heat when the air temperature drops below 40 F The IntelliFloVS Anti Freeze featureisnotintendedtoprotectthesystemplumbingfromfreezing TheAntiFreezetemperature feature is adjustable and can be changed from 40 F 50 F 4 4 C 10 C See page 11 for more information 1 Iftheairtemperaturedropsbelow40 Fthew...

Page 44: ...34 IntelliFlo VS SVRS Installation and User s Guide Blank Page ...

Page 45: ...eetabovethewaterlevelorthree 3 feetbelowwaterlevel 5 Installthepumpinashelteredwellventilatedlocationprotectedfromexcessivemoisture i e rain sprinklers etc 6 Forhottubsandspas donotinstallwithinanouterenclosureorbeneaththeskirtofahottuborspa 7 Installthepumpwitharearclearanceofatleast6inchessothatthemotorcanberemovedeasilyfor maintenanceandrepair Piping Forimprovedpoolplumbing itisrecommendedtouse...

Page 46: ...pumpshouldbepermanentlyconnectedtoeitheracircuitbreaker 2 poletimeror2 polerelay IfACpowerissuppliedbyaGFCIcircuitbreaker useadedicatedcircuitbreakerthathasnoother electricalloads 9 IMPORTANT Whenconnectingthepumptoanautomationsystem IntelliTouch EasyTouch SunTouchandIntelliComm continuouspowermustbesuppliedtothepumpbyconnectingit directly to the circuit breaker When using an automation system Be ...

Page 47: ...pumpmechanicalseal performthefollowingprocedures 1 Switchoffthepumpcircuitbreakeratthemainpanel 2 DisconnecttheRS 485communicationcablefromthepump 3 Drainthepumpbyremovingthedrainplugs 4 Removethesixboltsthatholdthemainpumpbody strainerpot volute totherearsubassembly 5 GENTLYpullthetwopumphalvesapart removingtherearsubassembly 6 Usea3 32inchAllenheadwrenchtoloosenthetwoholdingscrewslocatedonthedif...

Page 48: ...s with a clean cloth 3 Remount the seal plate to the motor 4 Grease the motor shaft thread and screw impeller onto the motor shaft 5 Screw in the impeller lock screw counterclockwise to tighten 6 Remount the diffuser onto the seal plate Make sure the plastic pins and holding screw inserts are aligned 7 Grease the diffuser o ring and seal plate gasket prior to reassembly 8 Grease the bolt threads a...

Page 49: ...oisture out of the drive and motor Replace the gasket if damaged Do not reassemble with a damaged or missing gasket ToinstalltheIntelliFloVSdriveassemblyontothemotorassembly 1 Makesureallelectricalbreakersandswitchesareturnedoffbeforeinstallingthedrive 2 Besurethatthegasketbetweenthedriveandmotorisinplace Itiscriticalinkeepingmoistureoutof thedriveandmotor Replacethegasketifdamaged Donotreassemble...

Page 50: ... RAMP WF Almond 33 350621 CVRASSY INTELLIFLO VS FWC Almond 34 355000 SVRS Suction Gauge not shown Note Not a serviceable part Illustrated Parts List Replacement Parts Item Part Description No No 1 070387 BASKETAQ WF 2 070429 BOLT HEX HD 2 56x0 875 s s QTY 4 3 070430 BOLT 3 8 16 X 1 HEX CAP 18 8 s s QTY 4 4 070431 BOLT 3 8 16 X 2 HEX CAP 18 8 s s QTY 2 5 070927 FOOT WF PUMP MOTOR SUPPORT 6 070929 F...

Page 51: ... s Guide IntelliFlo VS Pump Dimensions 12 50 23 41 10 78 IntelliFlo VS Electrical Specifications Circuit Protection Two pole 20 AMP device at the Electrical Panel Input 230 VAC 50 60 Hz 3200 Watts IntelliFlo VS Flow and Power vs Flow Pump Curve ...

Page 52: ...42 IntelliFlo VS SVRS Installation and User s Guide Blank Page ...

Page 53: ...tection is disabled when connected to an automation system Freeze protection is provided by selecting YES at the ON WITH FREEZE portion of the IntelliTouch s appropriate circuit function menu To re enable the pump s internal antifreeze protection the power to the drive must be cycled off then back on Blocked system Detects a blocked suction line This alarm resets automatically after two 2 minutes ...

Page 54: ...n r u T e h t s d l o h t a h t s t l o b 6 e h t e v o m e R e t a l p l a e s e h t o t e t u l o v y a w a e t a l p l a e s d n a r o t o m e h t e d i l S e t u l o v e h t m o r f s i r b e d f I r e l l e p m i m o r f s i r b e d n a e l C e h t e t e l p m o c d e v o m e r e b t o n n a c s p e t s g n i w o l l o f g n i r O d n a r e s u f f i d e v o m e R 1 n i p s i t n a d a e r h ...

Page 55: ...p o r p r o f k c e h C r e l l e p m i r o r e l l e p m i r e p o r p r o f k c e h C g n i b b u r d n a s e l b u o r T l a c i n a h c e M e s i o N e s i o n d u o l h t i w t u b g n i n n u r s i r o t o m p m u p e h T n o i t a t i v a C e r a g n i p i p e g r a h c s i d d n a n o i t c u s f I p m u p d e t r o p p u s y l e t a u q e d a t o n t o n o D d e n i a r t s e b l l i w y ...

Page 56: ...unt of water moved for the cost incurred Water toWire Efficiency The IntelliFloVS cannot be matched in today s industry for flow versus continuous watts at any speed by anyotherpumpinpool TheFiltermodeandflowcontrolfurtherassistsincostsavingbyalwaysallowing the pump to do the least amount of work at all times General Warnings Never go inside the drive enclosure There is a capacitor bank that holds...

Page 57: ...good way to check your water clarity is that the main drain cover shouldbeclearlyvisiblefromthedeck Automatic pool sweeps booster pump style Usually three to four hours of daily operation during summer and two to three hours daily in the winter are sufficient Start the pool sweep one hour or more after the pool pump has started and stop the sweep one hourormorebeforethepoolpumpturnsoff Onunusually...

Page 58: ...cy Energy Efficient IntelliFlo VS pump When its time to replace your old motor and pump assembly consider using the IntelliFloVS variable speed energy efficientpump Itmovesmorewatermoreefficiently andcanhelpyoureduceyourfilteroperating time by hours Once these tasks are done IntelliFlo VS automatically ramps down to low speed for your pool sdailyfiltrationcycle whichcansaveenergyandmoneyforyou ...

Page 59: ...Notes ...

Page 60: ...P N 351017 Rev A 351017 ...

Reviews: