10
IntelliFlo VS+ SVRS Installation and User’s Guide
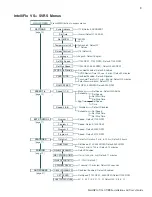
IntelliFlo VS+ Menus
The IntelliFlo VS+ menu descriptions are as follows:
Settings: Pump Address
The IntelliFlo pump address needs to be changed when there is more than one IntelliFlo pump on an automation
system. Addressing the pump allows the automation system to know which pump to send a command to. The
“Pump Address” setting is used when the IntelliFlo VS+ is connected via the RS-485 COM port to an
IntelliTouch
®
, EasyTouch
®
, SunTouch
®
or IntelliComm
®
system. The default pump address is #1. When
connected to EasyTouch
®
, SunTouch
®
or IntelliComm
®
the pump only communicates with address #1. The
pump address can be set from 1-16. However, IntelliTouch can communicate to four (1-4) IntelliFlo VS pumps.
Note: IntelliFlo pumps cannot be connected in series with other pumps.
To access the Settings menu:
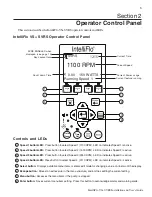
1. Be sure the green power LED is on and the pump is stopped.
2. Press the
Menu
button. “Settings” is displayed.
3. Press the
Select
button. “Pump Address” is displayed. The Factory default setting is address “1.”
4. To change the pump address, press the
Select
button. The first digit “1” selected.
5. Press
Up
or
Down
arrow button to change the address number from 1-16.
6. Press the
Enter
button to save the setting. To cancel any changes, press the
Escape
button to exit
edit mode without saving.
7. Press the
Escape
button to exit.
Settings: Set Time
Use “Set Time” to set the IntelliFlo VS+ system time. The IntelliFlo VS+ system clock controls all scheduled
start and stop times, functions, and programmed cycles. The system clock can store the correct time for up to
96 hours after power is shut off. The IntelliFlo will retain the time memory for 96 hours before a reset is needed.
To access the Set Time menu:
1. Check that the green power LED is on.
2. Press the
Menu
button. “Settings” is displayed.
3. Press the
Select
button. “Pump Address” is displayed.
4. Use the
Up
or
Down
arrow button to scroll to “Set Time”
5. Press the
Select
button. The cursor will appear in the Minutes column.
6. Press
Up
or
Down
arrow button to set the time.
7. Press the
Enter
button to save the setting. To cancel any changes, press the
Escape
button to exit
edit mode without saving.
8. Press the
Escape
button to exit.

