background image

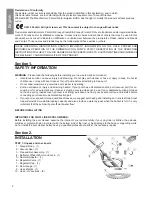
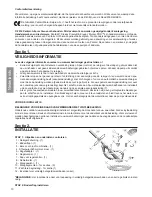
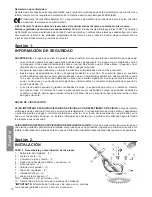
11 - Soft Leader Hose - 1m section (1)

12 - Friction Pad Insert (For Tiled Pools Only) 

*IMPORTANT:

 Friction Pad Insert is only for use in fully tiled pools (tiled walls and floor) and only if necessary.     

STEP 2:


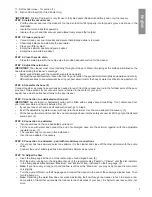
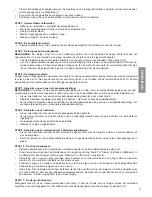
Install the vacuum seal

• 

Pull the vacuum seal over the cleaner’s foot pad so that it will fit properly into foot pad’s groove as shown in the 

illustration. 

• 

Insure that curved tips face upwards.

• 

Insure with your hand that vacuum seal rotates freely around the footpad.
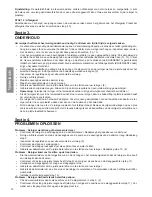
STEP 3:


Prepare your pool

• 

Vacuum clean your pool manually and assure that all large debris is removed.

• 

Chemically balance and stabilize the pool water.

• 

Clean your filter system.

• 

Empty the skimmer basket and pump basket.

• 

Empty the pump strainer basket.

• 

STEP 4:


Close the main drain

• 

Close the main drain with the pump valve to provide adequate suction for the cleaner
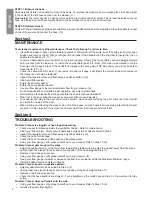
STEP 5:


Adjust the return line

IMPORTANT:

 The cleaner must move randomly throughout the pool. Water circulating at the surface will influence the 

hose thus limiting the cleaner’s coverage.

• 

Adjust eyeball inlets such that water flow points downwards

• 

To adjust the eyeball diverters, loosen the lock ring and redirect the eyeball diverters slightly downwards and also try 

different directions to see what works best in your pool allow time for the body of water to settle into new pattern. (2)

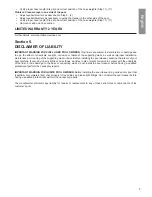
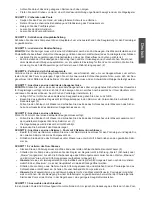
STEP 6: Assemble the hose (3)

Connect together as many hose sections as needed to reach from the vacuum source to the furthest point of the pool, 

plus one or two sections if your vacuum source is located in the center of your pool. 

Leader hose must be attached directly to the pool cleaner.

STEP 7: Connection to a dedicated suction port

IMPORTANT:

 Assure that your dedicated suction port is fitted with a safety vacuum lock fitting. If not, obtain one from 

your local pool store and have it installed first. (4)

• 

If your pool does not have a dedicated suction port; go to Step 8.

• 

Insert the adjustable regulator valve (with cap) into the skimmer. Use the cone adapter if necessary. (5)

• 

Fill the hose with water and connect the end of submerged hose into the safety vacuum lock fitting of your dedicated 

suction port. (6)

STEP 8: Connection to a skimmer

• 

If your pool does not have a dedicated suction port

• 

Fill the hose with water and connect the end of submerged hose into the skimmer together with the adjustable 

regulator valve. (7)

• 

The regulator cap is not used in this installation

• 

Use the cone adaptor if necessary

STEP 9: Connection to a skimmer - pool with two skimmer connections

• 

If your pool has two skimmers select one skimmer for the cleaner and close off the other skimmer with the pump 

valve.

• 

Connect the end of submerged hose into selected skimmer as per step 8.

STEP 10: Adjust the flow

• 

Insert the flow gauge at the end of the last section of submerged hose. (8)

• 

With the pump running turn the adjustment knob of the regulator valve “Faster” or “Slower” until the disc indicator 

in the flow gauge settles between “Maximum” and “Minimum” flow, indicated on the flow gauge. (9)

• 

Note:

 If you have very strong pump and the flow is still over the “Maximum” you may need to open the main drain 

only slightly.

• 

Turn the pump off. Remove the flow gauge and connect the cleaner to the end of the submerged leader hose. Then 

turn the pump on.

• 

Note:

 Optimizing the water flow does not mean maximizing the flow through the cleaner. In fact, to assure a ran

-

dom pattern of travel that will enable the cleaner to reach all areas of your pool, it is better to use less suction, not 

more.

3

English

Summary of Contents for KREEPY KRAULY Kruiser PRO

Page 1: ...e Installatiehandleiding Bedienungsantleitung Guide de l installation Guia de instalacion Guide all installazione Fran ais SUCTION SIDE CLEANER Kreepy Kruiser PRO IMPORTANT SAFETY INSTRUCTIONS READ AN...

Page 2: ...ner or hose or apply to body Do not let children use or play with pool cleaner Turn off pump before attempting to clean unit Do not allow swimmers in pool while pool cleaner is operating Suction entra...

Page 3: ...d suction port IMPORTANT Assure that your dedicated suction port is fitted with a safety vacuum lock fitting If not obtain one from your local pool store and have it installed first 4 If your pool doe...

Page 4: ...oses Note Remove the cleaner from the pool before the chemical shock treatment When not in the pool keep the cleaner s vacuum seal flat to avoid warping Your cleaner can stay in the pool at all times...

Page 5: ...as well as improper installation maintenance or cleaning of the supporting walls or base Before installing the pool cleaner examine the interior of your pool carefully If your vinyl liner is brittle...

Page 6: ...d Ertrinken durch die Saugwirkung des Ger ts Sofern Ihr Pool ber einen eigenen Sauganschluss f r das Saugen des Pools bzw den Anschluss eines automatischen Poolreinigers besitzt muss dieser bei Nichtg...

Page 7: ...chluss gehen Sie ber zu Schritt 8 Bauen Sie das justierbare Regelventil mit Regulierkappe in den Skimmer ein Verwenden Sie bei Bedarf den Reduzierkegel 5 F llen Sie den Schlauch mit Wasser und schlie...

Page 8: ...ie lich Originalschl uche verwendet werden 8 Hinweis Nehmen Sie den Poolreiniger vor chemischen Schockbehandlungen aus dem Pool Bei Aufbewahrung des Poolreinigers die Vakuumdichtung flach lagern um ei...

Page 9: ...gsausschluss WICHTIGERHINWEISF RBESITZERVONVINYL POOLS Vinylistanf lligf rBeeintr chtigungenundSch digungen durch Alter Einwirken von Chemikalien Sonnenlicht Korrosion oder mangelnde Festigkeit der St...

Page 10: ...s uw zwembad een spe ciale aanzuigaansluiting heeft vacu maansluiting voor stof zuigen of voor een automatische zwembadreiniger moet deze aansluiting worden afgedekt als deze niet in gebruik is Als uw...

Page 11: ...zwembad niet over een speciale aanzuigaansluiting beschikt gaat u naar stap 8 Plaats de instelbare regelklep met kap in de skimmer Gebruik zo nodig de kegeladapter 5 Vul de slang met water en sluit he...

Page 12: ...t reinigen met chemische middelen Als de reiniger zich niet in het zwembad bevindt moet u ervoor zorgen dat u de bodemflap in platte toestand houdt om vervorming te voorkomen De reiniger kan continu i...

Page 13: ...NG VOOR EIGENAREN VAN ZWEMBADEN MET VINYLBEKLEDING Vinylbekle dingen slijten of raken beschadigd vanwege leeftijd het effect van chemicali n zonlicht corrosie of schade aan de wanden evenals door fout...

Page 14: ...hetez en un aupr s de votre piscinier et installez le quand vous n utilisez pas le nettoyeur 7 Si beaucoup de feuilles tombent dans votre piscine nous vous conseillons d acheter et d installer un pi g...

Page 15: ...se balai Important Assurez vous que l orifice d aspiration peut tre ferm an amont par une vanne si ce n est pas le cas faites en installer une par votre piscinier 4 Si votre piscine n est pas quip e d...

Page 16: ...ez que les tuyaux d origine Remarque Enlever le nettoyeur de la piscine avant d effectuer le traitement chimique choc Lorsque vous ne l utilisez pas gardez la jupe du nettoyeur bien plate pour viter t...

Page 17: ...es dommages dus leur anciennet sous l effet des produits chimiques des rayons du soleil la corrosion ou un d faut dans les murs porteurs ainsi qu une mauvaise installation un mauvais entretien ou nett...

Page 18: ...ierta cargada por muelle accesorio de cierre por vac o compre uno en su tienda local de piscinas e inst lelo antes de conectar el limpiapiscinas al puerto de succi n dedicado 7 Si su piscina est expue...

Page 19: ...uno en su tienda local e inst lelo primero 4 Si su piscina no tiene un puerto de succi n dedicado vaya al paso 8 7 Inserte la v lvula del regulador ajustable con tap n en el succionador Use el adapta...

Page 20: ...de la piscina antes de aplicar el tratamiento de choque qu mico Cuando no est en la piscina mantenga la junta de vac o del limpiador plana para evitar que se deforme El limpiador puede permanecer en l...

Page 21: ...E PARA PROPIETARIOS DE PISCINAS CON REVESTIMIENTO DE VINILO Los revestimientos de vinilo est n sometidos al deterioro o a da os ocasionados por el paso del tiempo al efecto de los productos qu micos l...

Page 22: ...deve essere chiuso Se la vostra bocchetta di aspirazione dedicata non ha un coperchio a molla adatto alla sua chiusura acquistatene uno dal vostro rivenditore locale di piscine ed installatelo prima d...

Page 23: ...dispositivo di chiu sura stagna di sicurezza In caso contrario procurasene uno da un rivenditore locale di piscine e provvedere che venga installato prima di utilizzare il dispositivo di pulizia 4 Se...

Page 24: ...a Utilizzare il misuratore di flusso per assicurare al proprio apparecchio di pulizia un corretto flusso di acqua 8 Per ottenere i risultati migliori ed un corretto funzionamento utilizzare solo tubi...

Page 25: ...I 2 ANNI Ulteriori dettagli www pentairpooleurope co Sezione 5 Clausola di disconoscimento di responsabilit AVVISO IMPORTANTE PER I PROPRIETARI DI PISCINE CON RIVESTIMENTO IN VINILE I rivestimenti in...

Page 26: ...oncrete and marcite In your tiled pool if the pool cleaner does not transit from the floor to the wall First check the Trouble Shooting instructions If the cleaner still does not transit from the floo...

Page 27: ...5 8 11 12 6 9 7 10 Unscrew the nut and swivel assembly Lid Lock Oscillator Internal housing 27...

Page 28: ...g van Pentair International SRL Copyright Licence limit e sauf express ment autoris ci apr s aucune partie du contenu de ce document ne peut tre reproduite sous toute forme ou par tout moyen sans la p...

Reviews: