background image

5

SandShark

 Installation and User’s Guide

Optional Installation


WARNING

 —

Suction entrapment, injury, and drowning hazard.

 If your pool has a dedicated suction port

(“vac port”) for vacuuming or for an automatic pool cleaner, it must be covered when not in use.

Vac Port Installation with Vacuum Regulator in Skimmer

If your pool has a dedicated wall fitting “vac port”, (see Figure 16), you can  install the SandShark

 using the

Optional Installation

.

1. Turn the pool pump off.

2. Adjust valves for vacuuming. Adjust the pump valves (if your system has valves)

to direct all suction to the dedicated vacuum line and the skimmer.  Close the main
drain and all remaining suction lines, except the line from the dedicated vacuum line
to which your  SandShark

  cleaner will be connected, and the skimmer where the

vacuum regulator will be installed.

3. A spring loaded safety cover, (“vac port fitting”),  is included with this pool cleaner

(see Figure 17). Install it on the dedicated vacuum line to prevent entrapment and
injury. For details please refer to the 

Vac Port Instruction sheet

 included with your

vac port fitting. To install the included vac port fitting:

a. Screw the vac port fitting into the dedicated vacuum line opening.

b. Orient the vac port fitting so the arrow on the door points up.

c. Secure the cover by tightening the Allen-screw below the door, into the dedicated

vacuum line fitting.

4. Remove the skimmer basket from the skimmer, (see Figure 18).


WARNING

 —

Hazardous suction.

 Can cause entrapment with severe

personal injury or drowning.

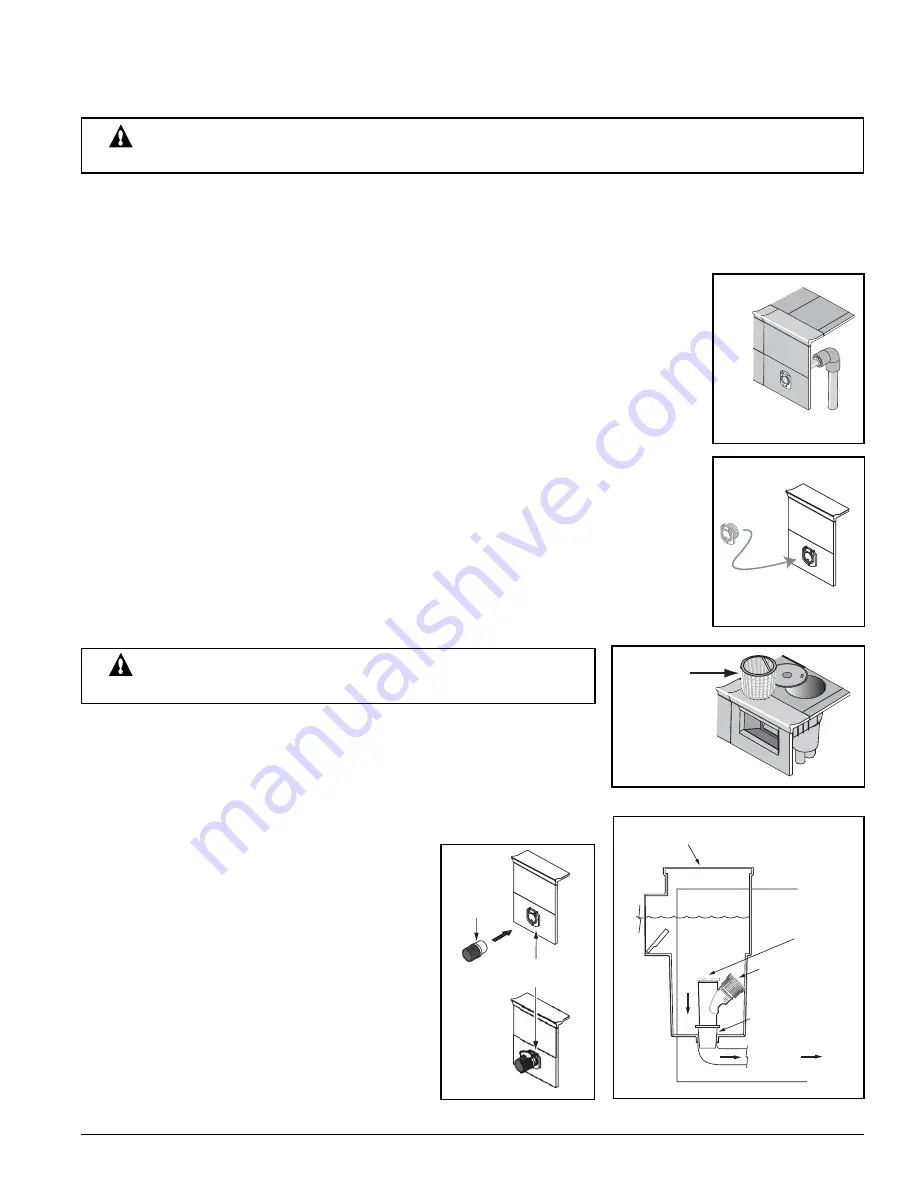
5. Insert the vacuum regulator and reducer cone in the skimmer,

(see Figure 19). To prevent water from flowing through the top of the
vacuum regulator, attach the regulator cap to the vacuum regulator.

6. Attach the end of the hose to the vac port fitting installed in the

dedicated vacuum line, (see Figure 20).

Figure 16.

Vac
Po

r

t

Figure 17.

Skimmer

Ba

ske

t

Figure 18.

Skimmer

Vacuu

m

R

e

gulato

r

R

e

gulato

r

Cap

To Pu

m

p

R

e

duc

er

 Con

e

Figure 19.

H

o

se

End

Vac Po

r

t

F

i

tt

i

ng

Figure 20.

Summary of Contents for Kreepy Krauly SandShark 7900

Page 1: ...IMPORTANT SAFETY INSTRUCTIONS READ AND FOLLOW ALL INSTRUCTIONS SAVE THESE INSTRUCTIONS Installation and User s Guide Suction Side Inground Pool Cleaner...

Page 2: ...ool and Spa Inc Those names and brands may be the trademarks or registered trademarks of those parties or others P N 39503 6300 Rev A 10 27 08 Customer Service If you have questions about ordering Pen...

Page 3: ...s Hose Balance 7 Fine tuning Valves and Connections 8 Adjusting Flow 8 Return Line Adjustments 9 Eyeball Diverter Positions 9 Installing the Eyeball Diverter 9 In Line Leaf Canisters 10 Section 4 Main...

Page 4: ...s manual Throughout the manual safety warnings and cautions are identified by the symbol Be sure to read and comply with all of the warnings and cautions WARNING Hazardous suction Do not play with cle...

Page 5: ...clean system is necessary for proper cleaner operation and coverage Before installing the cleaner fill the hose with water Always make sure the cleaner head is submerged and the hose is full of water...

Page 6: ...ith the directions contained in the Installation and Operation Manual or operating instructions provided by Pentair Water Pool and Spa or any injury loss damage defect or malfunction or failure to fun...

Page 7: ...d make sure that your pool is clean and free of algae If necessary make the following preparations before proceeding Chemicallybalancethepoolwater Brush the pool and let the debris settle Handvacuumth...

Page 8: ...gthefemale ends onto the male ends after wetting the ends in the pool seeFigure5 3 Makesuretheconnectionsaresnug Thenumberofsections thatyouwillneeddependsonthesizeofyourpool 4 Theoveralllengthofhosen...

Page 9: ...providetheSandShark withthepowernecessarytoensurepropercleaningperformance and we strongly recommend the use of the vacuum regulator valve for maximum safetyandperformance 1 Turnthepoolpumpoff 2 Adju...

Page 10: ...calibrated for use with the Y shaped vacuum regulatorvalve Theflowgaugewillnotindicatethecorrectflowforthecleaner ifyouarenotusingthe Y shapedvacuumregulatorvalve 5 Removetheflowgaugefromtheendoftheho...

Page 11: ...cludedwiththispoolcleaner seeFigure17 Installitonthededicatedvacuumlinetoprevententrapmentand injury FordetailspleaserefertotheVacPortInstructionsheetincludedwithyour vacportfitting Toinstalltheinclud...

Page 12: ...ratedforusewiththe Y shapedvacuum regulator valve The flow gauge will not indicate the correct flow for the cleaner if you are not using the Y shaped vacuum regulator valve 5 Removetheflowgaugefromthe...

Page 13: ...ool from where it s attached It is easy to position SandShark in the pool by moving it about with your pool pole and brush SandShark s hose should be long enough to reach the end of the pool plus one...

Page 14: ...nter into it Allow the cleaner to drop to the pool floor Then turn the pump on Too much Vacuum Flow You have too much vacuum if the cleaner climbs up the pool wall past the water line to the point tha...

Page 15: ...wdirectedalongthesideof pool the tile line flow directed downward flow directed against the hose will help steer the SandShark away from obstructions such as stairs and ladders Allow time for the body...

Page 16: ...tolargequantitiesofleaves wesuggestpurchasingandinstalling an in line leaf canister P N R211084 or R211086 see Figure 31 Aleaf canister will providemoredebris loadingcapacityandalsoprovidesawaterby pa...

Page 17: ...of unit When people are using the pool disconnect the cleaner and pull it to one side of the pool We recommend that you leave the SandShark cleaner in your pool except during chemical shock treatments...

Page 18: ...elSprocket Squeezethe latchingtabstoremovetheClutchClip seeFigure37 6 Remove the Shaft Plug with the stainless steel shaft and the Large SteeringDriveAssembly seeFigure38 7 Remove the Oscillator Sleev...

Page 19: ...ngs and tighten them Be sure that the openings of the eyeball diverters point down 6 00 o clock position or to the side 3 00 or 9 00 o clock positions before fully tightening the rings Usually directi...

Page 20: ...14 SandShark Installation and User s Guide 2 3 4 6 7 8 9 10 11 12 13 12 14 14 15 17 19 18 20 10 21 22 1 24 23 5 16 Section 6 Replacement Parts SandShark 7900 Model...

Page 21: ...lip 1 17 Drive Shaft Assembly 1 19 Center Sprocket 1 20 Short Sprocket Clip 1 Oscillator Kit Incl Item N s 12 13 14 GW7912 12 Small Sliding Seal 2 13 Oscillator 1 14 Large Sliding Seal 2 Seal Flap Kit...

Page 22: ...16 SandShark Installation and User s Guide NOTES...

Page 23: ...SandShark...

Page 24: ...P N 39503 6300 Rev A 10 27 08...

Reviews: