


11
SandShark
™
Installation and User’s Guide
Section 4
Maintenance
This section describes the service and maintenance of your SandShark
™
cleaner.
WARNING
—
Hazardous suction.
Suction through the cleaner can entrap bathers, causing severe injuries or
drowning. Do not operate the SandShark
™
cleaner while people are using the swimming pool. Do
not allow anyone to play with the SandShark
™
cleaner or its hoses.
Your new pool cleaner requires almost no maintenance. Manually open and close the regulator valve from time to
time to flush away accumulated dirt and debris and ensure smooth operation. Also, from time to time, visually
inspect the SandShark
™
to be sure that:
• The oscillator moves freely and is not obstructed by debris.
• The vacuum pad is not excessively worn. When the traction pads on the bottom have worn down, it’s time for
replacement.
• Keep skimmer basket and pump strainer basket clean and free of debris.
• Remove the pool cleaner from the pool before super chlorinating (shocking) or chemical balancing. Wait at
least four hours after the chemical procedure before reinstalling the cleaner.
• If cleaner jams with large debris (leaves, sticks, etc.), clean the debris from bottom of unit.
• When people are using the pool, disconnect the cleaner and pull it to one side of the pool.
• We recommend that you leave the SandShark
™
cleaner in your pool,
except during chemical shock
treatments
.
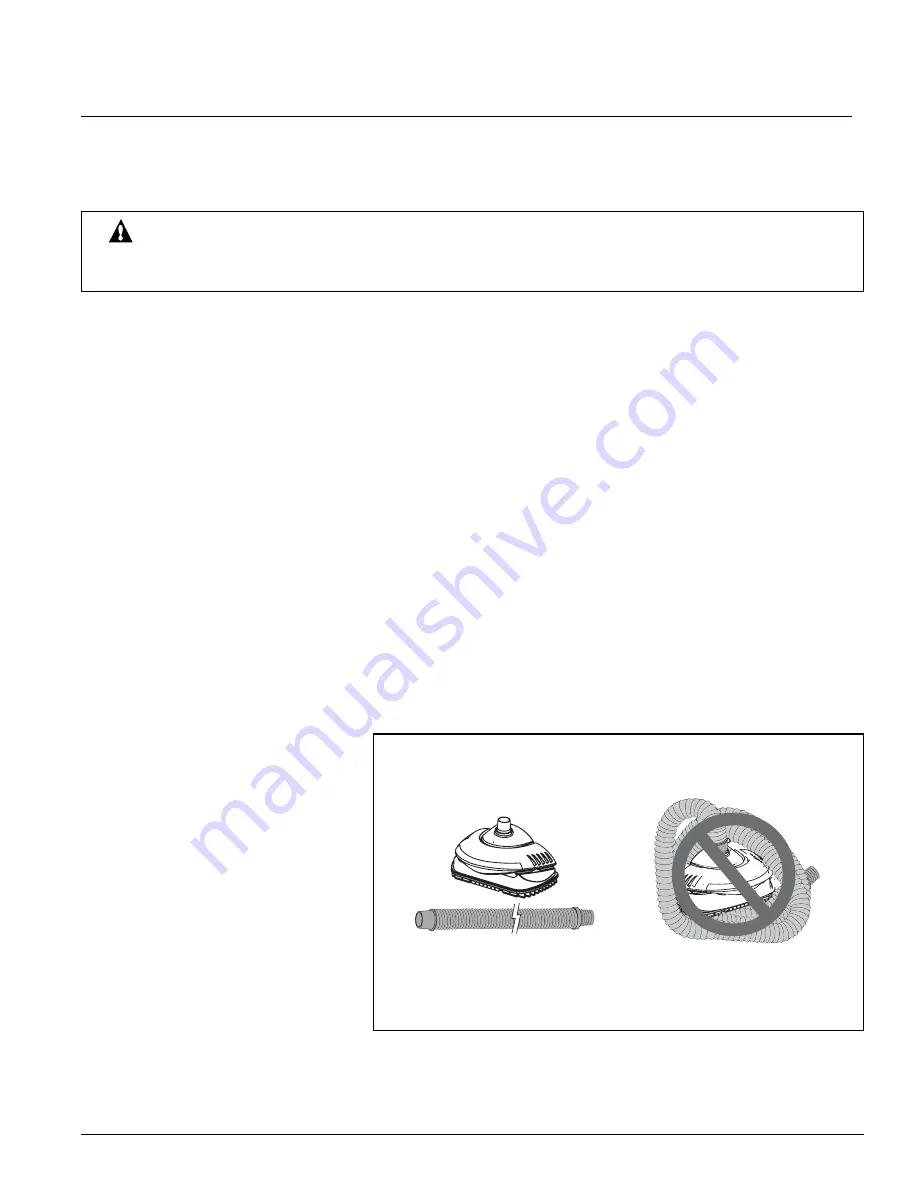
Hose Storage
NOTICE:
When storing the SandShark
™
,
do not coil the hose
. Instead, lay it out straight and flat in an area
protected from direct sunlight. If hose sections are disconnected, try not to disturb the hose weight locations. Use
only a genuine SandShark
™
hose. The warranty is void if the cleaner is operated with another hose other than a
genuine SandShark
™
hose.
•
Remove the hose from the cleaner
when removing the cleaner from
the pool. Store the hose flat and
straight.
•
Don't store the cleaner with the
hose connected to the cleaner
body or with the hose coiled, see
(Figure 32). To do so will cause
the hose to take a set or kink over
a period of time. When reinstalled
in the pool, the hose will tend to
stay coiled and will cause the
cleaner to malfunction.
•
If the hose has taken a set, uncoil
it as far as possible without
damaging it and lay it out in the
sun for several hours to straighten itself. Once it has relaxed and straightened out, store it laid out flat and
straight (no coiling).
HOSE STORAGE
Best:
H
o
se
s
to
re
d co
rre
ctly – la
i
d
out
s
t
r
a
i
ght, not conn
e
ct
e
d to
cl
e
an
er
.
Wrong:
S
to
ri
ng cl
e
an
er
w
i
th ho
se
conn
e
ct
e
d w
i
ll da
m
ag
e
ho
se
and
vo
i
d th
e
ho
se
wa
rr
anty.
Figure 32.
Summary of Contents for Kreepy Krauly SandShark 7900
Page 22: ...16 SandShark Installation and User s Guide NOTES...
Page 23: ...SandShark...
Page 24: ...P N 39503 6300 Rev A 10 27 08...


