background image

Rev. E  4-15-05

             P/N  472235

21

BASIC SYSTEM OPERATION

1.

Start pump, make sure the pump is running and is primed, to close the water pressure switch and supply power to
heater. 

Be sure the pool and/or spa is properly filled with water. Follow the Lighting/Operating instructions below.

Section IV. Operation

Operation Instruction

FOR YOUR SAFETY: READ BEFORE LIGHTING

A. This appliance does not have a pilot. It is equipped with

an ignition device which automatically lights the burners.
Do not try to light the burners by hand.

B.

BEFORE OPERATING, 

smell all around the appliance

area for gas. Be sure to smell next to the floor because some
gas is heavier than air and will settle on the floor.

WHAT TO DO IF YOU SMELL GAS

-

Do not try to light any appliance.

-

Do not touch any electrical switch; do not use any phone in
your building.

-

Immediately call your gas supplier from a neighbor's phone.
Follow the gas supplier's instructions.

-

If you cannot reach your gas supplier, call the Fire
Department.

C. Use only your hand to push in or turn the gas control knob.

Never use tools. If the knob will not push in or turn by hand,
don't try to repair it, call a qualified service technician. Forced
or attempted repair may result in a fire or explosion.

D. Do not use this appliance if any part has been under water.

Immediately call a qualified service technician to inspect
the appliance and to replace any part of the control system
and any gas control which has been under water.

MINIMAX NT HSI ELECTRONIC IGNITION LIGHTING/OPERATION

1.

STOP!

 Read the safety information above, (A through D).

2. Open the access doors. Set power switch to ”OFF”, (see

Figure 25

).

3. Set the thermostat to ”OFF”, (see 

page 27

).

4. This appliance is equipped with an ignition device which

automatically lights the burners. Do not try to light the burn-
ers by hand.

5. Push in gas control knob slightly and turn clockwise

to “OFF”.
NOTE: Knob cannot be turned to “OFF” unless knob is
pushed in slightly. Do not force.

6. Wait five (5) minutes to clear out any gas. If you then smell

gas, 

STOP!

 Follow "B" in the safety information above.

If you don't smell gas, go to the next step.

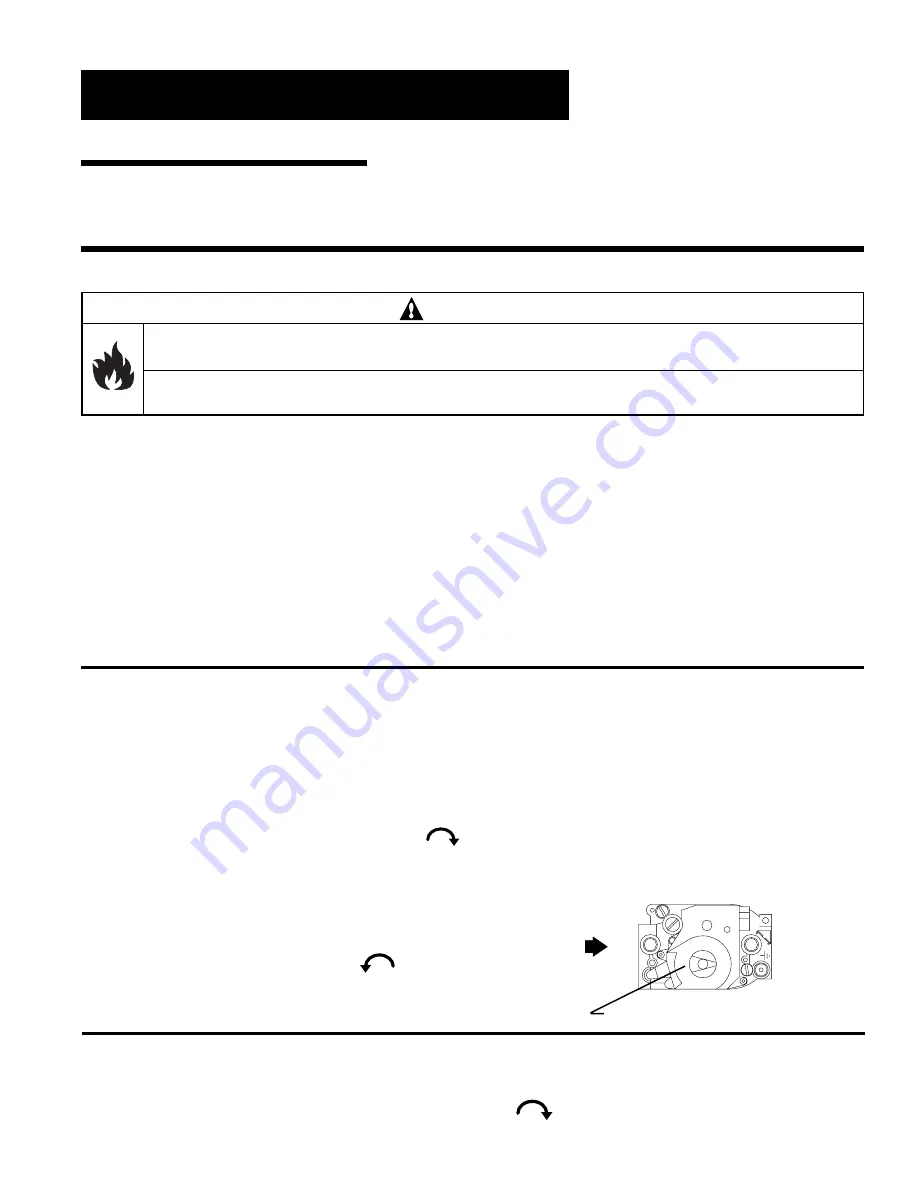
7. Turn gas control knob counterclockwise             to “ON”.

See 

Figure 20

.

8. Close the access doors and set the thermostat to desired

Mode: “POOL, SPA or REMOTE”.

If you do not follow these instructions exactly, a fire or explosion may result causing property damage, personal

injury or loss of life.
Do not attempt to light the heater if you suspect a gas leak. Lighting the heater can result in a fire or explosion

which can cause personal injury, death, and property damage.


WARNING

9. Set the thermostat to the desired temperature setting.

a. Ignition module is energized and the pre-purge cycle is

started, approximately 15 seconds.

b. Fan motor starts, which closes Vacuum Air Pressure (fan)

switch.

c. Check for powering-up the (glow coil) hot-surface ignitor

by viewing through the glass window or opening on the
burner face plate.

10. If the appliance will not operate, follow the instructions

"To Turn Off Gas To Appliance" and call your service tech-
nician or gas supplier.

OPERATING INSTRUCTIONS

Gas control knob shown in “ON” position.

Figure 20.

OFF

ON

Gas

Inlet

TO TURN OFF GAS TO APPLIANCE

1. Turn off all electric power to the appliance if service is to

be performed.

2. Set the thermostat to “OFF”.

3. Open access doors.
4. Push in gas control knob slightly and turn clockwise

             to "OFF". 

Do not force.

5. Close access doors.

Summary of Contents for MiniMax NT 200

Page 1: ...loss of life Improper installation adjustment alteration service or maintenance can cause property damage personal injury or death Installation and service must be performed by a qualified installer service agency or the gas supplier Do not store or use gasoline or other flammable vapors and liquids in the vicinity of this heater or other appliances WHAT TO DO IF YOU SMELL GAS Do not try to light ...

Page 2: ...94 Web site visit www pentairpool com to find information about Pentair Water Pool and Spa Inc 2004 Pentair Water Pool and Spa Inc 1620 Hawkins Ave Sanford NC 27330 919 556 8000 10951 West Los Angeles Ave Moorpark CA 93021 805 523 2400 All rights reserved Information in this document is subject to change without notice Trademarks and Disclaimers MiniMax NT and the Pentair Pool Products logo are re...

Page 3: ...y 16 Vent Adaptors 16 Indoor Installations Venting Guidelines 17 Outdoor Installations Venting Guidelines 18 Outdoor Vent Kit 18 Electrical Connections 19 Wiring Diagram NT STD TSI with DDTC 20 Section IV Operation 21 Basic System Operation 21 HSI Hot Surface Ignition Lighting Operation 21 Safety Controls 22 23 Digital Display Temperature Controller DDTC 24 28 Section V Troubleshooting 28 Troubles...

Page 4: ... the identification system 1 HTR Heater 2 200 250 300 or 400 Input rating Btu hr X 1000 3 NT MiniMax NT Series 4 STD or TSI Series Character 5 NH or PH Gas type Natural gas or Propane gas and ignition system Hot Surface Ignition 6 Options Blank Standard Model ASME ASME Certified Bronze Headers ASHI ASME Certified Bronze Header and High Altitude Rating HALT High Altitude Rating Section I Heater Ide...

Page 5: ...if for any reason the heater is improperly installed and or operated Be sure to follow the instructions set forth in this manual If you need any more information or if you have any questions regarding to this pool heater please contact Pentair Water Pool and Spa Inc at 800 831 7133 WARRANTY INFORMATION The MiniMax NT pool heater is sold with a limited factory warranty Specific details are describe...

Page 6: ...thermostats may err in regulating water temperatures by as much as 4 F 5 Persons with a medical history of heart disease circulatory problems diabetes or blood pressure problems should obtain their physician s advice before using spas or hot tubs 6 Persons taking medication which induce drowsiness such as tranquilizers antihistamines or anticoagulants should not use spas or hot tubs Should overhea...

Page 7: ...actor bears the appropriate license See Figure 1 for Outdoor and Indoor Installations SPECIFICATIONS Section III Installation Installation Instructions MODEL 200 250 24 63 21 63 A DIM 300 400 34 13 27 63 30 63 LEG 24 05 2 in SOCKET 15 50 7 35 2 in SOCKET 24 05 15 50 7 35 INDOOR VENT ADAPTOR 4 in Kit P N 460506 5 in Kit P N 460507 VENT ADAPTOR See Indoor Venting Instructions 30 63 LEG 2 00 A DIM 8 ...

Page 8: ...eater and is equipped with a positive seal noncorrosive Check Valve P N R172288 between the feeder and heater l e d o M M P G n i M M P G x a M 0 0 2 0 2 0 2 1 0 5 2 0 3 0 2 1 0 0 3 0 3 0 2 1 0 0 4 0 4 0 2 1 d e d n e m m o c e r m u m i x a m e h t d e e c x e t o n o D g n i p i p g n i t c e n n o c e h t r o f e t a r w o l f MANUAL BY PASS Where the flow rate exceeds the maximum 120 GPM a man...

Page 9: ...left large access doors It is not necessary to remove the top of the heater to gain access to the headers 2 Disconnect all wires from the high limit switches except the short jumper wire NOTE Do NOT remove the high limit and pressure switches or the thermistor from the front header during the reversing procedure as they will be in the proper location when installed on the left side 3 Disconnect th...

Page 10: ...the support bracket 10 Reconnect all the high limit wires and the pressure switch wiring routing the wires through the same hole as the thermostat sensor wires 11 Pump and bleed system to check the head for leaks 12 Reinstall the two large inspection plates on the appropriate side Reversible Inlet Outlet Connection On the MiniMax NT Series heater there is insulation installed by the factory on the...

Page 11: ...ually be of a larger size than the gas valve supplied with the heater Therefore a reduction of the connecting gas pipe will be necessary Make this reduction as close to the heater as possible The heater and any other gas appliances must be disconnected from the gas supply piping system during any pressure testing on that system greater that PSI The heater and its gas connection must be leak tested...

Page 12: ... T N E L A V I U Q E M U M I X A M t F t o o F c i b u C r e p U T B 0 0 0 1 t a s a G l a r u t a N t o o F c i b u C r e p U T B 0 0 5 2 t a s a G e n a p o r P L E D O M 2 1 4 3 1 4 1 1 2 1 1 2 2 1 2 T A N O R P T A N O R P T A N O R P T A N O R P T A N O R P T A N O R P T A N O R P 0 0 2 0 2 0 3 0 8 5 2 1 0 5 2 0 5 4 0 0 6 0 5 2 0 1 0 2 0 5 0 7 0 5 1 0 5 2 0 0 5 0 0 6 0 0 3 0 1 0 3 0 5 0 0 1 0...

Page 13: ...T TSI MiniMax NT STD Inlet Manifold Illustrations above are for Natural Gas for Propane requirements see Table 7 1 Push the power switch to OFF 2 Turn the gas valve knob to OFF 3 Remove 1 8 in NPT plug on the outlet side of the valve and screw in the fitting from the Manometer kit 4 Connect the Manometer hose to the fitting 5 Turn the gas valve knob to ON 6 Turn on the heater and read the Manomete...

Page 14: ...earance recommendation by the vent pipe manufacturer the requirements of the Uniform Mechanical Code should be met The ventilation air requirements for the MiniMax NT heater can be found on page 16 It is recommended that vent runs over 18 feet be insulated to reduce condensation related problems and or the use of a condensate trap in the vent run close to the heater may be necessary in certain ins...

Page 15: ...ate drainage be installed under the heater The pan must not restrict air flow It is recommended to install the heater on fire resistance slabs Do not install the heater directly on a combustible wood floor without placing a non combustible material between the floor and the heater Heaters must NEVER be installed directly on carpeting Installations in basements garages or underground structures whe...

Page 16: ...lding r o f a e r A n e p o e e r F t e N s e h c n I e r a u q S g n i n e p O h c a E r e t a e H e z i S m o r f d e t c u D e d i s t u O m o r f t c e r i D e d i s t u O 0 0 2 0 0 1 0 5 0 5 2 5 2 1 3 6 0 0 3 0 5 1 5 7 0 0 4 0 0 2 0 0 1 r o o l f t a e n o s g n i n e p o o w t f o e n o r o f s i d e t a c i d n i a e r A g n i l i e c e h t t a e n o d n a l e v e l E T O N s g n i n e p o ...

Page 17: ...m any door window or gravity air inlet 4 ft below 4 ft horizontally 1 ft above Air Supply Clearances indicated are for non mechanical air supply inlet to the building For mechanical air supply inlet a minimum horizontal clearance of 10 feet should be maintained away from the vent termination Vent termination for side wall installations must be the same diameter as the vent connector must be suitab...

Page 18: ...or a heat pump allow a minimum of 36 in between the air conditioning unit and the heater Outdoor Shelter Installation in Canada see page 15 Section III Installation VENTING GUIDELINES OUTDOOR INSTALLATION Must be at least 3 ft above any forced air inlet located within a 10 ft radius Vent Termination Must be located 4 feet away from the building wall openings and at the following distances away fro...

Page 19: ...e 17 If any of the original wiring supplied with this heater must be replaced installer must supply No 18 AWG 600V 105 C U L approved AWM low energy stranded copper wire or it s equivalent Thermal fuse wiring must be replaced with 18 AWG 600V 150 C temp rating CAUTION The installation must conform with local codes or in the absence of local codes with the National Fuel Gas Code ANSI Z223 1 NFPA 54...

Page 20: ...ERMIQUE DOIT ETRE REMPLACEE JI0 VLV HLMT 24V J4 J7 J9 P9 IGN J11 IGN 120 GND 24VAC IGN FS IGN 240 VLV W O R PR GY TH PS BK BR Y L2 L1 J17 BL FC F1 F2 W W J16 BK BLACK NOIR BL BLUE BLEU BR BROWN MARRON G GREEN VERT GY GRAY GRIS O ORANGE ORANGÉ PR PURPLE VIOLET R RED ROUGE Y YELLOW JAUNE W WHITE BLANC R W RED W WHITE TRACE ROUGE ET BLANC BK W BLACK W WHITE TRACE NOIR ET BLANC WIRE COLOR COULEUR DU C...

Page 21: ...ower switch to OFF see Figure 25 3 Set the thermostat to OFF see page 27 4 This appliance is equipped with an ignition device which automatically lights the burners Do not try to light the burn ers by hand 5 Push in gas control knob slightly and turn clockwise to OFF NOTE Knob cannot be turned to OFF unless knob is pushed in slightly Do not force 6 Wait five 5 minutes to clear out any gas If you t...

Page 22: ... Pool Level Installation instructions on page 8 The switch may remain closed with no water flow if there is more than a 3 ft elevation difference between the heater heat exchanger and the pool water line if this is the case the water pressure switch must be reset by a qualified service technician to maintain open switch contacts with no water flow NOTE If the pool is more than one floor above or o...

Page 23: ...the heat up and TFI periods and continues thereafter for another 30 seconds at low speed then return to full speed for the remainder of the heating cycle The thermostat air pressure switch and burner flame are constantly monitored to assure that the system operates properly When the thermostat is satisfied and the demand for heat ends the gas valve is immediately de energized the module senses the...

Page 24: ...re of the water returning to the heater depending on which mode has been selected Pool or Spa This is accomplished by a thermister sensor on the inlet port of the water header of the heater and working in conjunction with the internal microprocessor controlling the operation of the heater Changing the desired pool or spa temperature is easily done by simply depressing the appropriate up or down ar...

Page 25: ...Rev E 4 15 05 P N 472235 25 Section IV Operation Figure 27 ...

Page 26: ... be seen from the front of the control panel five are system indicators and four are mode indicators which helps you understand the operation of the heater see Figure 26 If something should go wrong the lights will aid in troubleshooting the problem An additional four lights can be seen after opening the control panel These four lights are diagnostic indicators for the service technician to troubl...

Page 27: ... remote control systems In order to operate by a remote control system the REMOTE mode must be selected on the front panel When the REMOTE mode is selected the REMOTE LED will light up REMOTE CONTROL THE TWO WIRE REMOTE CONTROL SYSTEM is typically installed and connected to the heater for spa heating The two wire remote system is usually provided with a water temperature sensor that monitors the s...

Page 28: ...on there is a failure within the heater control system or a DDTC internal fault The DDTC will display the actual temperature or set point temperature or OFF as selected by the user When DDTC detects an error the display will show Exx see Figure 27 where Exx is the error code of DDTC fault see Table 13 Codes 1 through 9 indicate a soft lockout error that means after these errors are fixed the heate...

Page 29: ...r operating after pump has shut off Shut off gas supply and call serviceperson Heater exchanger scaled Shut off gas supply and call serviceperson SERVICE CHECKS IGNITION MODULE m o t p m y S e r u C e s u a C d a e D 1 d e r i w s i M A d a b r e m r o f s n a r T B d a b r e k a e r b t i u c r i C e s u F C l o r t n o c d a B D n o i t i n g i o n n o t a t s o m r e h T 2 d e r i w s i M A l a...

Page 30: ...main header being careful to drill only through wall at bottom of 3 4 in NPT port and no deeper now thread in the 3 4 in NPT PRV NOTE A S M E version varies slightly It is of bronze construction and is supplied with the A S M E Section IV pressure relief valve pre installed at factory Test the relief valve at least once a year by lifting up lever FOR PRV INSTALLATION DRILL THRU THE NPT PORT RELIEF...

Page 31: ...eze damage to the exchanger or headers Freeze damage is specifically not covered by the warranty If the pool won t be used for a month or more turn the heater off at the main gas valve For areas where there is no danger of water freezing water should circulate through the heater all year long even though you are not heating your swimming pool The MiniMax NT should not be operated outdoors at tempe...

Page 32: ... once every month or so to be sure it is being maintained See your local pool dealer for help in properly balancing the water chemistry 7 2 6 8 7 0 7 4 7 6 7 8 8 0 8 2 8 4 Add Soda Ash or Sodium Bicarbonate Add Acid Marginal Ideal Marginal pH Control Chart Table 15 CHEMICAL BALANCE POOL AND SPA WATER Your Pentair Pool Products pool heater was designed specifically for your spa or pool and will giv...

Page 33: ...Rev E 4 15 05 P N 472235 33 REPLACEMENT PARTS NT STD w DDTC all Models NT TSI w DDTC 200 250 and 300 Models FOR TSI ONLY 29 30 31 33 34 35 36 FOR STD ONLY ...

Page 34: ...P N 472235 Rev E 4 15 05 34 B J K Q X Q J J Q J J Q J J J J YY Q Z J B B X J _ _ _ _ _ K Q K Q J J J J Q Y _ Y Y _ Y _ Y _ Y Z B Y K Q J Q K Q K Q B Y J J YY Z Y Z X Z Z Q J Z J J JJ JJ J J Z _ Z J ...

Page 35: ...Q J J Q J J J J YY Q Z J B B X J _ _ _ _ _ K Q K Q J J Q X Y _ Y Z B Y K Q J J Q K Q K Q B Y J J YY Z Y Z X Z Z Q J J J _ Y Z J Z _ Z JJ J JJ Replacement Parts for the 400 Model Series are for models manufactured prior to product Serial No 12040039 ...

Page 36: ...v E 4 15 05 36 1 4 3 6 8 10 11 13 46 45 44 42 41 30 31 32 25 35 38 39 2 7 12 22 21 27 29 43 40 36 15 28 24 20 16 14 23 9 17 26 18 5 19 34 33 37 REPLACEMENT PARTS NT TSI w DDTC 400 Model Starting w Serial No 12040039 ...

Page 37: ...Rev E 4 15 05 P N 472235 37 J J B K JJ Q X Q Q Y _ Y _ Y J _ J _ _ K Q J K Q _ JJ J _ B X J X B X YY J YY Q Q Q J YY Q B Y J K Q Z Q Z K Q K Q B Y YY Z Y Z X Z Z Q J ...

Page 38: ...P N 472235 Rev E 4 15 05 38 NOTES ...

Page 39: ...Rev E 4 15 05 P N 472235 39 NOTES ...

Page 40: ...P N 472235 Rev E 4 15 05 40 40 Pentair Water Pool and Spa Inc 1620 Hawkins Ave Sanford NC 27330 919 566 8000 10951 W Los Angeles Ave Moorpark CA 93021 805 523 2400 SAVE THESE INSTRUCTIONS ...

Page 41: ...nstallation ajustement modification ou entretien inadéquat peut entraîner des dommages matériels des blessures ou la mort L installation et l entretien doivent être effectués par un technicien qualifié provenant d un service d entretien ou du fournisseur de gaz Ne pas entreposer ni utiliser d essence ou autres gaz ou liquides inflammables à proximité de ce chauffe eau ou tout autre appareil QUE FA...

Page 42: ...pentairpool com pour trouver des renseignements concernant Pentair Water Pool and Spa Inc la compagnie de Piscine et de Spa d Eau Pentair 2005 Pentair Water Pool and Spa Inc 1620 Hawkins Ave Sanford NC 27330 919 556 8000 10951 West Los Angeles Ave Moorpark CA 93021 805 523 2400 Tous droits réservés Les renseignements se trouvant dans ce document sont assujettis à des changements sans préavis Marqu...

Page 43: ... Canada 55 Admission d air pour combustion 56 Adaptateurs d aération 56 Installation intérieure Recommandations pour la ventilation 57 Installation extérieure Recommandations pour la ventilation 58 Ensemble de ventilation pour l extérieur 58 Raccordements électriques 59 Schéma de câblage NT STD et TSI avec thermostat à affichage numérique 60 Section IV Fonctionnement Général 61 Fonctionnement de b...

Page 44: ... 6 Options BLANC Modèle standard ASME Certification ASME Collecteurs en bronze ASHI Collecteurs en bronze Certifié ASME et Taux haute altitude HALT Taux haute altitude HTR 400 NT TSI N H HALT BLANC MODÈLE STANDARD ASME CERTIFICATION ASME COLLECTEURS EN BRONZE ASHI COLLECTEURS EN BRONZE CERTIFIÉ ASME ET TAUX HAUTE ALTITUDE HALT TAUX HAUTE ALTITUDE H ALLUMAGE À SURFACE CHAUDE NT GAMMES MINIMAX NT DI...

Page 45: ...annulée si pour quelque raison que ce soit le chauffe eau n est pas installé ou utilisé comme il se doit Prenez soin de suivre les instructions décrites ci après dans ce manuel Pour tout autre information ou question relative à ce chauffe eau veuillez contacter Pentair Pool Products au 800 831 7133 GARANTIE Le chauffe eau pour piscine MiniMax NT est couvert par une garantie limitée Les détails son...

Page 46: ...fier la température à l aide d un thermomètre précis Les thermostats de spa ou de bain tourbillon peuvent donner des températures avec une marge d erreur allant jusqu à 4 F 15 C 5 Les personnes présentant antécédents médicaux de maladies cardiaques de problèmes circulatoires de diabète et de troubles de tension artérielle doivent prendre conseil auprès de leur médecin avant d utiliser les spas ou ...

Page 47: ...ites affaire soit dûment autorisé Voir la Figure 1 pour les consignes d installation extérieure et intérieure SPÉCIFICATIONS Section III Installation Consignes d installations MODÈLE 200 250 62 6 54 9 DIM A 300 400 86 7 70 2 77 8 JAMBE 61 1 5 1 cm DOUILLE 39 4 18 7 5 1 cm DOUILLE 61 1 39 4 18 7 ADAPTATEUR DE VENTILATION Voir les instructions pour l installation intérieure 77 8 PIED 5 1 DIM A 22 5 ...

Page 48: ...é 3 po 90cm au dessus ou en dessous du niveau de l eau Si le chauffe eau doit être installé à plus de 3 po 90cm au dessus ou en dessous le manostat doit être ajusté par un technicien d entretien qualifié Voir la Figure 21 à la page 62 COMMUTATEUR DE DÉBIT Si le chauffe eau doit être installé à plus de 6 po 1 8m au dessus ou à 10 po 3m en dessous du niveau de l eau vous dépassez alors les capacités...

Page 49: ...t et rebranchez les au collecteur 5 Retirez les 8 boulons qui maintiennent la tête principale d entrée et de sortie Section III Installation Raccords d entrée et de sortie réversibles Le MiniMax NT est assemblé en usine avec des raccords d arrivée et de sortie d eau sur le côté droit Les collecteurs d entrée et de sortie peuvent être inversées et placées sur le côté gauche sans retirer l échangeur...

Page 50: ...anchez tous les câbles à limites supérieures et le manostat en passant les câbles par le même orifice que les câbles du capteur du thermostat 11 Pompez et purgez le système afin de vous assurer que la tête ne fuit pas 12 Remettez les deux grands panneaux d inspection en place Sur la gamme de chauffe eau MiniMax NT il existe un isolant installée par l usine situé sur le même côté que la tête de ret...

Page 51: ...e gaz fournie avec le chauffe eau Par conséquent la réduction de cette conduite s avérera nécessaire Faites cette réduction aussi près du chauffe eau que possible Le chauffe eau et tout autre appareil fonctionnant au gaz doivent être débranchés de l alimentation en gaz lors de toute vérification de la pression du système de gaz plus grand que PSI 3 5 kPa Le chauffe eau et sa connexionaugazdoiventê...

Page 52: ... T S E D E R U S E M X U A Y U T E D E T N E L A V I U Q É M U M I X A M R U E U G N O L n e e r t ê m e b u c d e i p r a p U T B 0 0 0 1 à l e r u t a N z a G e b u c d e i p r a p U T B 0 0 5 2 à e n a p o r P E L É D O M m c 7 2 1 m c 5 0 9 1 m c 4 5 2 m c 5 7 1 3 m c 1 8 3 m c 8 0 5 m c 5 3 6 T A N O R P T A N O R P T A N O R P T A N O R P T A N O R P T A N O R P T A N O R P 0 0 2 m 6 m 9 m 4...

Page 53: ...re pour augmenter ou dans le sens inverse pour baisser la pression du gaz ATTENTION L utilisation de Raccords Flexibles Flex n est PAS recommandée étant donné qu ils provoquent des chutes brusques dans la pression de gaz VÉRIFICATION DE LA PRESSION DE GAZ Figure 4 Section III Installation Tableau 7 MiniMax NT TSI MiniMax NT STD Les illustrations ci dessus s appliquent aux exigences pour le gaz nat...

Page 54: ...au de ventilation les exigences du Uniform Mechanical Code s appliquent Les exigences de ventilation d air du chauffe eau MiniMax NT se trouvent page 56 Il estrecommandéquelescoursesdeventilationdeplusde18pieds 5 40m soientisoléespourminimiser les problèmes lies à la condensation et ou l utilisation d un piège à condensation sur la course de ventilation près du chauffe eau peut s avérer nécessaire...

Page 55: ...1 50 m de la piscine ou du spa Le chauffe eau doit être placé dans une pièce adéquate sur un sol auniveauetoùtoutefuiteprovenantdel échangeurdechaleurou des conduites d eau ne provoquera aucun dégât au niveau de la surfaceenvironnanteduchauffe eauoudelastructure Lorsqu on ne peut éviter ce problème il est recommandé de placer sous le chauffe eau unbacderécupérationavecundrainageadéquat Le bac ne d...

Page 56: ...ement d air pour les chauffe eau MiniMax NT 1 Retirez les six 6 vis de retenue de la vieille grille d échappement et jettez les vis le joint d étanchéité et la grille d échappement tel qu indiqué dans la figure 10 Section III Installation Tableau 12 e r u t r e v u O e u q a h C r u o p t r e v u O t n e m e c a l p m E m c s é r r a c e r t è m i t n e c 3 u d n o i s n e m i D u a e f f u a h C ...

Page 57: ...aération 4 pi 1 20 m en dessous 4 pi 1 20 m à l horizontal 1 pi 30 cm au dessus de l approvisionnement d air Approvisionnement d Air Les dégagements indiqués s appliquent à des entrées d air du bâtiment non mécaniques Pour des entrées d air mécaniques un dégagement horizontal minimal de 10 pi 3 00 m de la terminaison de la ventilation est nécessaire Hotte de ventilation pour installation murale Do...

Page 58: ... installation extérieure sous abris au Canada voir la page 55 Section III Installation RECOMMANDATIONS POUR L INSTALLATION DE VENTILATION EXTÉRIEURE Doit être à au moins 3 pi 90 cm d une quelconque prise d air extérieure située dans un rayon de 10 pi 3 00 m Terminaison de la ventilation Doit se trouver à 4 pieds 1 20 m des ouvertures murales du bâtiment et aux distances suivantes des portes fenêtr...

Page 59: ...ec le chauffe eau doit être remplacé l installateur doit fournir Nº 18 AWG 600 volts 105 approuvéC U L à faible énergie AWM du fil torsadé en cuivre ou l équivalent Le câblage de fusibles thermiques doit être remplacé avec du 18 AWG 600 volts 150 C température nominale ATTENTION L installation doit être conforme aux codes locaux ou en leurs absences au National Fuel Gas Code ANSI Z 223 1 NFPA 54et...

Page 60: ...REMPLACEE JI0 VLV HLMT 24V J4 J7 J9 P9 IGN J11 IGN 120 GND 24VAC IGN FS IGN 240 VLV W O R PR GY TH PS BK BR Y L2 L1 J17 BL FC F1 F2 W W J16 BK BLACK NOIR BL BLUE BLEU BR BROWN MARRON G GREEN VERT GY GRAY GRIS O ORANGE ORANGÉ PR PURPLE VIOLET R RED ROUGE Y YELLOW JAUNE W WHITE BLANC R W RED W WHITE TRACE ROUGE ET BLANC BK W BLACK W WHITE TRACE NOIR ET BLANC WIRE COLOR COULEUR DU CABLE G W P10 PR P4...

Page 61: ...tre le thermostat à la position OFF voir la page 67 4 Cet appareil est doté d un dispositif d allumage qui allume les brûleurs automatiquement Ne pas essayer d allumer les brûleurs à la main 5 Enfoncer légèrement la manette de contrôle du gaz et tourner dans le sens des aiguilles d une montre jusqu à la position OFF À NOTER La manette ne peut être en position OFF que si elle est légèrement enfoncé...

Page 62: ...NOTER Voir Consignes d installation sous le niveau de l eau page 48 Le commutateur peut rester fermé sans débit d eau s il y a un nivellement de plus de 3 pi 90cm entre le chauffe eau et le niveau de l eau de la piscine si tel est le cas le commutateur de pression d eau doit être réinstallé par un technicien d entretien qualifié pour maintenir les contacts du commutateur ouverts sans débit d eau Á...

Page 63: ...t commutateur de pression du vide d air ainsi que le brûleur principal sont constamment sous moniteur pour s assurer que le système continue à fonctionner normalement Quand le thermostat est satisfait et que la demande de chaleur cesse la stimulation de la soupape principale s arrête immédiatement et un cycle de post purge d une durée de 45 secondes se met en route avant l arrêt du ventilateur d a...

Page 64: ... affiche la température courant de l eau retournant au chauffe eau selon le mode sélectionné piscine ou spa C est avec l aide d un capteur thermique sur l orifice d alimentation du collecteur d eau du chauffe eau et à l aide du microprocesseur interne qui contrôle le fonctionnement du chauffe eau Changer le réglage de la température de la piscine ou du spa en appuyant sur la flèche appropriée haut...

Page 65: ...Rev E 4 15 05 P N 472235 65 Section IV Fonctionnement Figure 26 ...

Page 66: ...le fonctionnement du chauffe eau voir figure25 Aubesoin lesvoyantslumineuxaiderontàlocaliserunproblèmeéventuel Quatreautrestémoinssont visibles à l intérieur du panneau de contrôle Ces témoins transmettent des informations concernant la panne au technicien d entretien lui permettant de poser un diagnostic À droite sur le devant du thermostat il y a quatre touches et témoins DEL correspondants voir...

Page 67: ...de à distance le mode à distance REMOTE doit être sélectionné sur le panneau avant Lorsque ce mode est sélectionné le témoin DEL s allume COMMANDE À DISTANCE LE SYSTEME DE COMMANDE A DISTANCE A DEUX FILS est généralement installé et branché au chauffe eau pour réchauffer l eau d un spa Le système de commande à distance à deux fils est habituellement équipé avec un capteur thermique pour contrôler ...

Page 68: ...eurs sont corrigées vous devez réinitialiser le chauffe eau à l aide de l interrupteur qui se trouve à l intérieur du caisson du chauffe eau à droite sur le bas de la boîte de jonction électrique afin qu il redémarre et reprenne son fonctionnement normal NOTE Si le code ERR s affiche sur l écran mettre le chauffe eau hors tension à l aide de l interrupteur d alimentation et remettre ensuite sous t...

Page 69: ... est encrassé Fermer l arrivée de gaz et contacter le service d entretien VERIFICATIONS D ENTRETIEN MODULE D ALLUMAGE Section V Dépannage CONSIGNES DE DÉPANNAGE S E M Ô T P M Y S E D È M E R E S U A C t r o M 1 t n e m e h c n a r b s i a v u a M A r u e t a m r o f s n a r t s i a v u a M B t i u c r i c e l b i s u f e d r u e t p u r r e t n i s i a v u a M C e l ô r t n o c s i a v u a M D e g...

Page 70: ...au du brûleur le nettoyer ainsi que les orifices et les brûleurs eux mêmes 5 Ne pas conserver de combustibles ou de liquides inflammables à proximité du chauffe eau 6 Vérifier les fils et les connexions électriques Ils doivent être exempts de saletés et bien serrés 7 Vérifier la pression de gaz admission et entrée telle qu expliqué dans ce guide A S M E VERSION 1 Si possible recouvrir la piscine o...

Page 71: ... si de l eau reste emmagasinée dans l échangeur d air ou les collecteurs des dommages à ces derniers pourraient survenir Si la piscine ne doit pas être utilisée pendant un mois ou plus éteindre le chauffe eau par la soupape de gaz principale Pour les zones géographiques où l eau ne risque pas de geler l eau doit circuler dans le chauffe eau toute l année même si vous ne chauffez pas la piscine Ne ...

Page 72: ...NE ET DE SPA Le chauffe eau de Pentair Pool Products a été spécialement conçu pour votre piscine ou votre spa et vous permettra d apprécierdesannéesd entretienfacile àconditiondemaintenir un bon équilibre chimique de l eau Lestroiscausesprincipalesdedéfaillancesduchauffe eausont un mauvais pH des résidus de désinfectant et une alcalinité totale Si l équilibre de ces trois facteurs n est pas mainte...

Page 73: ...5 05 P N 472235 73 FOR TSI ONLY 29 30 31 33 34 35 36 FOR STD ONLY Pour Modèle TSI Seulement Pour Modèle STD Seulement PIÈCES DE REMPLACEMENT NT STD avec DDTC tous Modèles NT TSI avec DDTC Modèles 200 250 et 300 ...

Page 74: ...P N 472235 Rev E 4 15 05 74 JZ J _ _ _ J J J J J J Z J J J _ ...

Page 75: ...Rev E 4 15 05 P N 472235 75 Pièces de Rechange pour la Série de modèles 400 sont pour les modèles fabriqués avant le numéro de série 12040039 JZ J _ _ _ J J J Z J J J _ J ...

Page 76: ...76 1 4 3 6 8 10 11 13 46 45 44 42 41 30 31 32 25 35 38 39 2 7 12 22 21 27 29 43 40 36 15 28 24 20 16 14 23 9 17 26 18 5 19 34 33 37 PIÈCES DE REMPLACEMENT NT TSI avec DDTC Modèle 400 Commençant avec le numéro de série 12040039 ...

Page 77: ...Rev E 4 15 05 P N 472235 77 J K GG GG JK O Q V X V Y O O Z J Q G _ G Z V G V G O Q Q Z J G O O O J O O J O Z G G G G Q Y O O J K J G Q Q K K _ _ ...

Page 78: ...P N 472235 Rev E 4 15 05 78 ANNOTE ...

Page 79: ...Rev E 4 15 05 P N 472235 79 ANNOTE ...

Page 80: ...P N 472235 Rev E 4 15 05 80 Pentair Water Pool and Spa Inc 1620 Hawkins Ave Sanford NC 27330 919 566 8000 10951 W Los Angeles Ave Moorpark CA 93021 805 523 2400 VEUILLEZ CONCERVER CE GUIDE D INSTRUCTION ...

Reviews: