background image

13

Prowler

®

  710 Installation and User’s Guide

Summary of Contents for Prowler 710

Page 1: ...IMPORTANT SAFETY INSTRUCTIONS READ AND FOLLOW ALL INSTRUCTIONS SAVE THESE INSTRUCTIONS Installation and User s Guide Prowler 710 Robotic Inground Pool Cleaner...

Page 2: ...nd brands and PentairWater Pool and Spa Inc Those names and brands may be the trademarks or registered trademarks of those parties or others P N P12153 Rev C 3 30 11 Customer Service If you have quest...

Page 3: ...wler 710 Cleaner Works 4 Setting up your Prowler 710 Cleaner 5 Power Supply Transformer 5 Pool Cleaner with Floating Cable 5 Power Supply Set Up 6 Cleaner Placement 7 Adjusting the Timing Cycle 8 Oper...

Page 4: ...will create an electrical hazard which could result in death or serious injury to pool or spa users installers or others due to electrical shock and may also cause damage to property Always disconnect...

Page 5: ...clean system is necessary for proper cleaner operation and coverage Before installing the cleaner fill the hose with water Always make sure the cleaner head is submerged and the hose is full of water...

Page 6: ...light or chemicals or parts which even if worn do not affect performance of the cleaner Nicks scratches fading discoloration etc are cosmetic conditions that do not affect mechanical performance Both...

Page 7: ...terlinesolongasthere is an adequate floor to wall angle most vinyl lined pools or radius of about 6 inches from beginning of radius to end most hard surface pools in 60 to 90 minutes or less Scrubs va...

Page 8: ...ional Features Time and energy saving features Reduces your filtration system s run time up to 25 Independently filters algae and bacteria Cleans and hydroscrubs along floors up inclines to the waterl...

Page 9: ...s cleaner has to offer NOTE Before setting up this product read and follow all warning notices and instructions starting on page ii Introducing the Prowler 710 Cleaner Congratulations on your purchase...

Page 10: ...s for easy vacuumingbythecleaner ssuctionpower Alldirtfromleavestoalgaeiscollectedintheinternalfilterbagfor easy removal A simple patented axle tilting system allows your cleaner to alternate between...

Page 11: ...gCable Power ON OFF Switch ResetButton NOTE ThePowerSupplyappearancemayvaryandfeaturesmaybelocatedindifferentpositionsthanwhatisshownabove Rear view Front view 6 Figure 1 B Pool Cleaner with Floating...

Page 12: ...so cause damage to property CAUTION Never power the cleaner ON if it is not fully immersed in water This cleaner has an internal timer which will automatically shut off the cleaner after 2 hours of op...

Page 13: ...ightsideupandallowittosinktothebottomofthepoolwiththe wheelsdown SeeFigure5 NOTE Yourcleanermustbecompletelysubmersedinthepoolwaterbeforeitisswitchedon Ifthe cleaner does not sink it is because air is...

Page 14: ...djusttheTimeControlDialaccordingly NOTE Turning the Time Control Dial clockwise will lengthen the time between reversals to a maximum time of 90 seconds Conversely turning the dial counter clockwise w...

Page 15: ...ight above the C RUN Button is not blinking If light is blinking the timer is already set to the ExternalTimer Mode If time is not blinking it is currently set to the Internal 2 Hour Automatic Shut Of...

Page 16: ...ime to clean the Filter Bag Removing the Cleaner from the Pool CAUTION Removing your cleaner by its Floating Cable may cause severe damage to the cable requiring costly repairs Keep the cleaner on all...

Page 17: ...he Bag in your hands to help removefineparticles Continuewringing cleaning and squeezing the Bag gently until rinse water is clear Use of a washing machine cold water only is recommendedwhenvisibledir...

Page 18: ...er Bag and cleaner After removing your cleaner from the pool you should clean and re install the Filter Bag Then rest your cleaner on all four wheels in a dry shaded area along with its Power Supply a...

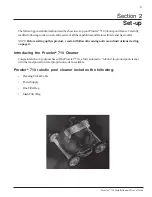
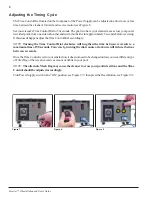
Page 19: ...13 Prowler 710 Installation and User s Guide...

Page 20: ...oves quickly this is an indication that your Bag is not clean enough and you must repeat the cleaning instructions until the Bag is clean Water flow from the hydroscrub jet tubes Remove the Bottom Lid...

Page 21: ...debris like hair string or a small twig caught in the Propeller Use your paper clip to hook or free the debris and remove it Figure 20 on page 15 Reverses before reaching the opposite Turn the Time Co...

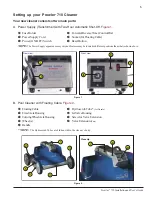
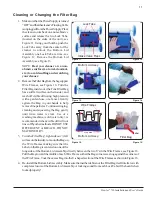
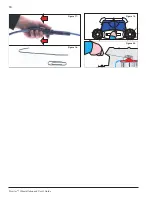
Page 22: ...16 Prowler 710 Installation and User s Guide Figure 17 Figure 18 Figure 19 Figure 20...

Page 23: ...Replacement Parts Prowler 710 Model 12 0 17 0 20 1 5 1 2 3 4 6 7 8 9 9 10 10 11 11 12 13 13 14 14 15 15 15 15 16 16 17 18 19 20 20 20 20 21 21 21 21 21 21 21 21 22 23 22 22 23 22 24 25 25 26 26 27 28...

Page 24: ...7 TUBE OVAL BRIGHT WHITE 3 x 1 58 O D 12 INC LG 1 18 TUBE OVAL WITH ONE HOLE 1 19 AXLE FIBER GLASS 16 5 INC LG 0 5 INC ROD 1 20 P12148 CLIP S S RETAINING STAR 8 21 WASHER NYLON FLAT 1 INC OD x 1 2 ID...

Page 25: ...19 Prowler 710 Installation and User s Guide Notes...

Page 26: ...20 Prowler 710 Installation and User s Guide Notes...

Page 27: ...21 Prowler 710 Installation and User s Guide...

Page 28: ...P N P12153 Rev C 03 30 11...

Reviews: